Bevel Protractor: Read Vernier Scale, Least Count, Error

Used in machining, fabrication, and inspection, a bevel protractor is a precision angle instrument with a rotating blade and vernier scale. It measures or sets angles, often across 0° to 360°, reading degrees on the main scale and minutes on the vernier for tight fits.
In this lab, you will learn how to read the vernier cleanly and repeatably.
You will also learn the obtuse-angle rule, plus the checks that prevent costly rework.
Quick Read Routine
Seat → Snug → Read Degrees → Read Minutes → Re-seat Verify
Most shop models cover 0° to 360°, and the vernier lets you resolve minutes, so the same tool supports both setup work and inspection checks without relying on “eyeballing” an angle.
Setting Up Before You Read Anything
A vernier scale only helps after the tool is seated correctly. Treat this like a contact measurement, because it is.
Wipe contact faces. Clean the stock face, blade edge, and the work faces. Dust and chips create believable, repeatable error.
Seat the stock first. Press the stock firmly against your reference face, then bring the blade to the angled face.
Snug, then adjust. Lightly snug the clamp, fine-adjust into full contact, then lock fully.
Re-seat once. Lift off, set it again, and confirm you land on the same reading window before you commit to a number.
Practical Tip: Read at eye level. Parallax makes two lines look “almost right,” and that is where most wrong readings start.
Parts Of Bevel Protractor
The Parts of Bevel Protractor are listed below:
Stock (Reference Face): Treat this as your datum surface, and check for rocking or burrs on the seating edge before every critical reading.
Blade (Measuring Arm): On this edge, confirm there are no nicks or rounding that would change where it actually contacts the work.
Main Scale (Degree Scale): For the degree readout, make sure the graduation marks are readable from your normal working angle without twisting your head.
Vernier Plate (Minute Scale): At the vernier, ensure you can see a single clear coincidence line without parallax before you commit to minutes.
Swivel Plate And Pivot: Through this joint, expect smooth rotation, and watch for sticky motion or backlash that causes overshoot and inconsistent seating pressure.
Clamp Screw (Lock): With the lock tightened, check that tightening does not shift the blade, especially near the end of travel.
Fine Adjustment (If Fitted): Using this control, creep into final contact, and confirm it moves smoothly rather than jumping past the mark.
Acute Angle Attachment (If Included): When this attachment is fitted, verify it seats flat and does not introduce a new contact line you did not intend.
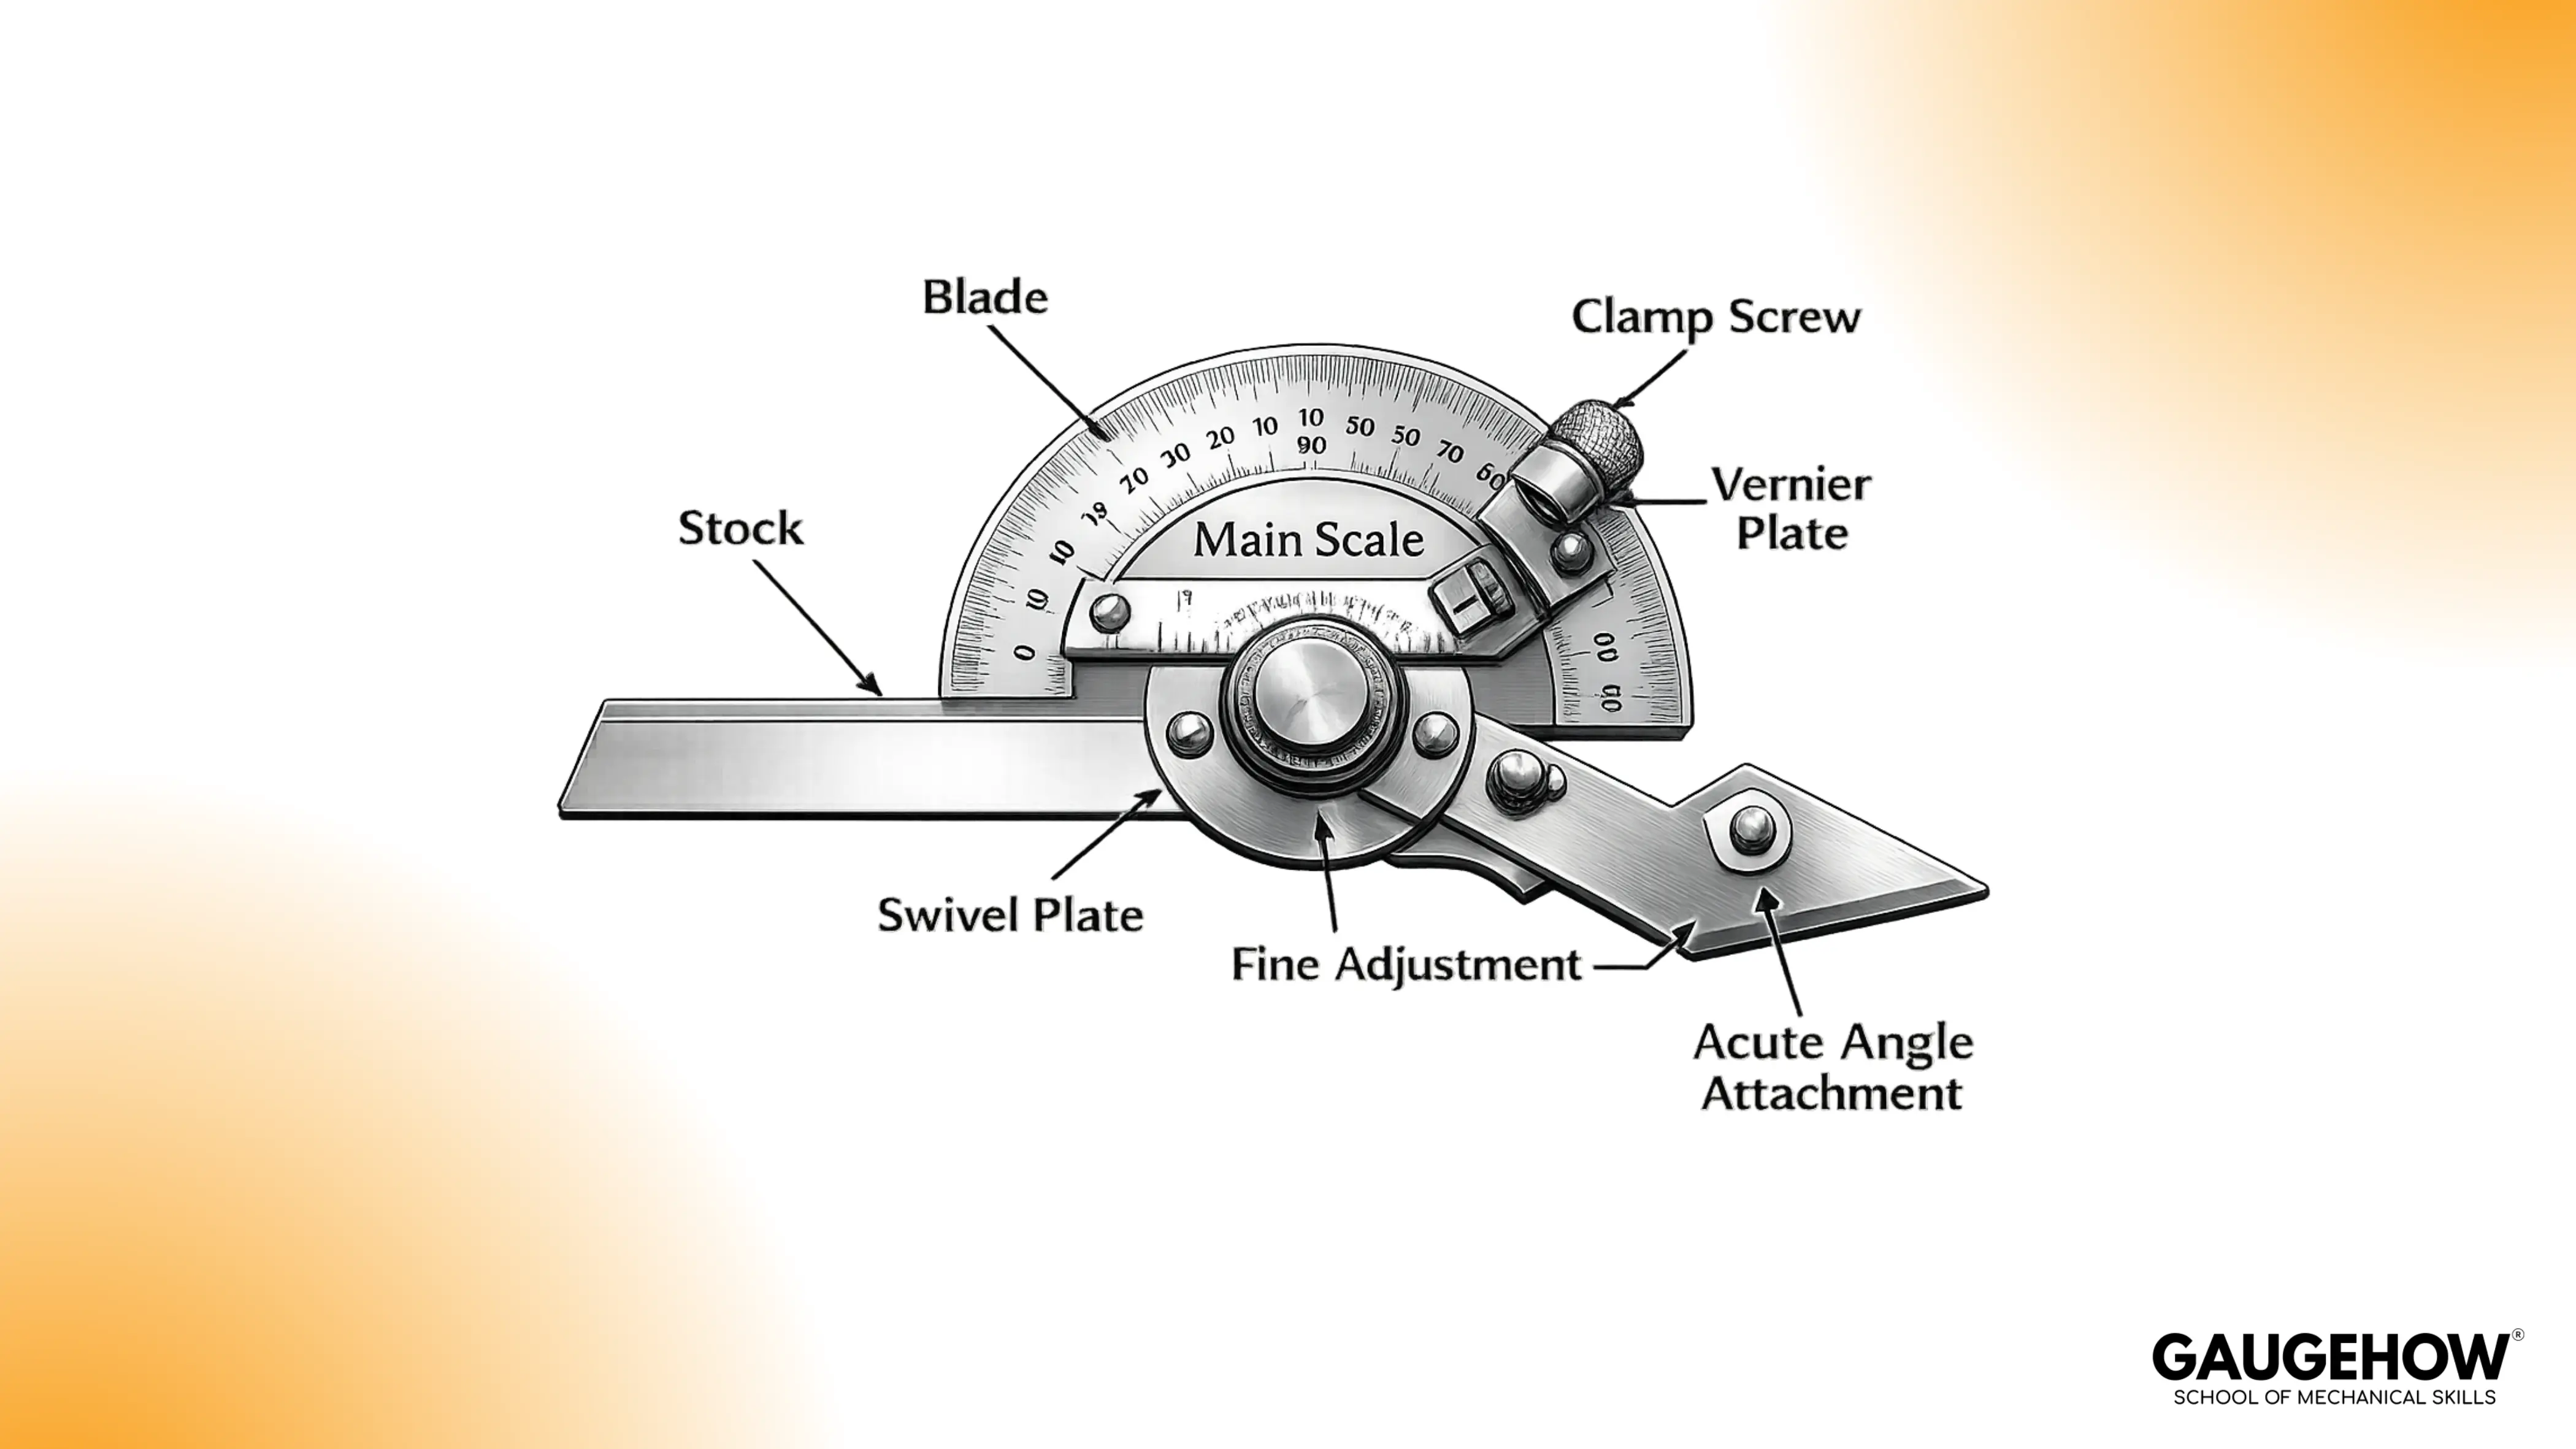
Bevel Protractor Diagram
The Bevel Protractor Diagram shown here labels the stock, blade, main scale, vernier plate, swivel plate, clamp screw, fine adjustment, and acute angle attachment.
Bevel Protractor Reading
In bevel protractor reading, you always do two reads, then you verify once: degrees from the main scale, minutes from the vernier coincidence, then a quick re-seat to confirm repeatability.
The Reading Routine You Can Repeat Under Pressure
Set the stock. Put the stock firmly on the reference face. Keep pressure consistent.
Bring the blade into full contact. Rotate until the blade lies flat on the angled face with no daylight.
Snug the clamp. Snug enough to prevent drift, but not so tight that you cannot micro-adjust.
Read degrees first. Use the vernier zero line as your pointer to the main scale degree marking.
Read minutes next. Find the single vernier line that aligns best with a main scale line, then convert that alignment using the least count.
Re-seat and verify. Lift off, set it again, and confirm the same coincidence line within one vernier step.
The Obtuse-Angle Rule
Rule: If your dial layout gives the acute side but you need the obtuse, use 180° − (dial reading), then add minutes from the vernier.
Micro-Example:
Your dial shows 62°15′, but the drawing needs the obtuse angle.
Compute: 180°00′ − 62°15′ = 117°45′.
Record 117°45′ only after you re-seat once and see the same vernier coincidence.
A Worked Reading That Feels Like A Lab Demo
You are at the bench and the blade is seated well, but two vernier marks look close to coincidence. Do not guess.
First, shift your eye so you are directly over the scale, then look for the mark that aligns cleanly along the entire line length, not just at the tip.
If two still look close, lightly loosen, re-seat the stock, and re-snug the clamp, because seating drift often creates the “two lines are close” illusion.
After final tightening, always glance back at the coincidence line. If it moved by one step, treat that as clamp drift and reset instead of averaging.
Vernier Bevel Protractor Least Count
Vernier bevel protractor least count matters because it tells you the smallest angle increment you can reliably resolve and verify.
In most common shop versions, the least count is 5 minutes, which is 1/12 of a degree.
Practically, that means your verification goal is simple: if a careful re-seat changes the result by more than one least-count step, something is wrong with seating, cleanliness, or locking.
A quick way to keep the concept grounded is to remember that degrees are coarse alignment, while minutes are your fit and finish insurance. When you are chasing tight assembly, minutes are where the tool earns its keep.
🔧 Trusted by 23,000+ Happy Learners
Industry-Ready Skills for Mechanical Engineers
Upskill with 40+ courses in Design/CAD, Simulation, FEA/CFD, Manufacturing, Robotics & Industry 4.0.
Errors That Quietly Ruin Measurements
Most mistakes look neat on the scale. That is why they survive long enough to become scrap or rework.
Parallax error: Two vernier marks appear “nearly aligned.” Correct it by reading straight-on at eye level.
Dirty seating faces: A chip under the stock creates a repeatable wrong angle. Correct it by wiping both faces, then re-seating.
Clamp drift: Tightening pulls the blade slightly. Correct it by snugging first, then locking in stages, then verifying once.
Edge damage on the blade: A nick changes the contact line. Correct it by inspecting the edge and avoiding sliding the tool across rough corners.
Rocking on a narrow datum: If the stock does not sit stable, your hand pressure becomes part of the measurement. Correct it by improving the datum or supporting the tool.
Verification Gate
Re-seat once. If you cannot repeat within one least-count step, do not record the value yet. Clean, reset, and read again.
Uses Of Bevel Protractor
The uses of bevel protractor work best when you need both setting and checking in the same workflow, with repeatable results.
Engineering and machining: Setup angles, fixture alignment, and pre-cut checks where small angular error becomes a mismatch downstream.
Metalworking and fabrication: Bevel and prep angles that control fit-up, weld consistency, and assembly squareness.
Woodworking: Joinery layout and verification where clean mating depends on accurate transfer, not “close enough.”
Quality control and inspection: Checking chamfers, tapers, and angular features against drawings with a repeatable routine.
Drafting and shop verification: Confirming angles on parts and templates when the drawing intent must be matched on the floor.
Advantages And Limitations
Advantages:
High practical precision when you use the vernier minutes correctly.
Wide range, often 0° to 360°, so one instrument covers many setups.
Strong transfer capability, because you can set an angle and carry it to the work.
Limitations:
It is sensitive to seating, cleanliness, and clamping technique.
Confined spaces make stable contact harder, which reduces repeatability.
Manual reading can introduce errors when you rush or read off-axis.
A balanced view builds trust. The tool is reliable, but only when your handling is disciplined.
Choosing The Right Model
Choose based on your environment and who will use it.
Material: Stainless steel bodies resist wear and hold clean edges longer.
Range: Confirm your common work fits the instrument travel without awkward seating.
Least count: A smaller least count supports finer work, but only if your repeatability is good.
Usability: If multiple operators need quick readability, a digital bevel protractor can reduce reading strain, although it will not fix poor seating.
Attachments: Acute angle attachments and fine adjustment matter if you frequently work on tight geometry or need controlled creep.
A practical buying rule is simple: pick the model you can read confidently at eye level, because readability drives repeatability more than extra features.
Frequently Asked Questions
1) What is the difference between a bevel protractor and a standard protractor?
A standard protractor is for basic layout. A bevel protractor is adjustable and uses a vernier to resolve minutes, which makes it suitable for setup and inspection work.
2) What is the least count, and why should you care?
Least count is the smallest measurable increment. It matters because it sets your verification expectation. If you cannot repeat within one least-count step, your technique needs correction.
3) How do you avoid parallax on the vernier scale?
Bring your eye directly over the graduation and take the alignment that stays true along the full line length, not the mark that looks close from an angle.
4) When do you use 180° minus the dial reading?
Use it when your dial layout presents the acute side, but the job needs the obtuse angle. Compute 180° − (dial reading), then include the minutes from the vernier.
5) What should you do if the reading shifts after tightening?
Assume clamp drift. Loosen, re-seat, snug, adjust, then lock in stages and verify once before recording.


