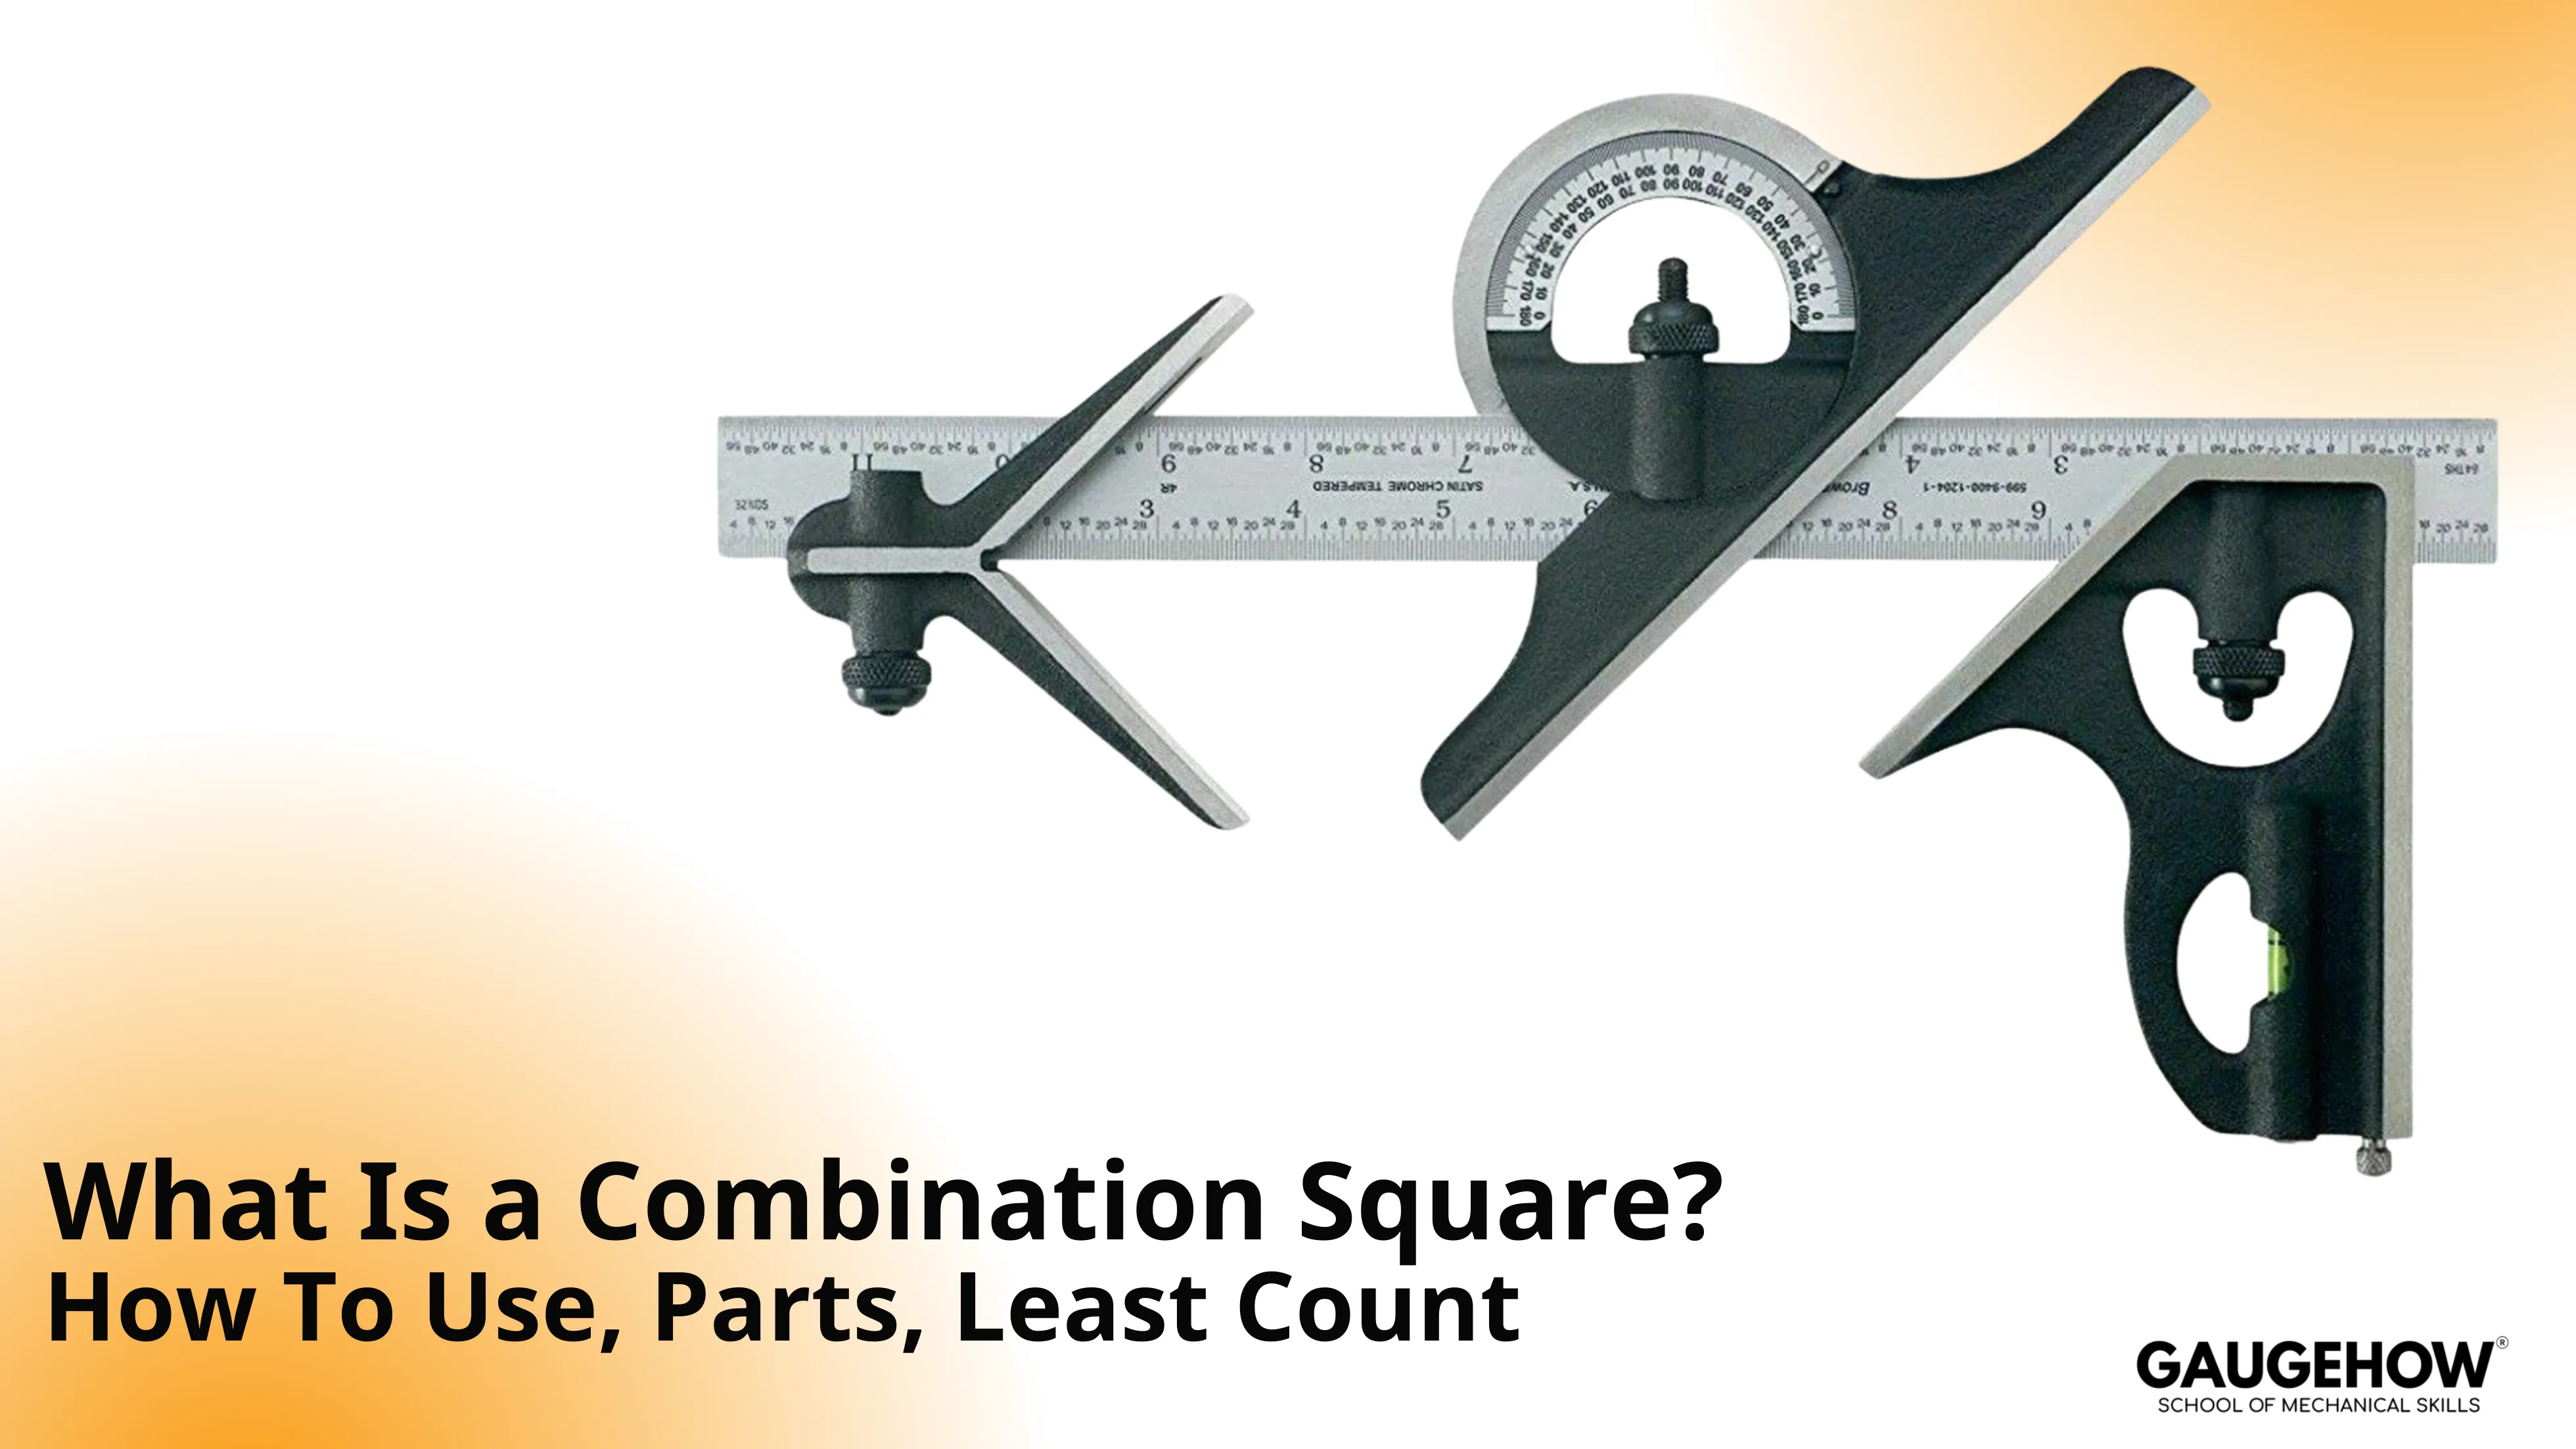
Combination Square: Parts, Uses, Reading and Least Count
A combination square is an adjustable layout and checking tool made from a graduated steel rule and a locking head. It marks and verifies 90° and 45° lines, sets offsets from an edge, and provides quick depth or height readings from a flat datum surface when the head seats cleanly.
In toolrooms, angle errors become fit problems. A fence can look square yet cut a taper that repeats on every part. Rather than chasing offsets by feel, you confirm the reference first.
A combination square does that by seating on a clean edge, locking a setting, and repeating the same check or layout line. Adopted as an adjustable alternative to fixed try squares, it remains a setup tool.
Working, parts, reading method, least count, and shop use follow that order.
Bench Task | Best Setup | Practical Benefit | Typical Example |
Mark 90° Line | Square Head Against Edge | Fast perpendicular layout | Shoulder line before cutting |
Check 90° | Square Head Seated Flat | Detects out-of-square setup | Fence squareness check |
Mark 45° | 45° Face of Head | Quick mitre layout | Chamfer or mitre reference |
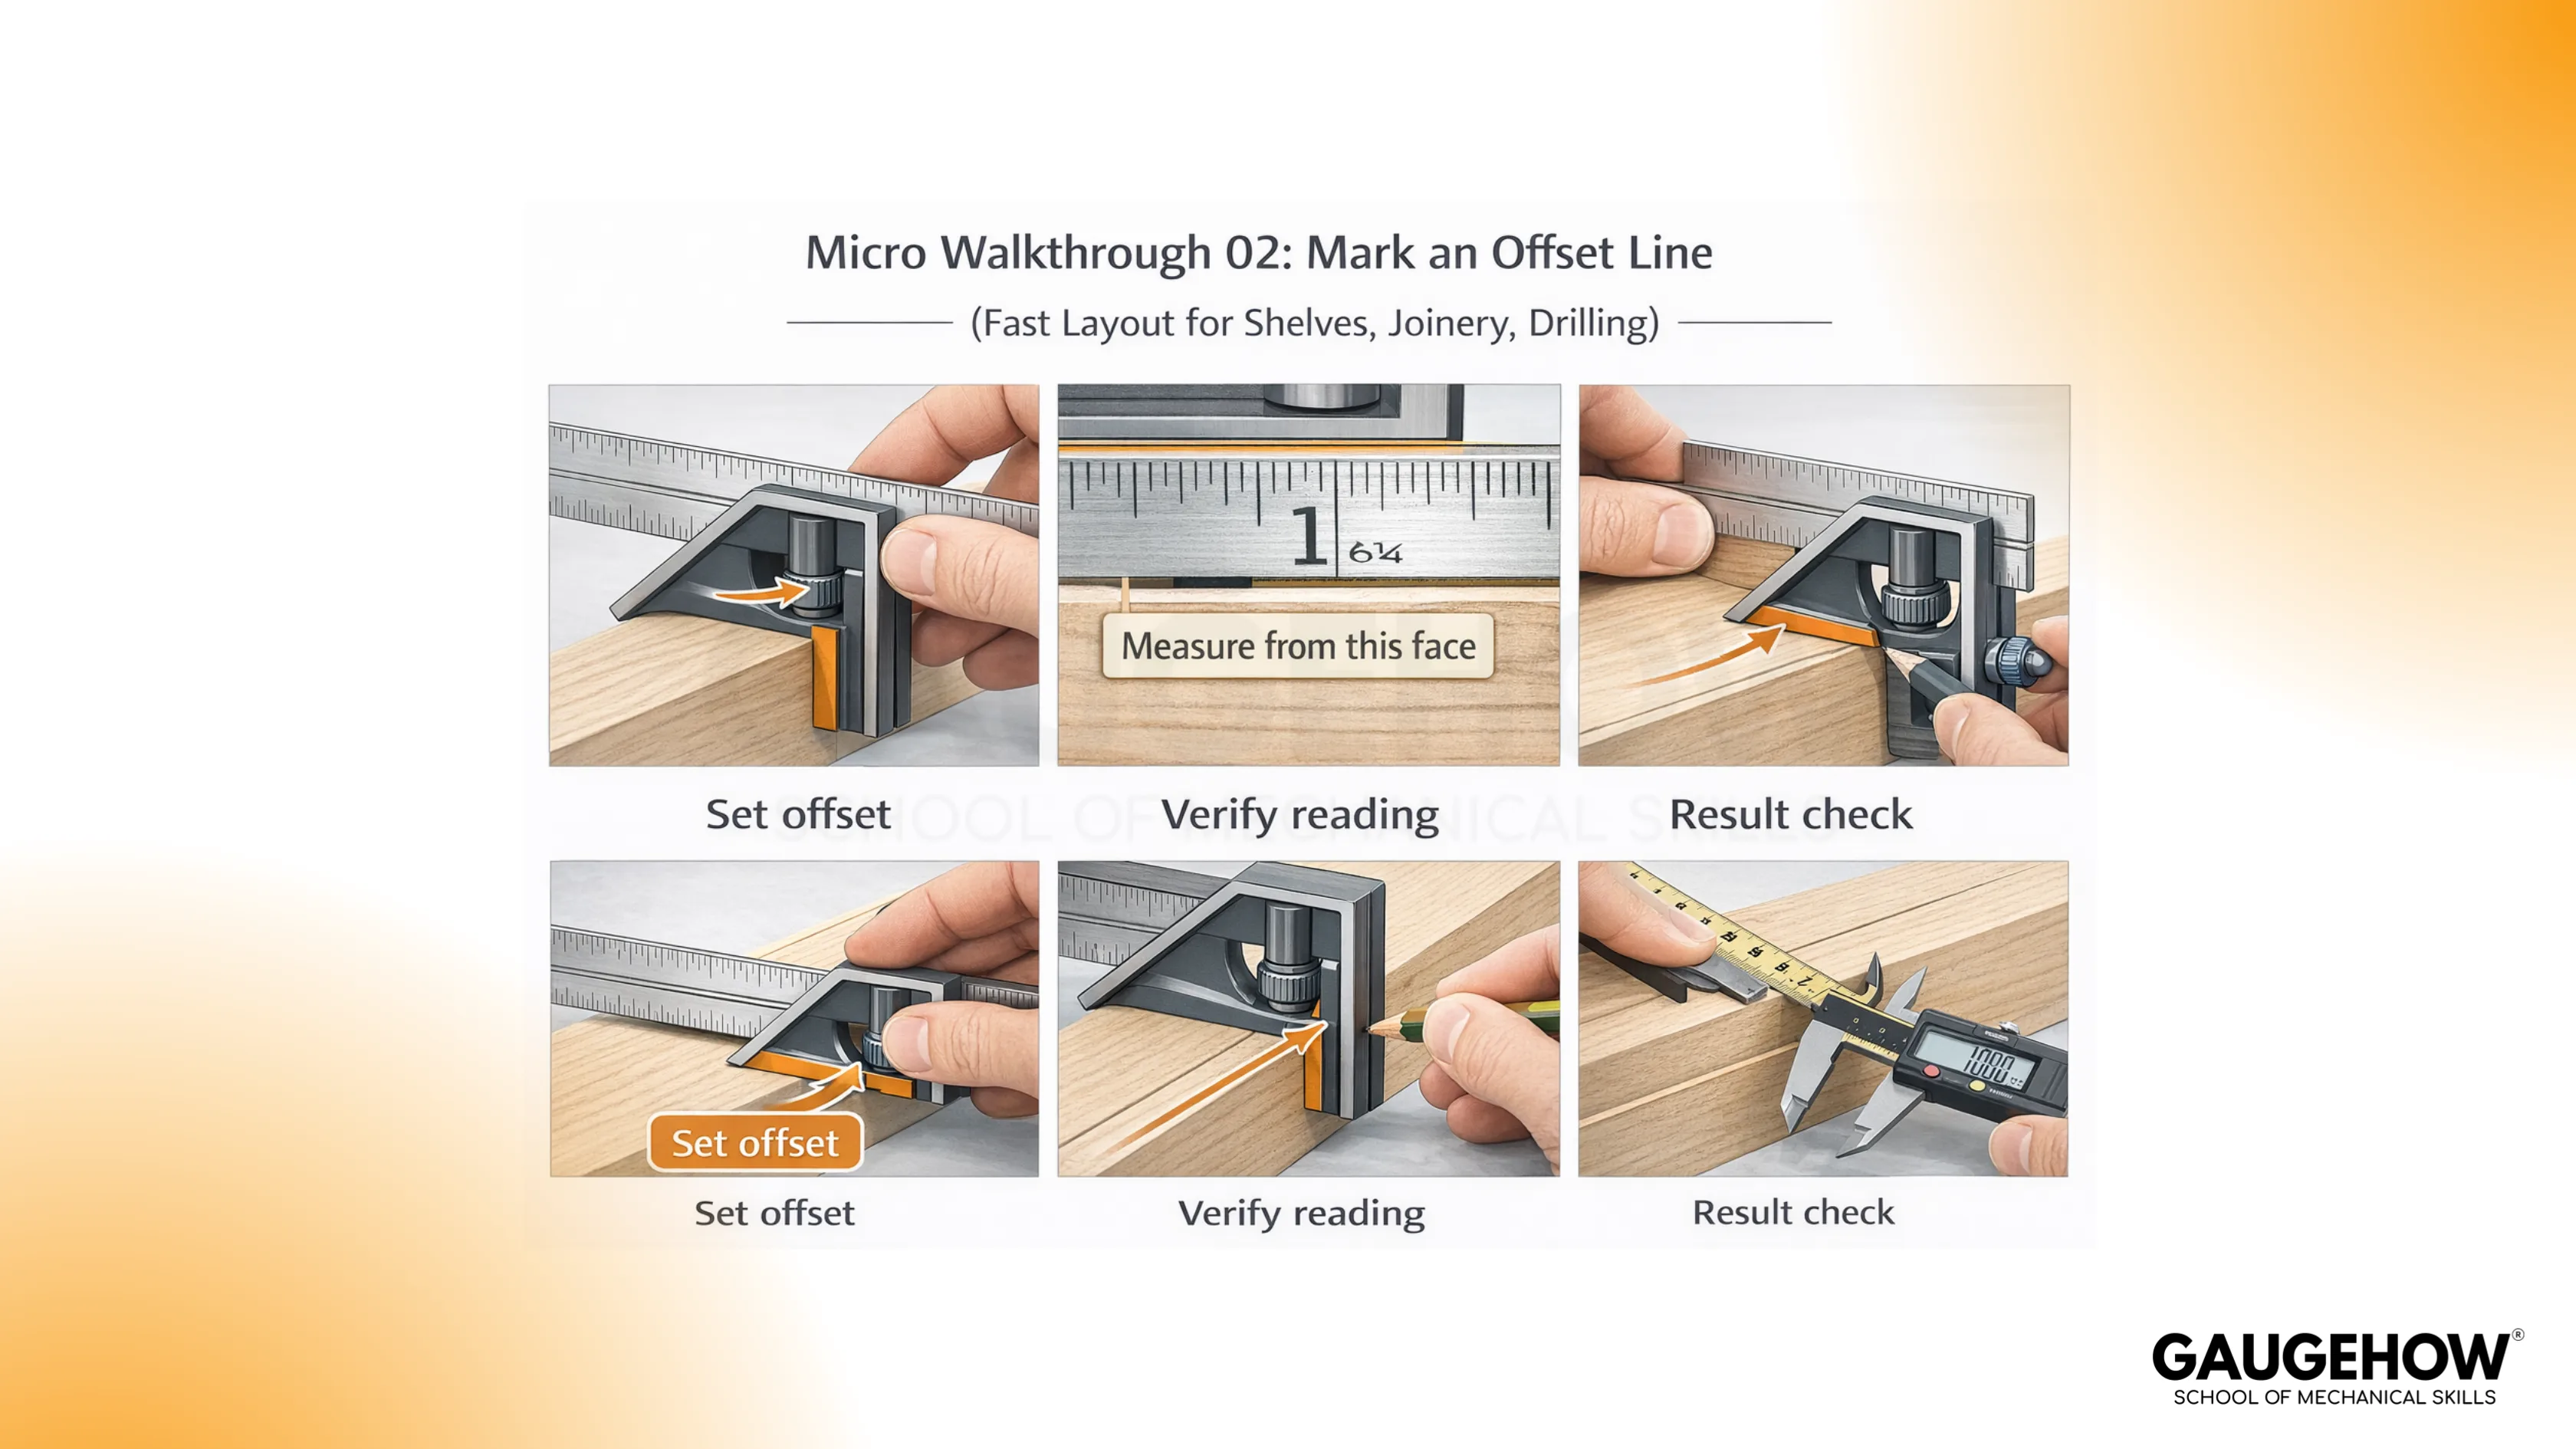
Set Offset From Edge | Lock Rule At Dimension | Repeatable parallel line | Scribe 20 mm from edge |
Check Depth/Height | Rule Projection From Head | Quick reference reading | Step height verification |
What Is a Combination Square
A combination square consists of a straight steel rule and a sliding head that locks to the rule. The head provides reference faces used to register against an edge or face of a workpiece.
When the head is seated correctly, the rule becomes a controlled extension for marking, checking, or setting a measurement without relying on freehand alignment.
In practice, it is used in two modes that should not be mixed. One mode is marking, where the tool acts as a guide for a pencil, scribe, or knife line. The other mode is checking, where the tool acts as a reference to confirm that a surface or setup is actually square or actually at 45°.
What Does a Combination Square Measure
A clean way to think about capability is this: the tool measures linear distance along the rule, and it checks geometry when the head is registered against a known reference.
In day-to-day work, what does a combination square measure is usually answered by the output you need on the part, not by the scale itself.
Linear distance is read directly from the graduations on the rule.
90° is checked or marked by seating the head against an edge and using the rule as a perpendicular.
45° is checked or marked by using the 45° face on the head, again only as good as the seating.
Offsets from an edge are set by locking the head at a dimension and using the head as a fence while you scribe.
Depth or height readings are taken by extending the rule past the head and referencing the head against a flat datum.
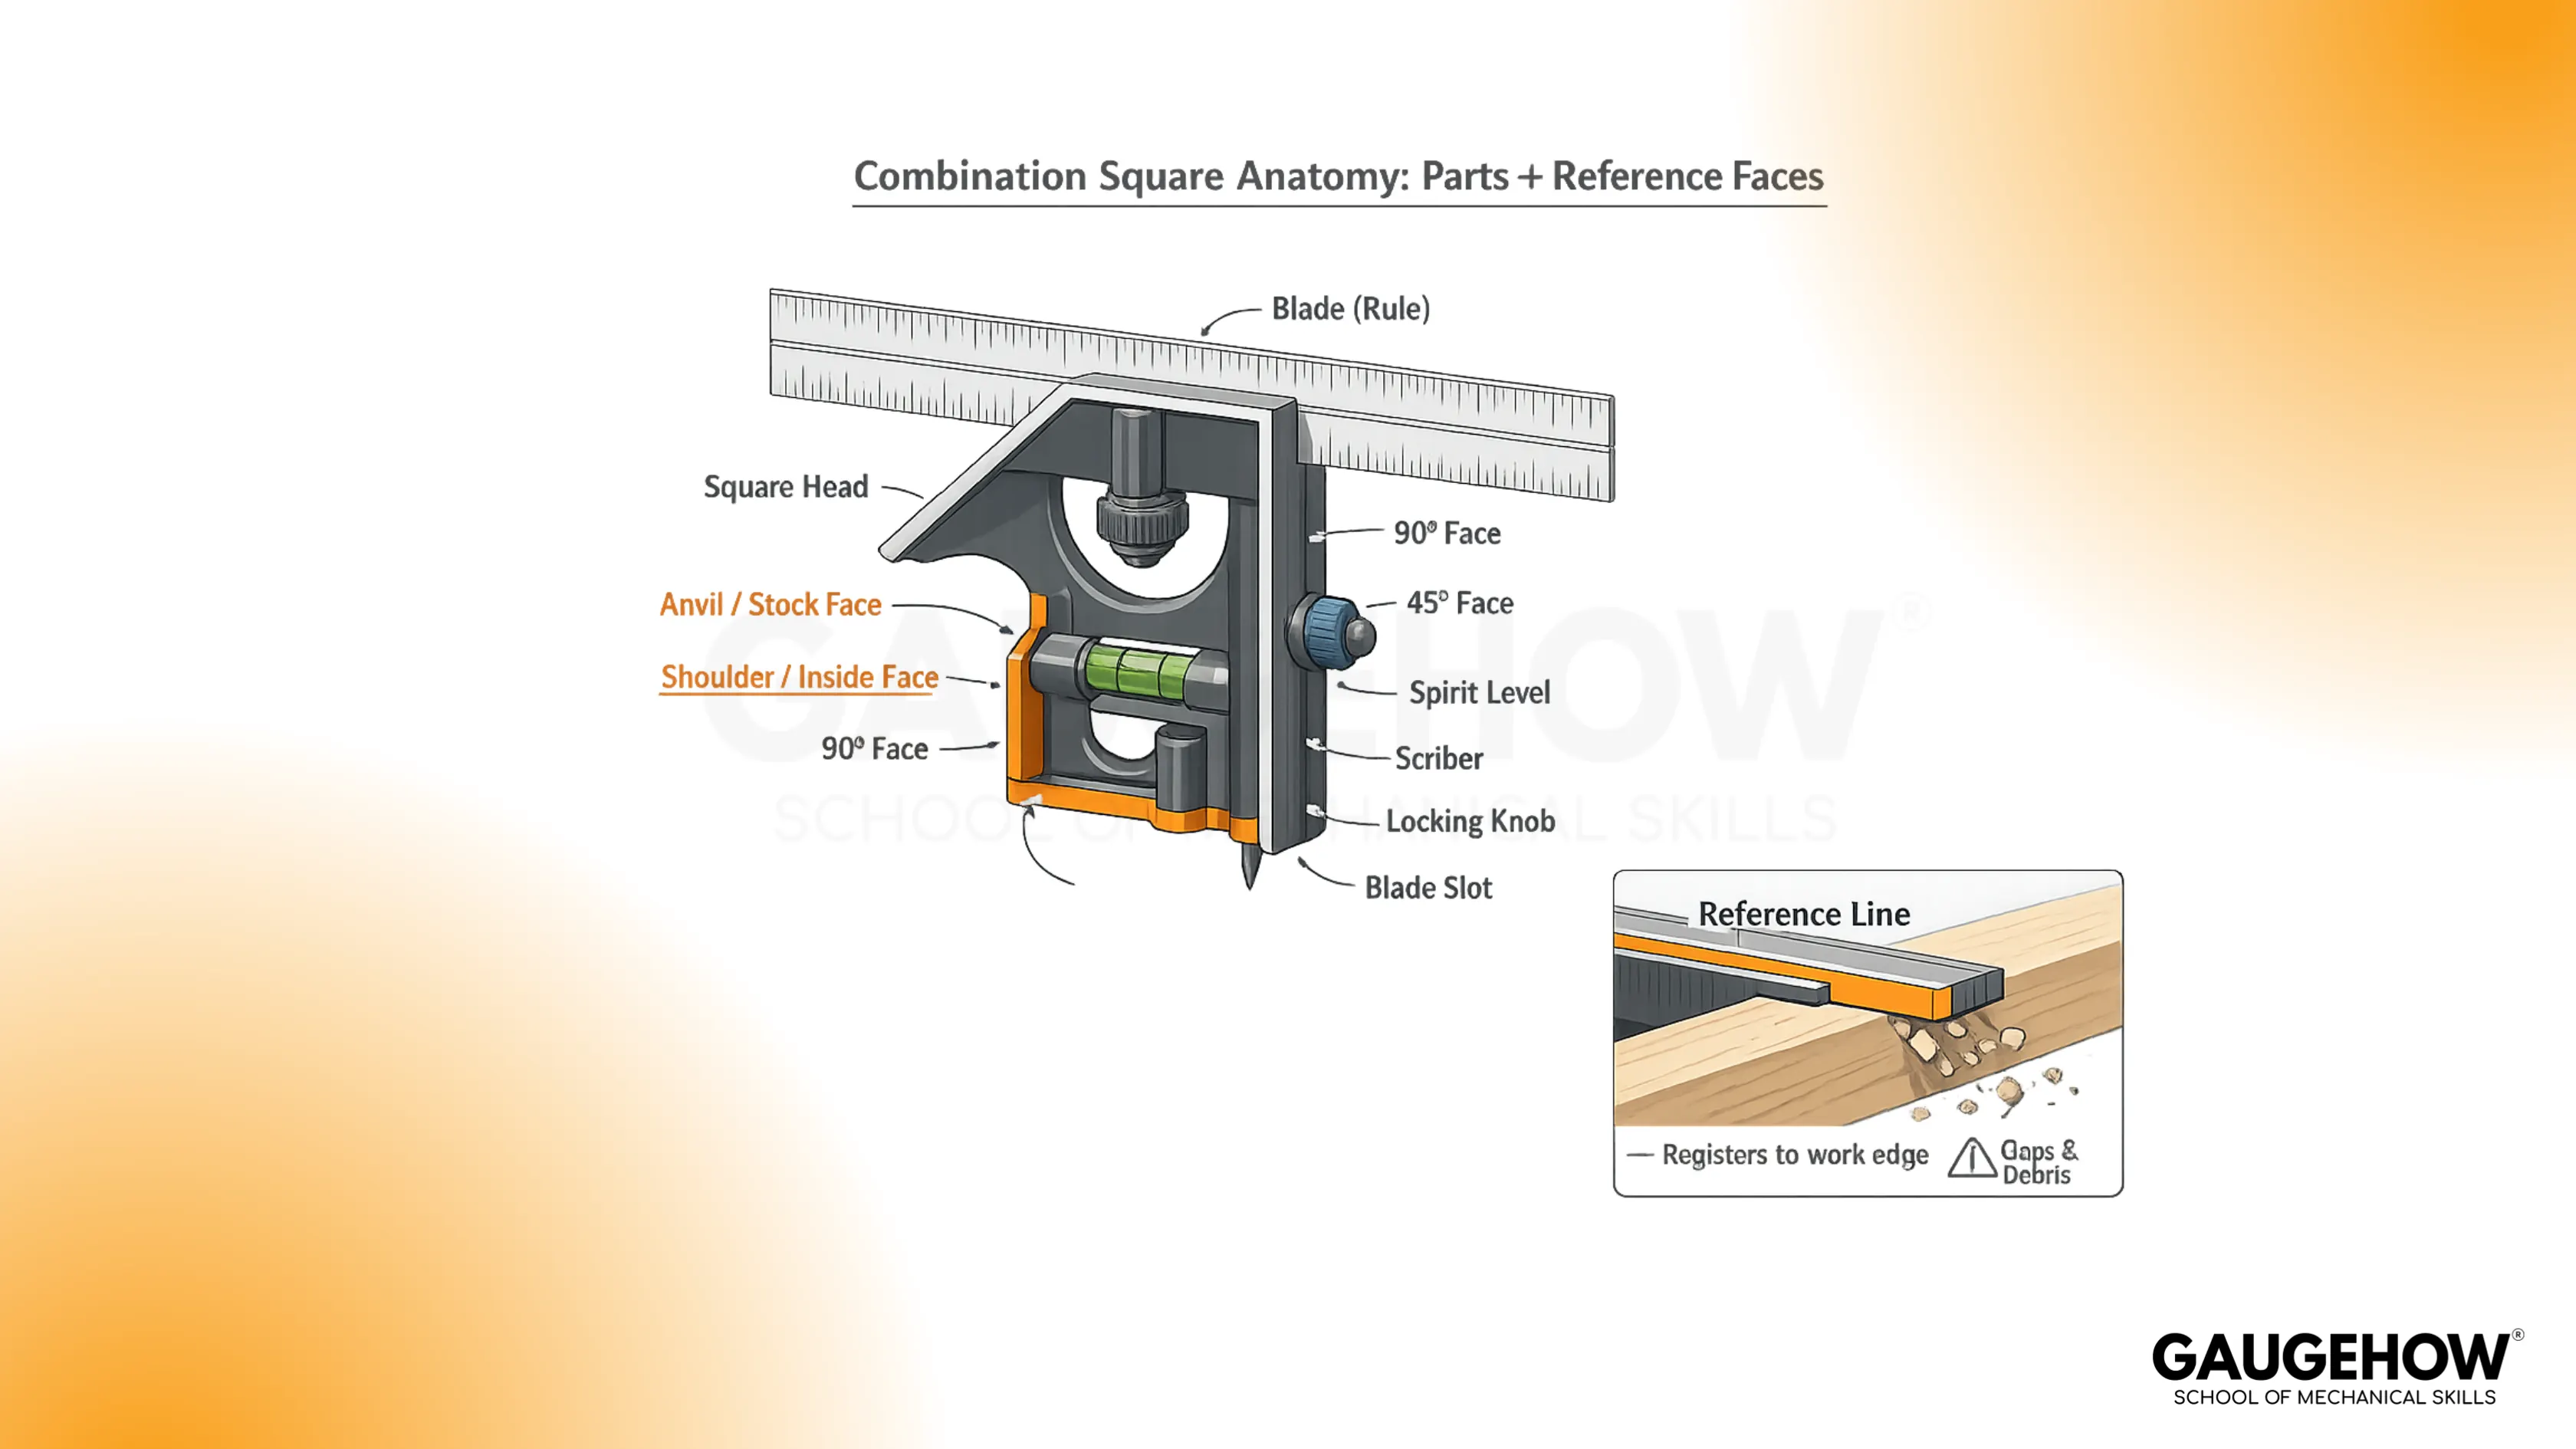
Parts of Combination Square
The parts of combination square are simple, but each part controls either registration, locking, or readability. When one of those three fails, the tool still looks correct but the output is wrong.
Steel Rule (Blade): Provides the graduated scale and acts as the marking or checking leg.
Square Head: Slides on the rule and provides the reference faces used for 90° and 45° work.
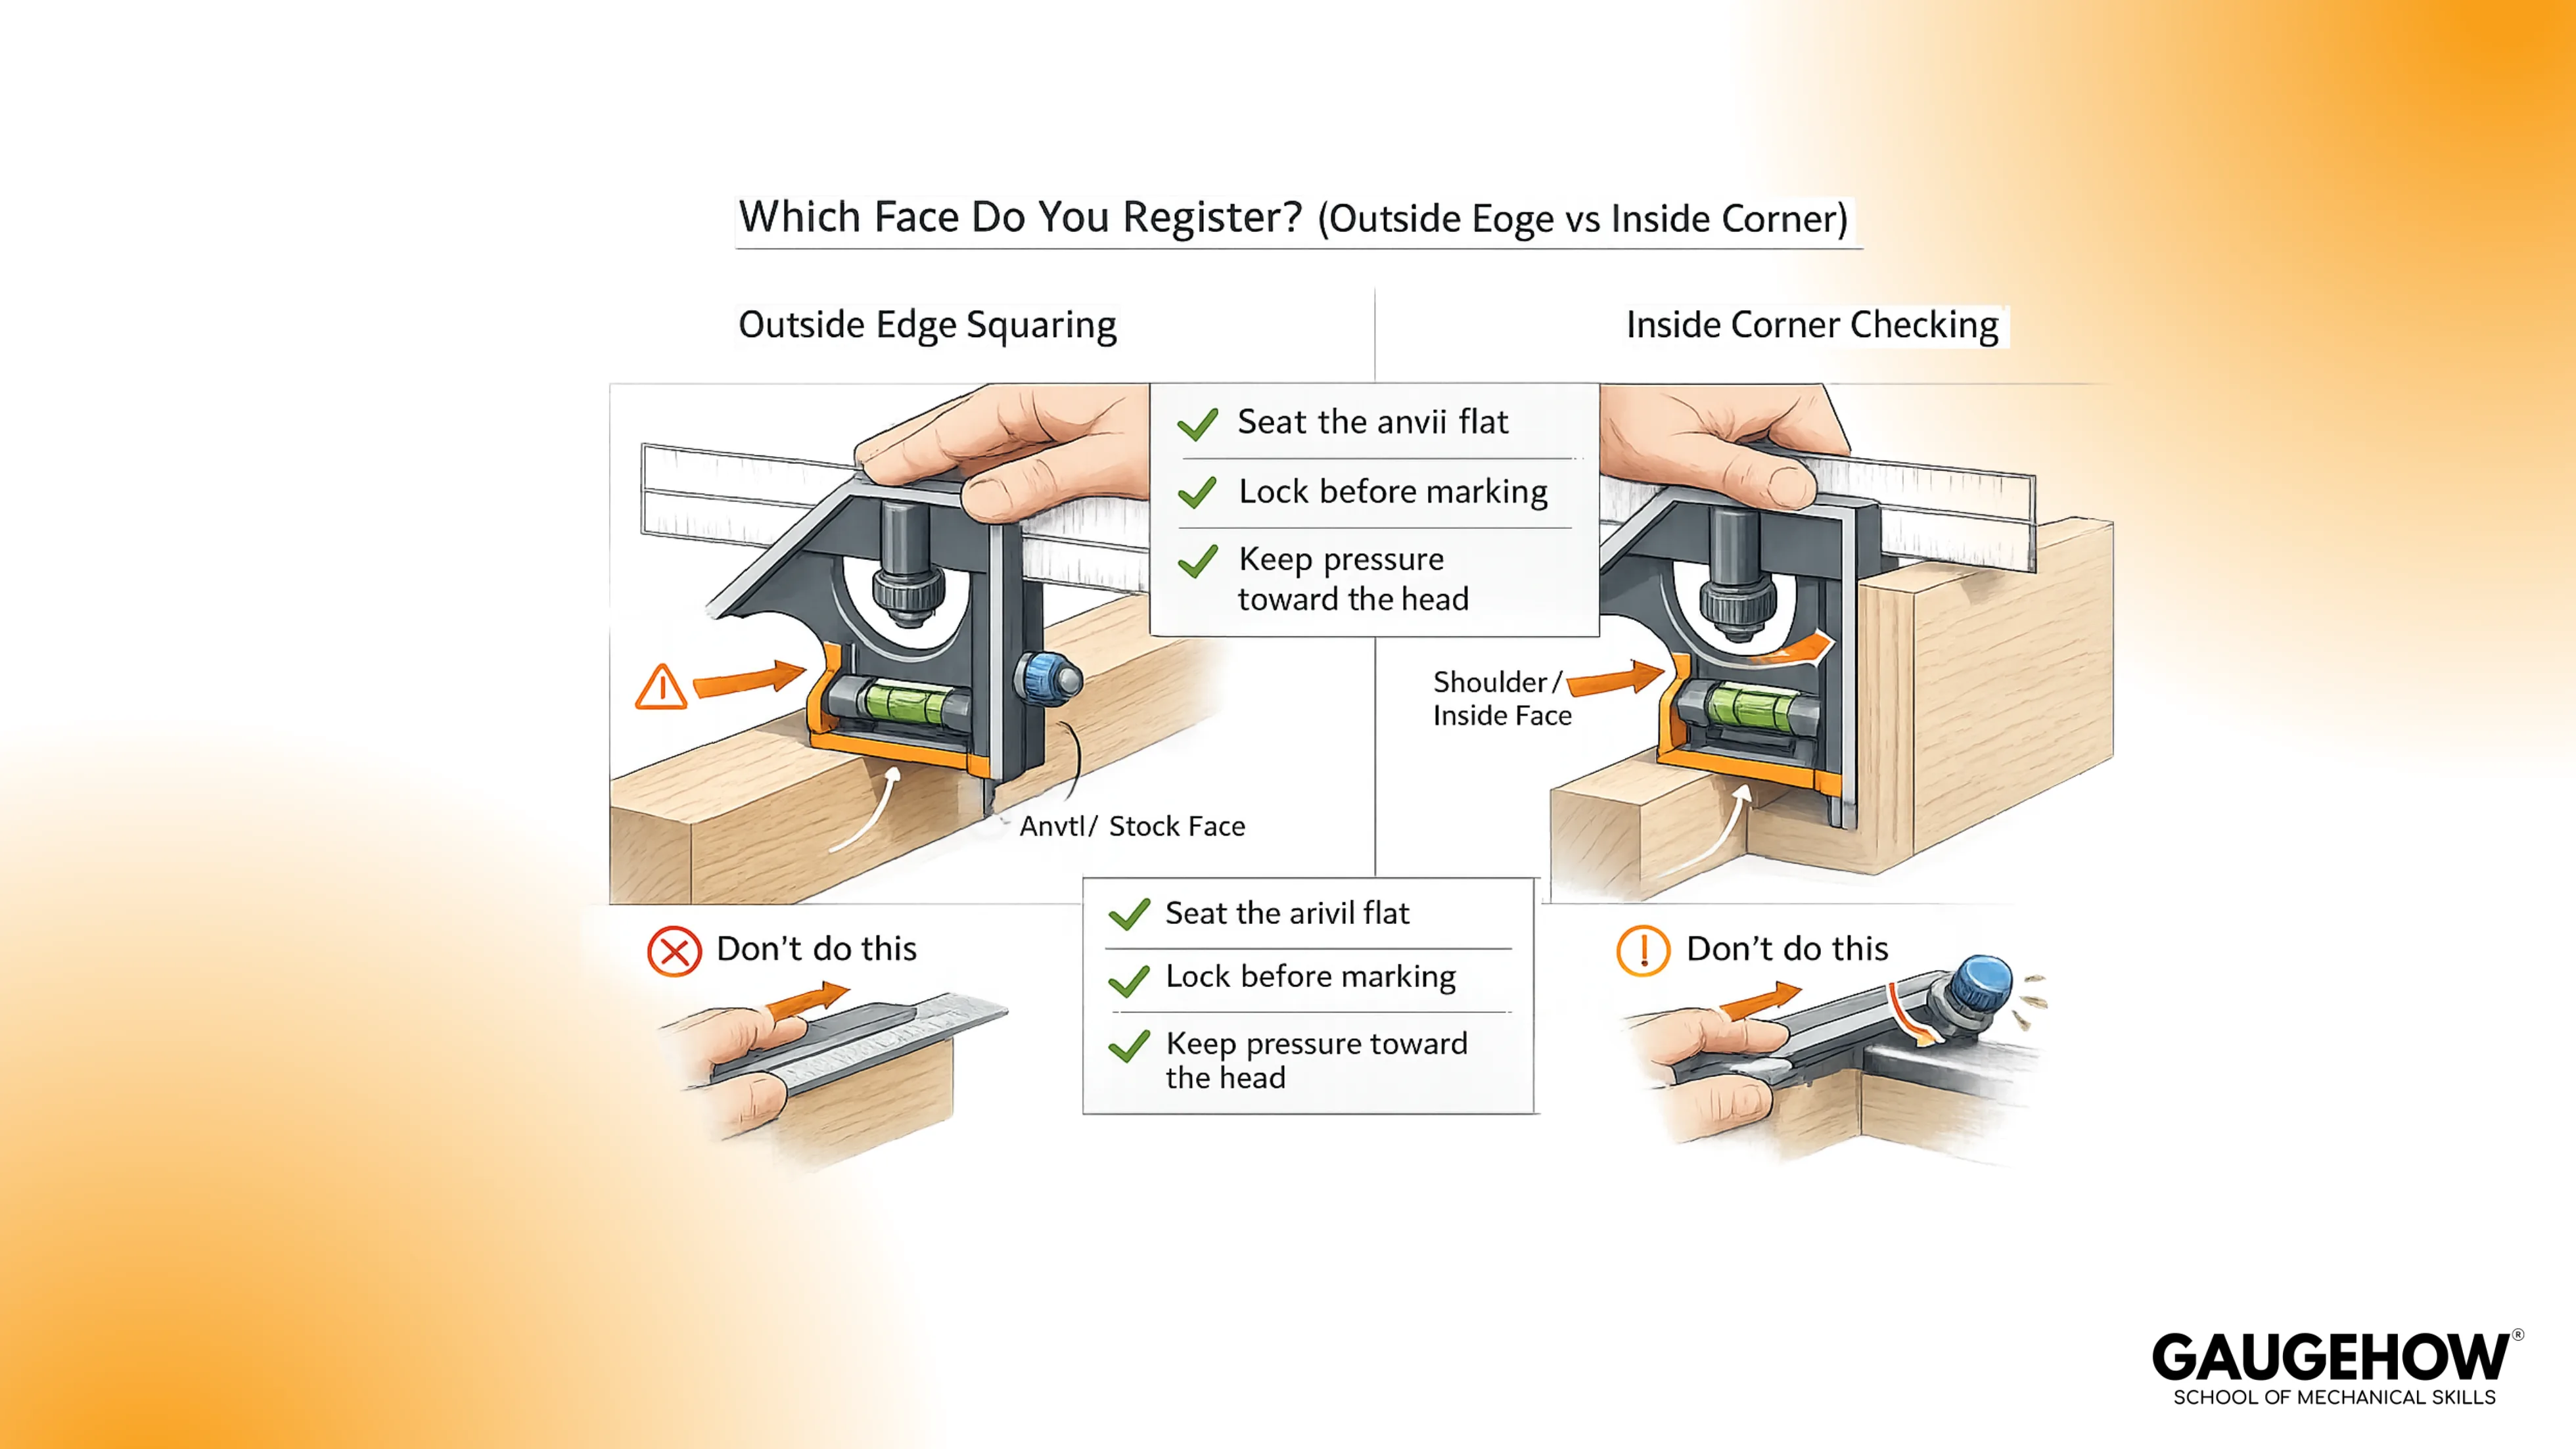
Shoulder Face: The broad reference face typically used to register against the edge of a workpiece.
Anvil Face: The opposite face on the head, used when access or geometry makes the shoulder face inconvenient.
Locking Knob or Nut: Clamps the head to the rule to hold a setting under light marking pressure.
Scriber (When Included): Stores in the head and provides a fine marking point for metal layout.
Spirit Vial (When Included): Provides a quick level or plumb reference for setup checks.
Center Head (In Sets): V-block style head used to locate the centerline on round stock.
Protractor Head (In Sets): Head with a pivoting blade and degree scale used to set or transfer angles.
A quick reliability habit is to treat the reference faces like gauge surfaces. Wipe them, seat them flat, and lock the head before you trust any line you produce.
Working Principle of Combination Square
The working principle is mechanical and direct. The head constrains the rule in a known orientation relative to a reference face.
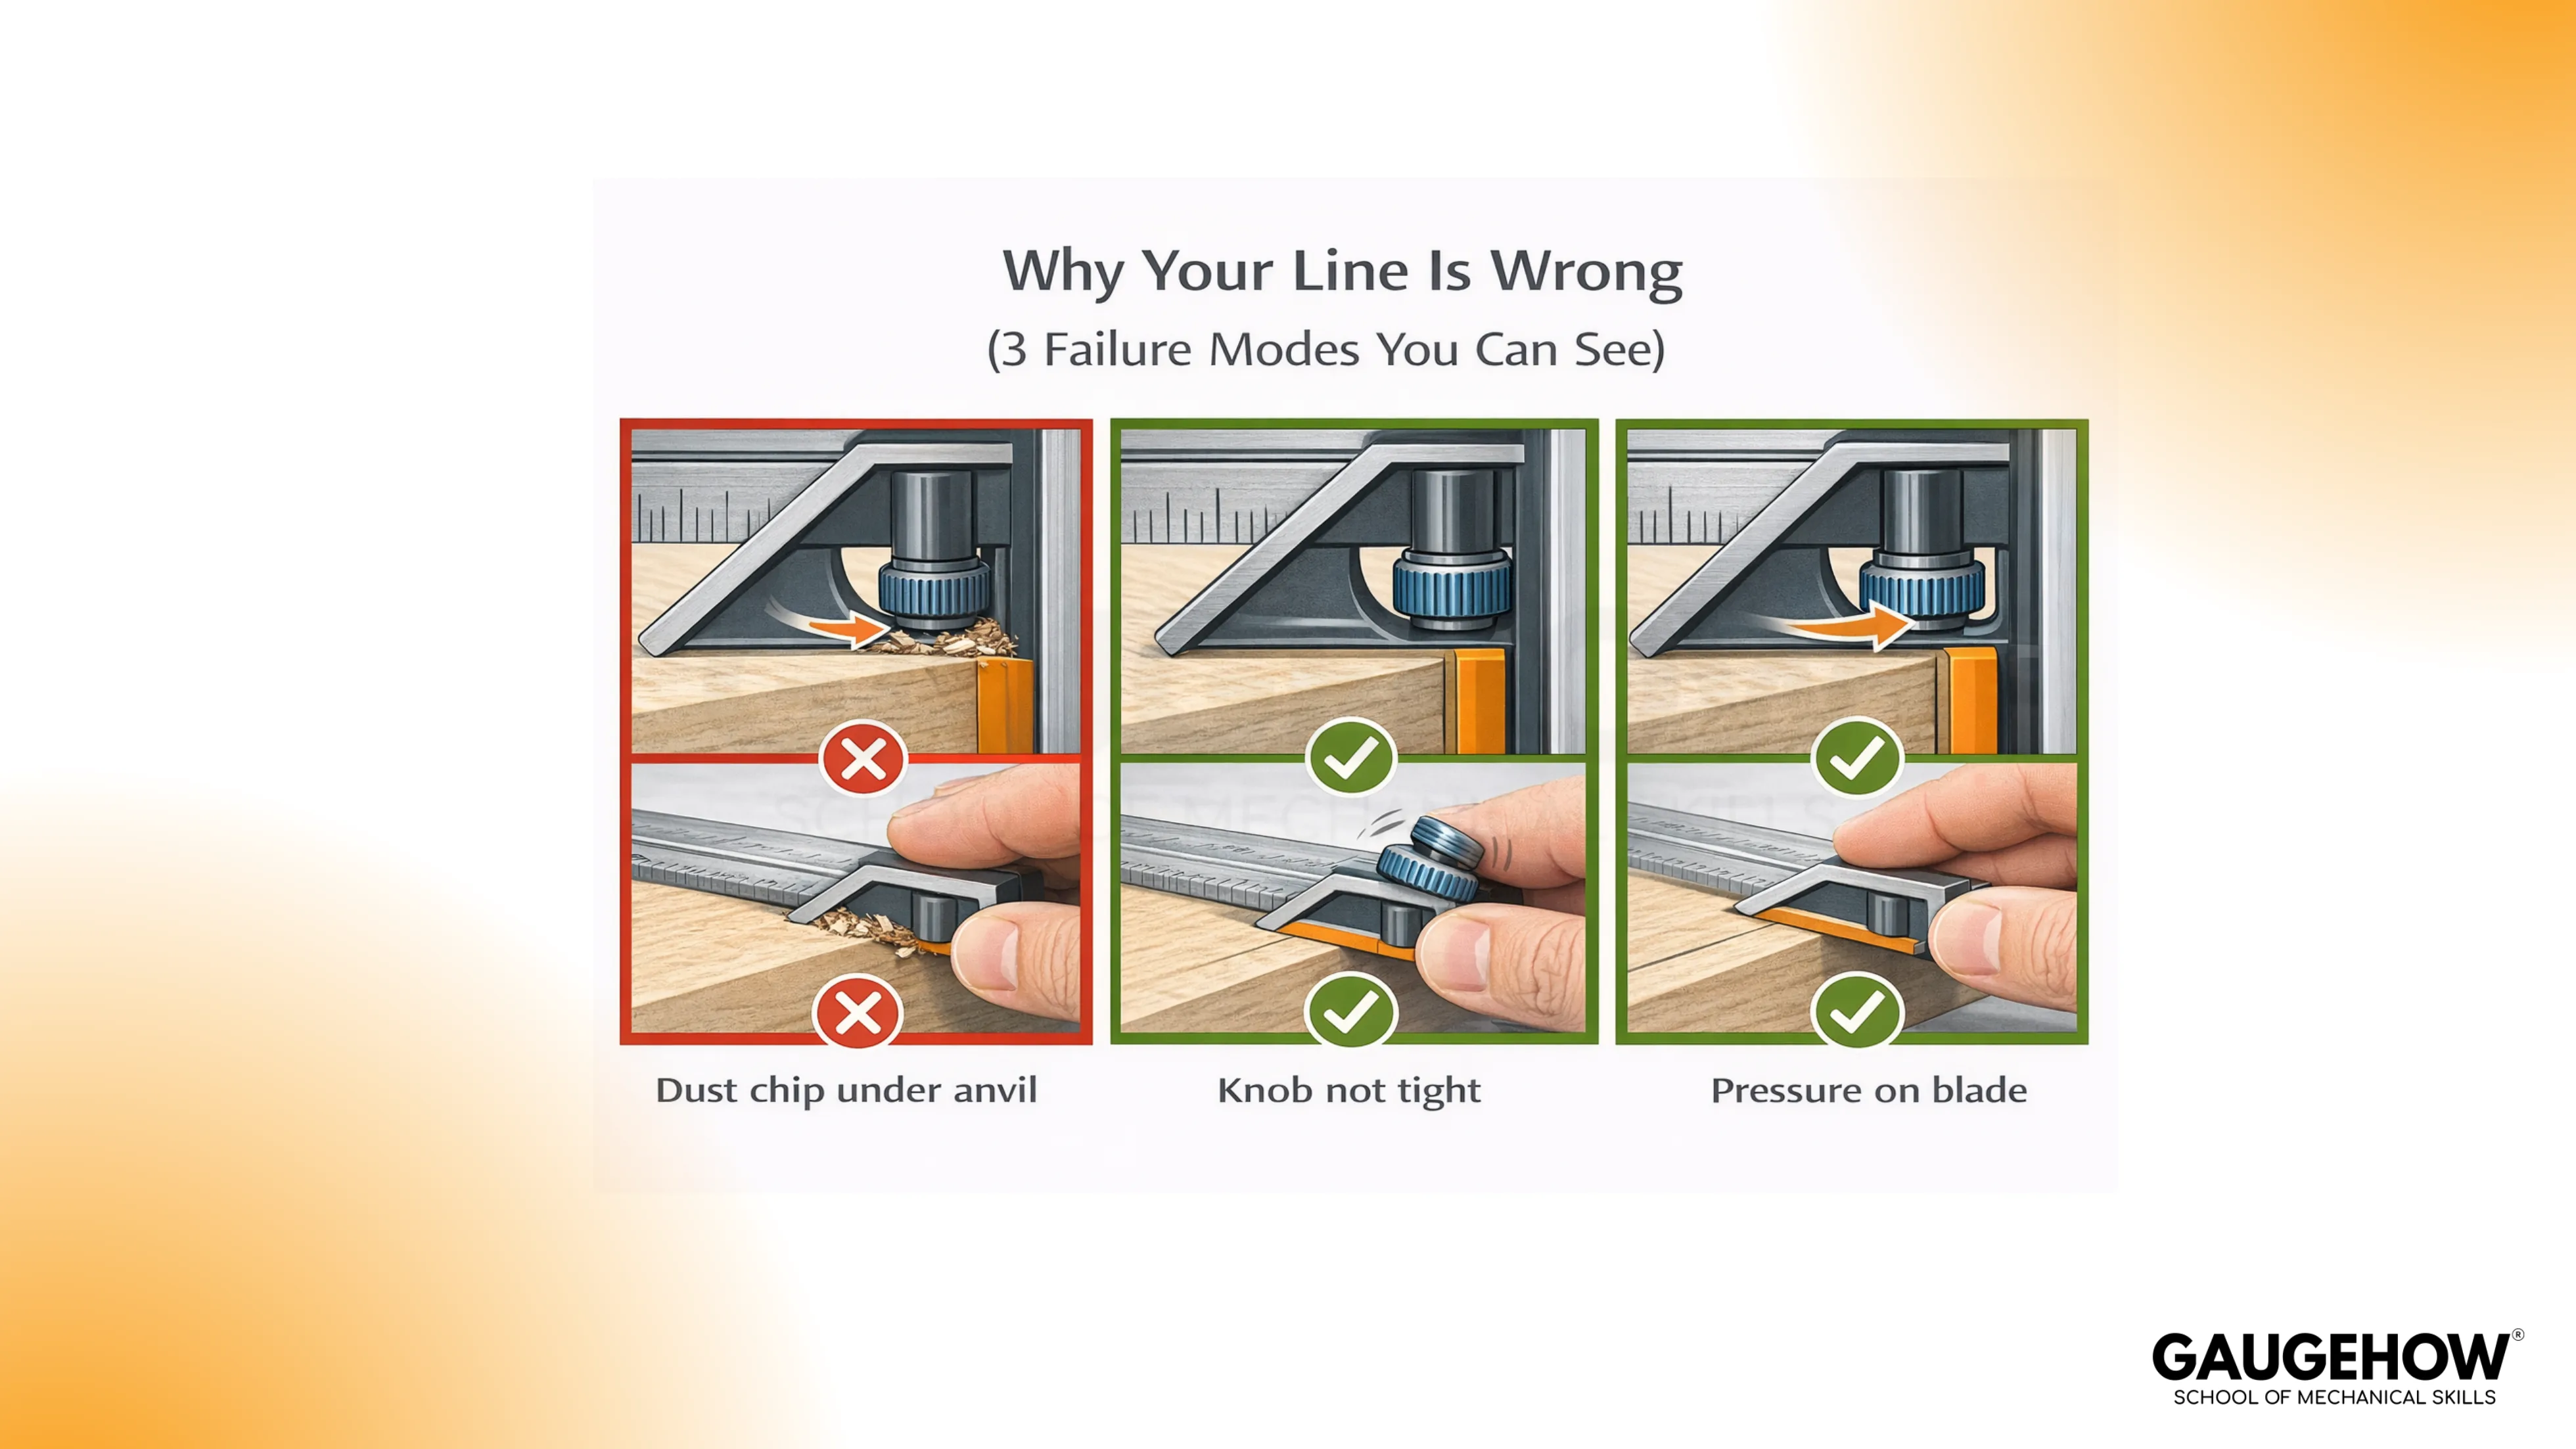
When the head is seated against a workpiece, the rule becomes a controlled extension of that reference. Accuracy depends less on the scale and more on seating, contact pressure, and whether the head is actually locked.
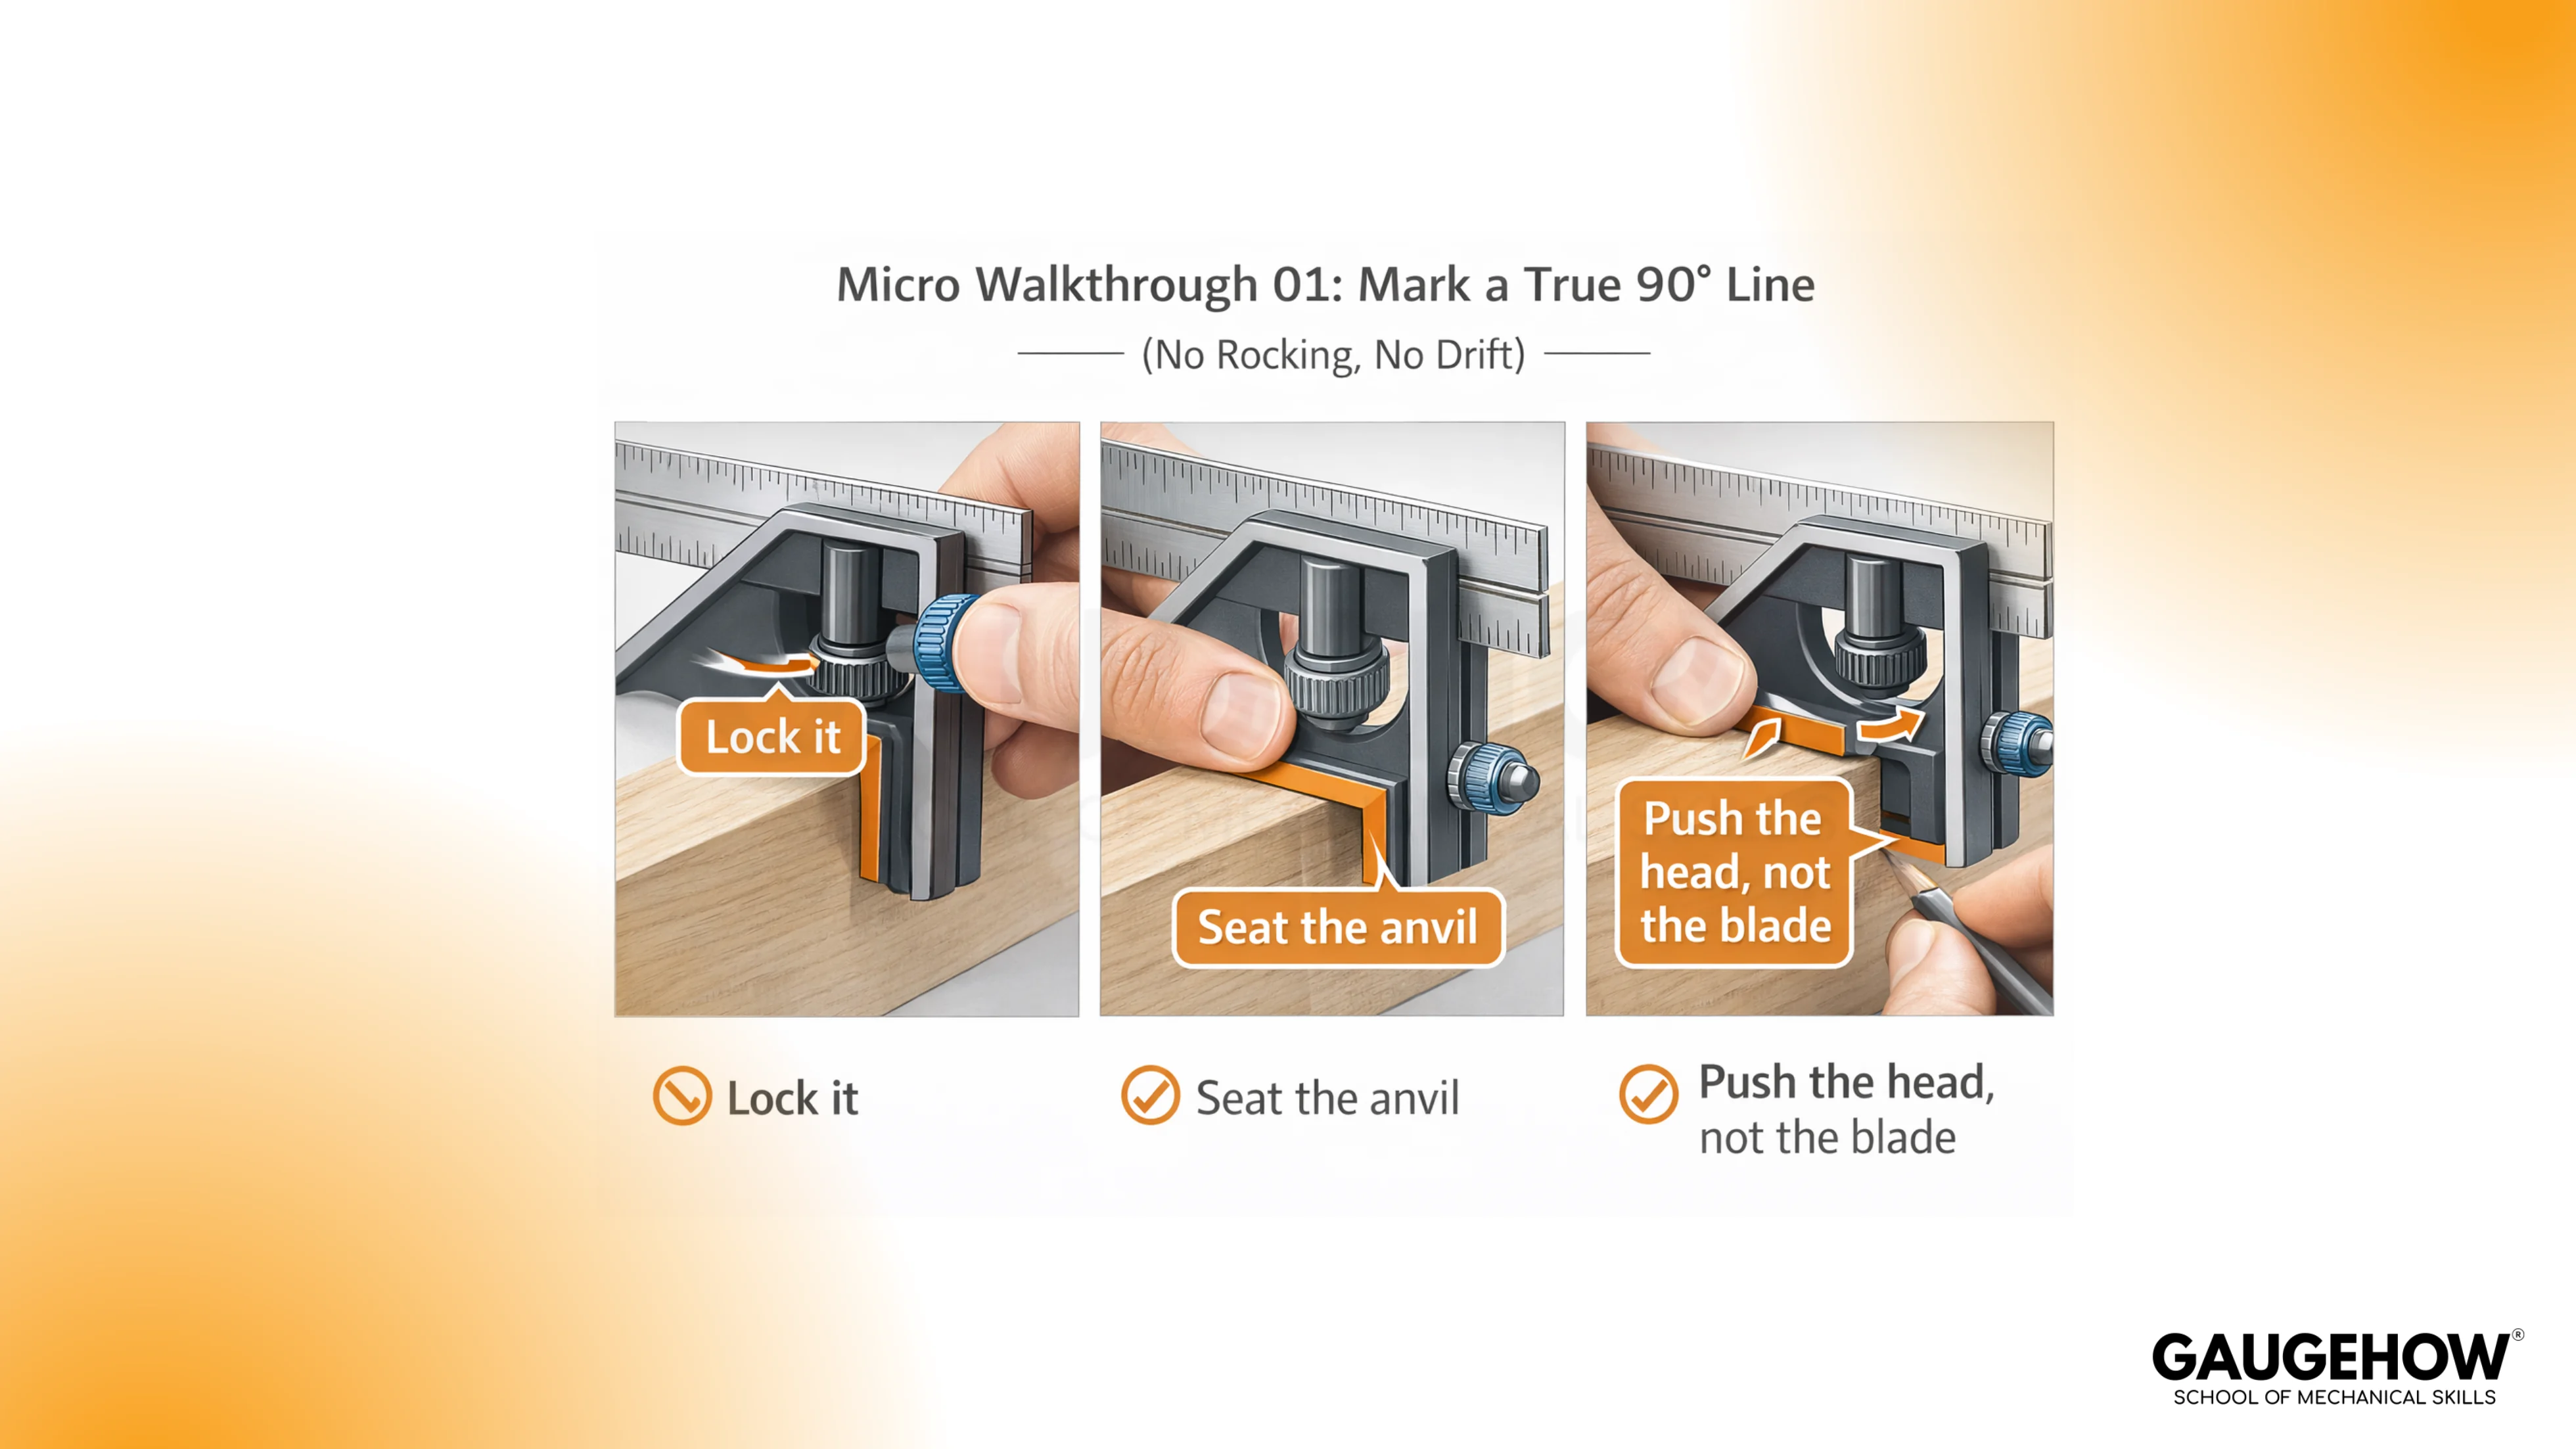
A repeatable working sequence is used for most bench tasks:
Choose the reference face on the head (shoulder or anvil) that seats flat on the datum edge or surface.
Seat the head fully against the datum with light, even pressure.
Lock the head if you are using the tool as a setting or offset gauge.
Mark or check once, then repeat the same contact to confirm the result matches your expectation.
Two common failure modes show up in real work:
False squareness from poor seating: The head touches on a burr, a chip, or a rounded edge, and the tool “rocks” without you noticing.
Slip while marking: The head is not fully locked, and the rule shifts under marking pressure.
Combination Square Depth Gauge
When a depth check is needed quickly, the tool can act as a simple reference probe. In this method, the head sits on the datum surface and the rule projects down into the feature.
The term combination square depth gauge fits the function, but the reliability still comes from how well the head sits on the datum and how consistently you contact the bottom of the feature.
A practical method is:
Seat the head flat on the datum surface.
Extend the rule until it touches the bottom surface of the recess.
Lock the head lightly so the rule does not shift.
Lift and reseat once to confirm the reading repeats.
This method is best for checks and setups, not for certifying a tight depth tolerance without a dedicated depth instrument.
Combination Square Least Count
Least count means the value of the smallest division you can read on the instrument’s scale.
For a combination square, the least count is set by the rule graduations, not by a vernier or a micrometer mechanism.
Least Count = Value of One Smallest Division on the Rule
Two clean examples make this concrete:
If the metric rule is graduated in 1 mm divisions, the least count is 1 mm.
If the imperial rule is graduated in 1/32 in divisions, the least count is 1/32 in.
Reading method stays simple:
Seat the head flat on the datum edge or surface.
Use the same edge of the rule every time.
Read at the head’s reference line or at the head face that aligns with the scale.
Common reading errors show up repeatedly in the shop:
Parallax: Viewing the scale from an angle makes you pick the wrong graduation.
Mixed-edge reading: Switching rule edges after setting causes a different reading.
Cosine error in depth checks: A tilted rule is not normal to the bottom surface, so the apparent depth is biased.
Burrs and chips: Debris prevents the head from seating flat, so every reading inherits that tilt.
For most layout work, the rule’s least count is not the limiting factor. Seating and repeatability usually dominate the real accuracy you get.
🔧 Trusted by 23,000+ Happy Learners
Industry-Ready Skills for Mechanical Engineers
Upskill with 40+ courses in Design/CAD, Simulation, FEA/CFD, Manufacturing, Robotics & Industry 4.0.
How to Test a Combination Square for Accuracy
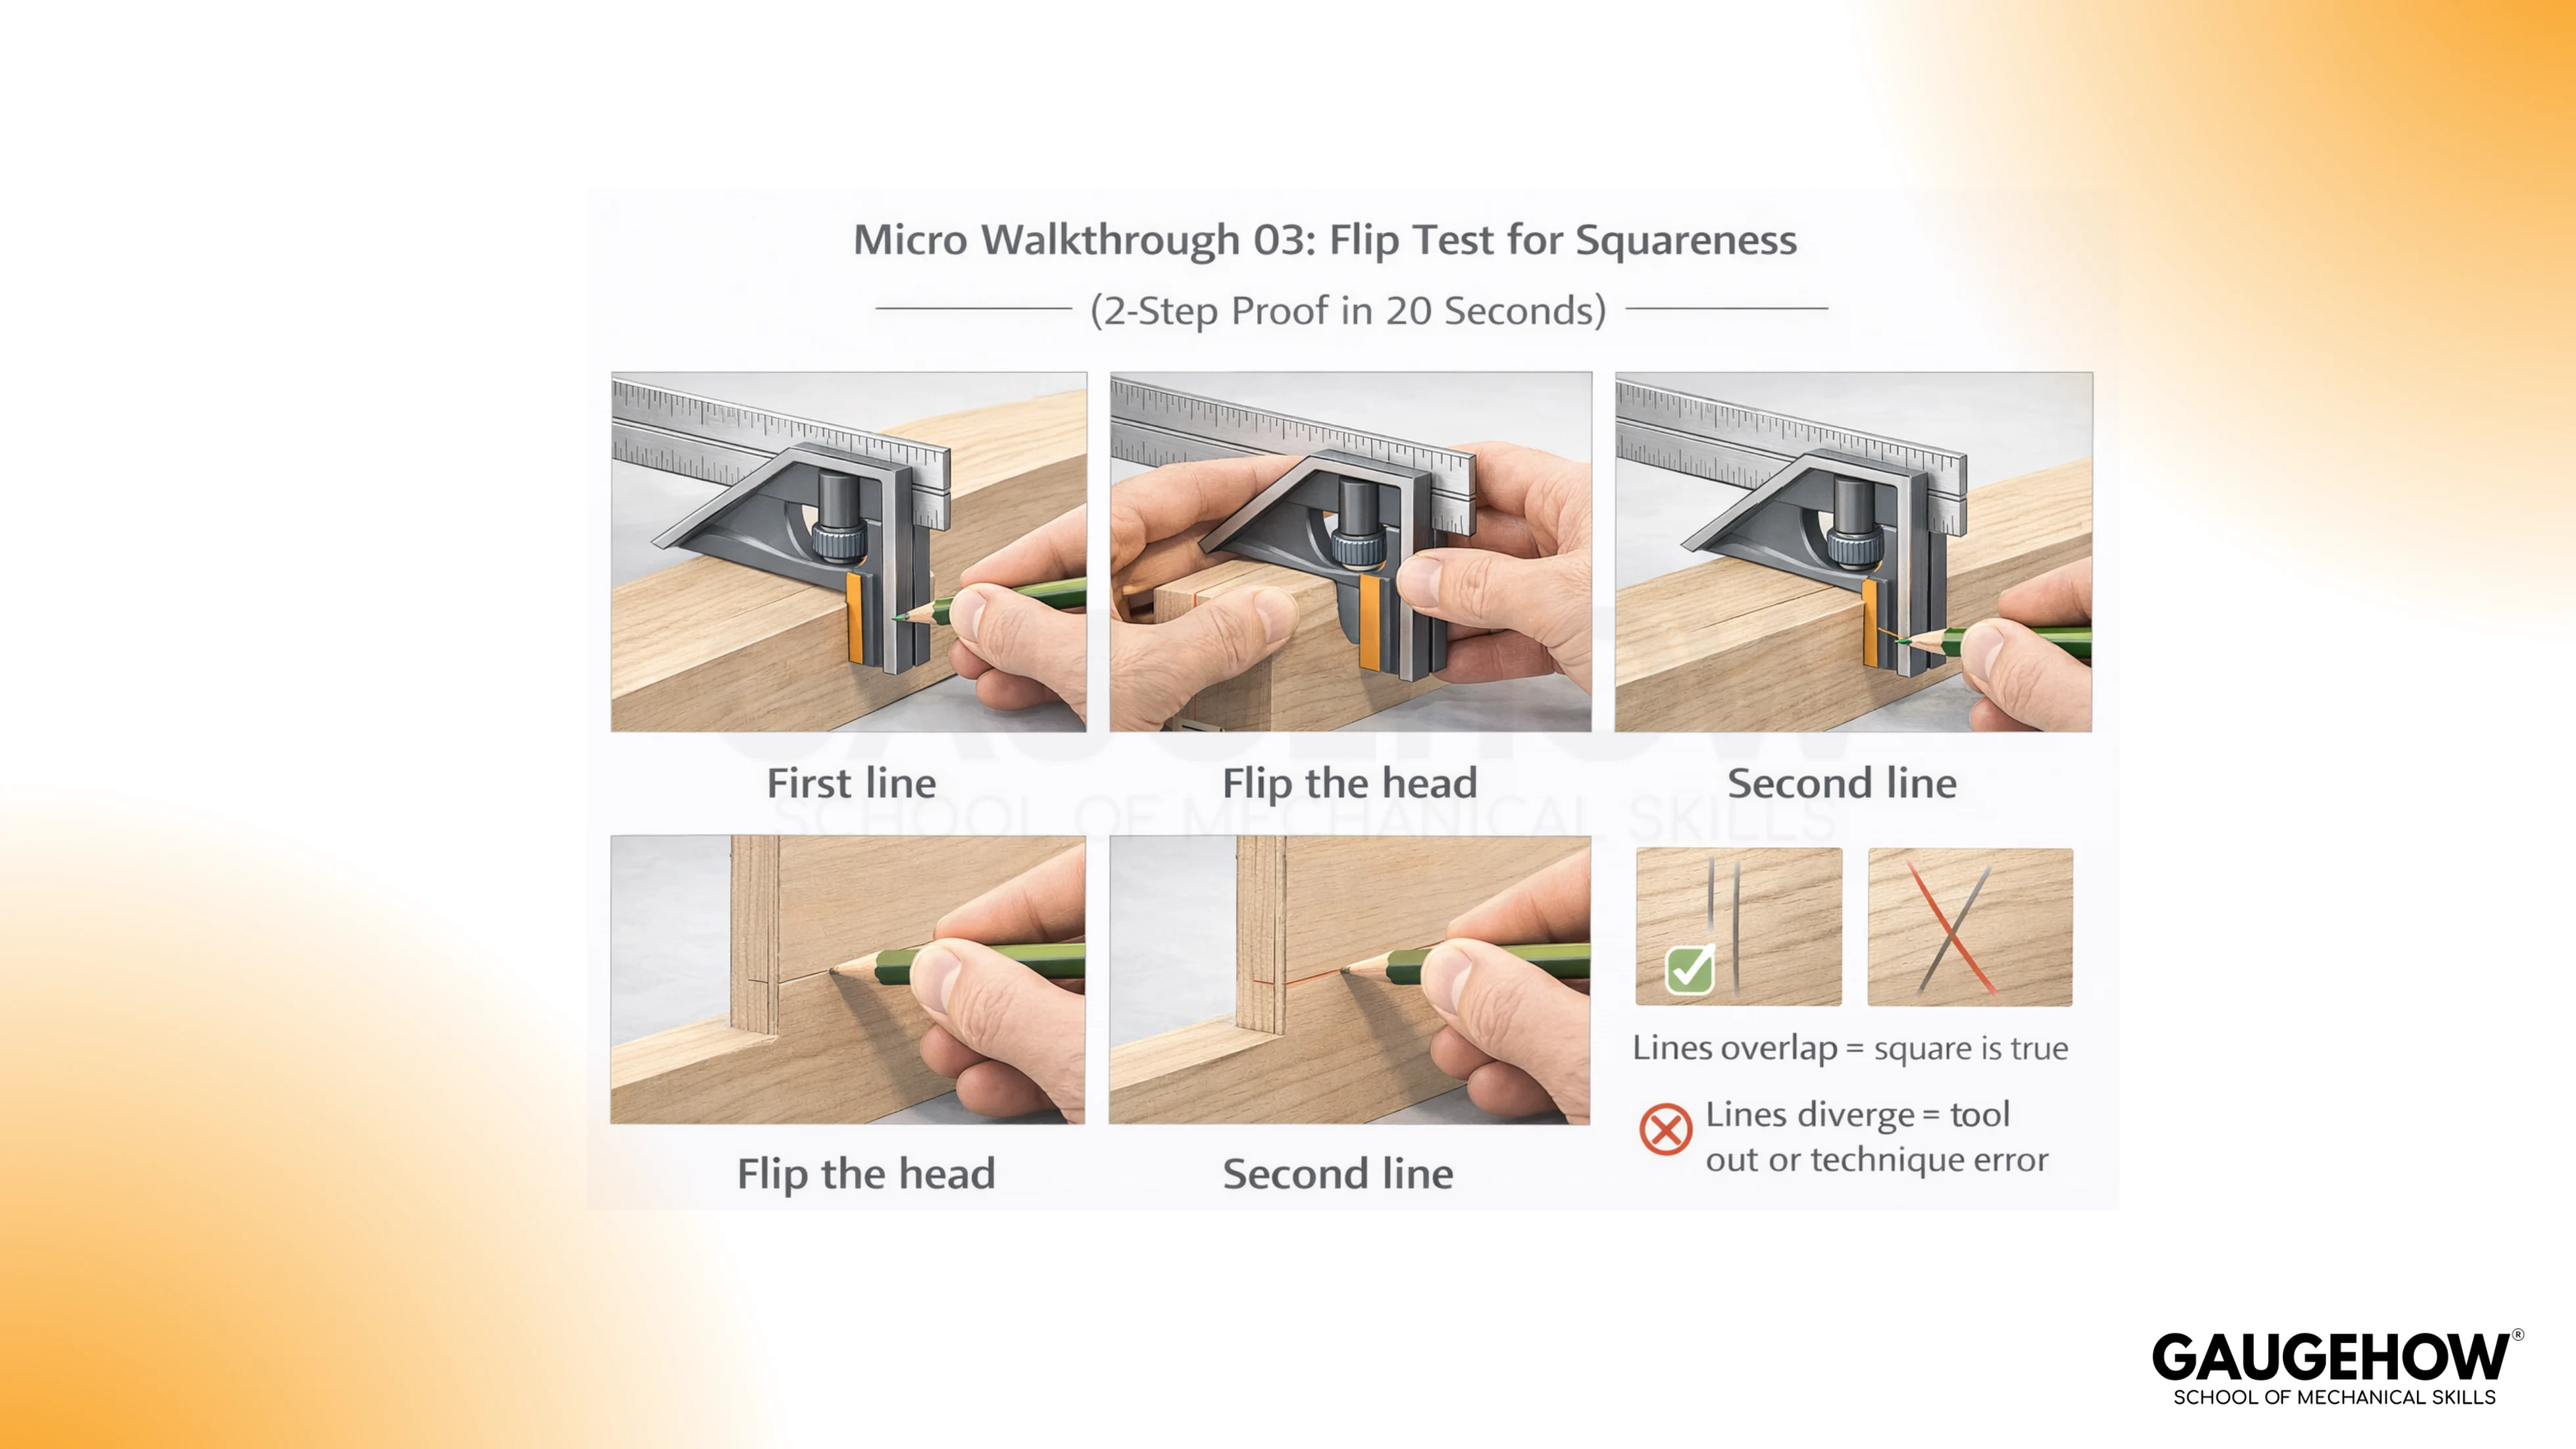
Before a critical layout or machine setup, a quick verification prevents quiet errors. The phrase how to test a combination square for accuracy describes a short check you can do with nothing more than a straight reference edge and a marking tool.
A reliable bench test is:
Draw a straight reference line using the square at 90°.
Flip the square over so the opposite face registers on the same reference edge.
Draw a second line from the same starting point.
Compare the two lines.
Diverging lines usually indicate poor seating, dirt, a nick, or headwear. After cleaning and reseating, continued divergence means it is not fit for precision checks.
Combination Square Types
A combination square is often sold as a single head and rule, or as a set with multiple heads. The heads define capability more than the rule does.
Standard Square Head: Used for 90° and 45° marking and checking, offsets, and basic height or depth readings.
Center Head: Helps locate the centerline on round stock by registering the V surfaces against the diameter.
Protractor Head: Allows you to set or transfer angles beyond 45° when an angle scale is needed.
Combination Square Protractor Head
Angle work often causes confusion because a standard head only gives a fixed 90° and 45° geometry. A combination square protractor head adds a pivot and a degree scale so you can set an angle intentionally and transfer it to the work.
It is used for layout and setup where the goal is repeatable angle setting, not just “close enough” marking.
A practical limitation is worth stating plainly. The protractor scale is only as accurate as the seating and your reading discipline.
If the job needs high-angle accuracy across multiple parts, the protractor head is treated as a setup tool and the angle is verified against a better reference when required.
Combination Square Uses
In real bench practice, Combination square uses fall into three categories: layout, checking, and setup. The tool is valuable because it combines a scale with a reference face that can be registered repeatedly.
Perpendicular layout: Mark shoulder lines, cut lines, and reference lines at 90° from an edge.
45° layout: Mark or check mitre lines, chamfers, and bevel references.
Offset marking: Set a distance once, lock it, and scribe a parallel line without re-measuring each time.
Squareness checking: Check fences, assemblies, and simple machine setups for 90°.
Depth and height checks: Use the projecting rule for quick step, recess, and setup verification.
Center finding on round stock (with center head): Mark a centerline for drilling, turning, or alignment.
Angle transfer (with protractor head): Set or copy an angle for layout and fixture setup.
FAQs
What Does a Combination Square Measure?
It reads the linear distance on the rule and sets offsets. And it checks and marks 90° and 45°, plus quick depth or height from a flat datum.
How To Test a Combination Square for Accuracy?
Draw a 90° line, flip the square on the same edge, then draw again. Overlap is good; divergence after cleaning and careful seating means reject it for precision layout.
When Should You Use a Center Head Instead of the Standard Head?
Use the center head when you need a centerline on round stock. The V faces register on the diameter, so you can scribe or punch the true center without measuring across.
When Is a Combination Square Protractor Head Worth Using?
Choose it when the job needs an angle beyond 45° repeatedly. It is useful for layout and setup, but verify critical angles with a higher-accuracy reference.
Is a Combination Square Depth Gauge Accurate Enough for Your Work?
It is accurate enough for quick setup checks and comparing features. For tight tolerances, use a dedicated depth gauge or micrometer, because seating and bottom contact can bias the reading.


