Measuring Tape: Parts, Reading, Least Count and Accuracy
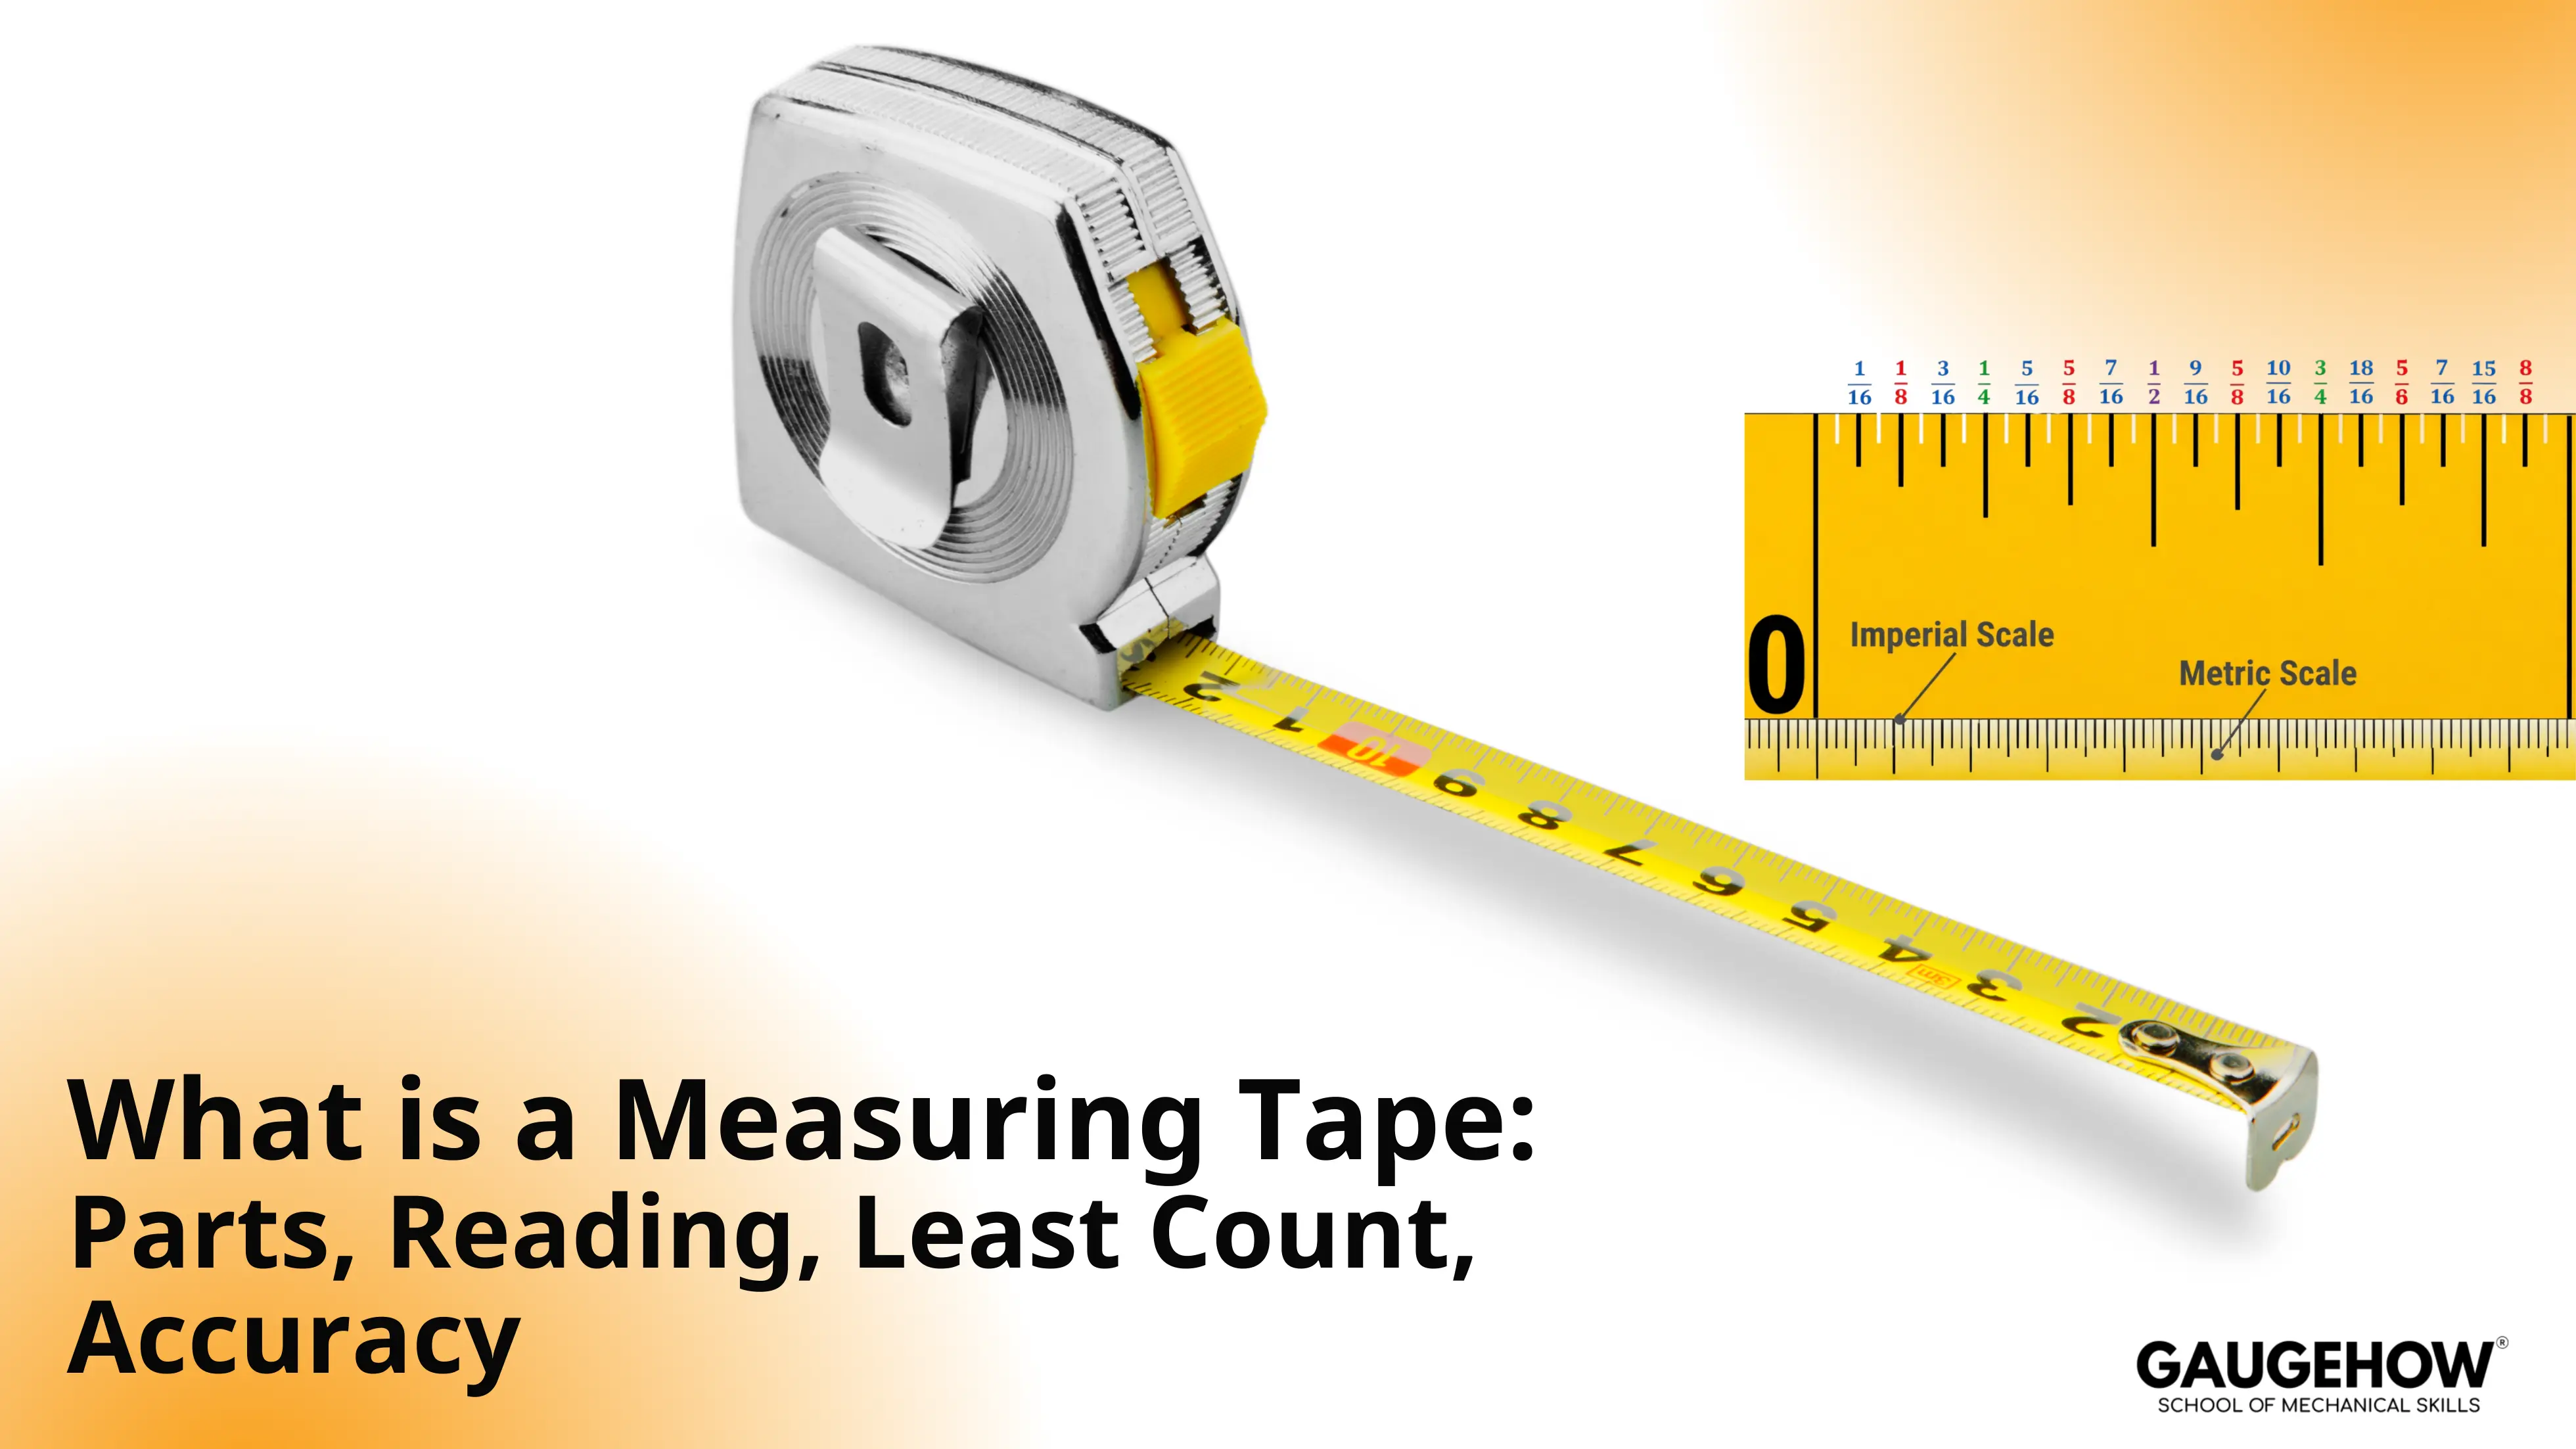
A measuring tape, also known as a tape measure, is a flexible ruler with a graduated scale used to measure linear length over short or long distances.
It is used in woodworking, fabrication, construction layout, sewing, and quick quality checks when a rigid rule or caliper is impractical.
Picture this: You pull a tape, mark the cut line, and the piece still comes up short. Nothing “mystical” happened, but three small effects stacked up. The graduations are dense, so your eye rounds without noticing.
The end hook shifts by design, so the start point changes between push and pull. Then an inside measurement adds the case into the geometry, and the reference edge quietly moves again.
This post covers what the measuring tape least count is, tape measure accuracy, how to read measuring tape, and types of measuring tapes.
Selection Table
Your Task | Best Tape Style | Typical Length | Verify Before You Measure |
Furniture, carpentry, fabrication, layout | Retractable steel pocket tape | 3–8 m | Hook is tight, and square, lock holds |
Long-distance, outdoor work, site checks | Open-reel fiberglass tape | 10–50 m | Tape is not stretched, reel runs smoothly |
Sewing, body measurement, soft materials | Flexible tailoring tape | 1.5–2 m | Tape edges are not frayed, scale is readable |
Quick internal width checks | Retractable tape with case-length method | 3–5 m | Case length is known, hook slides freely |
Verification Habit
Hook condition, alignment, tension, and surface quality decide whether your result is reliable.
What Is Measuring Tape
A measuring tape consists of a marked blade or strip, an end reference (hook or tab), and a housing or reel that stores and guides the tape. The scale is fixed, but the measurement quality depends on how the tape is seated, pulled, supported, and read
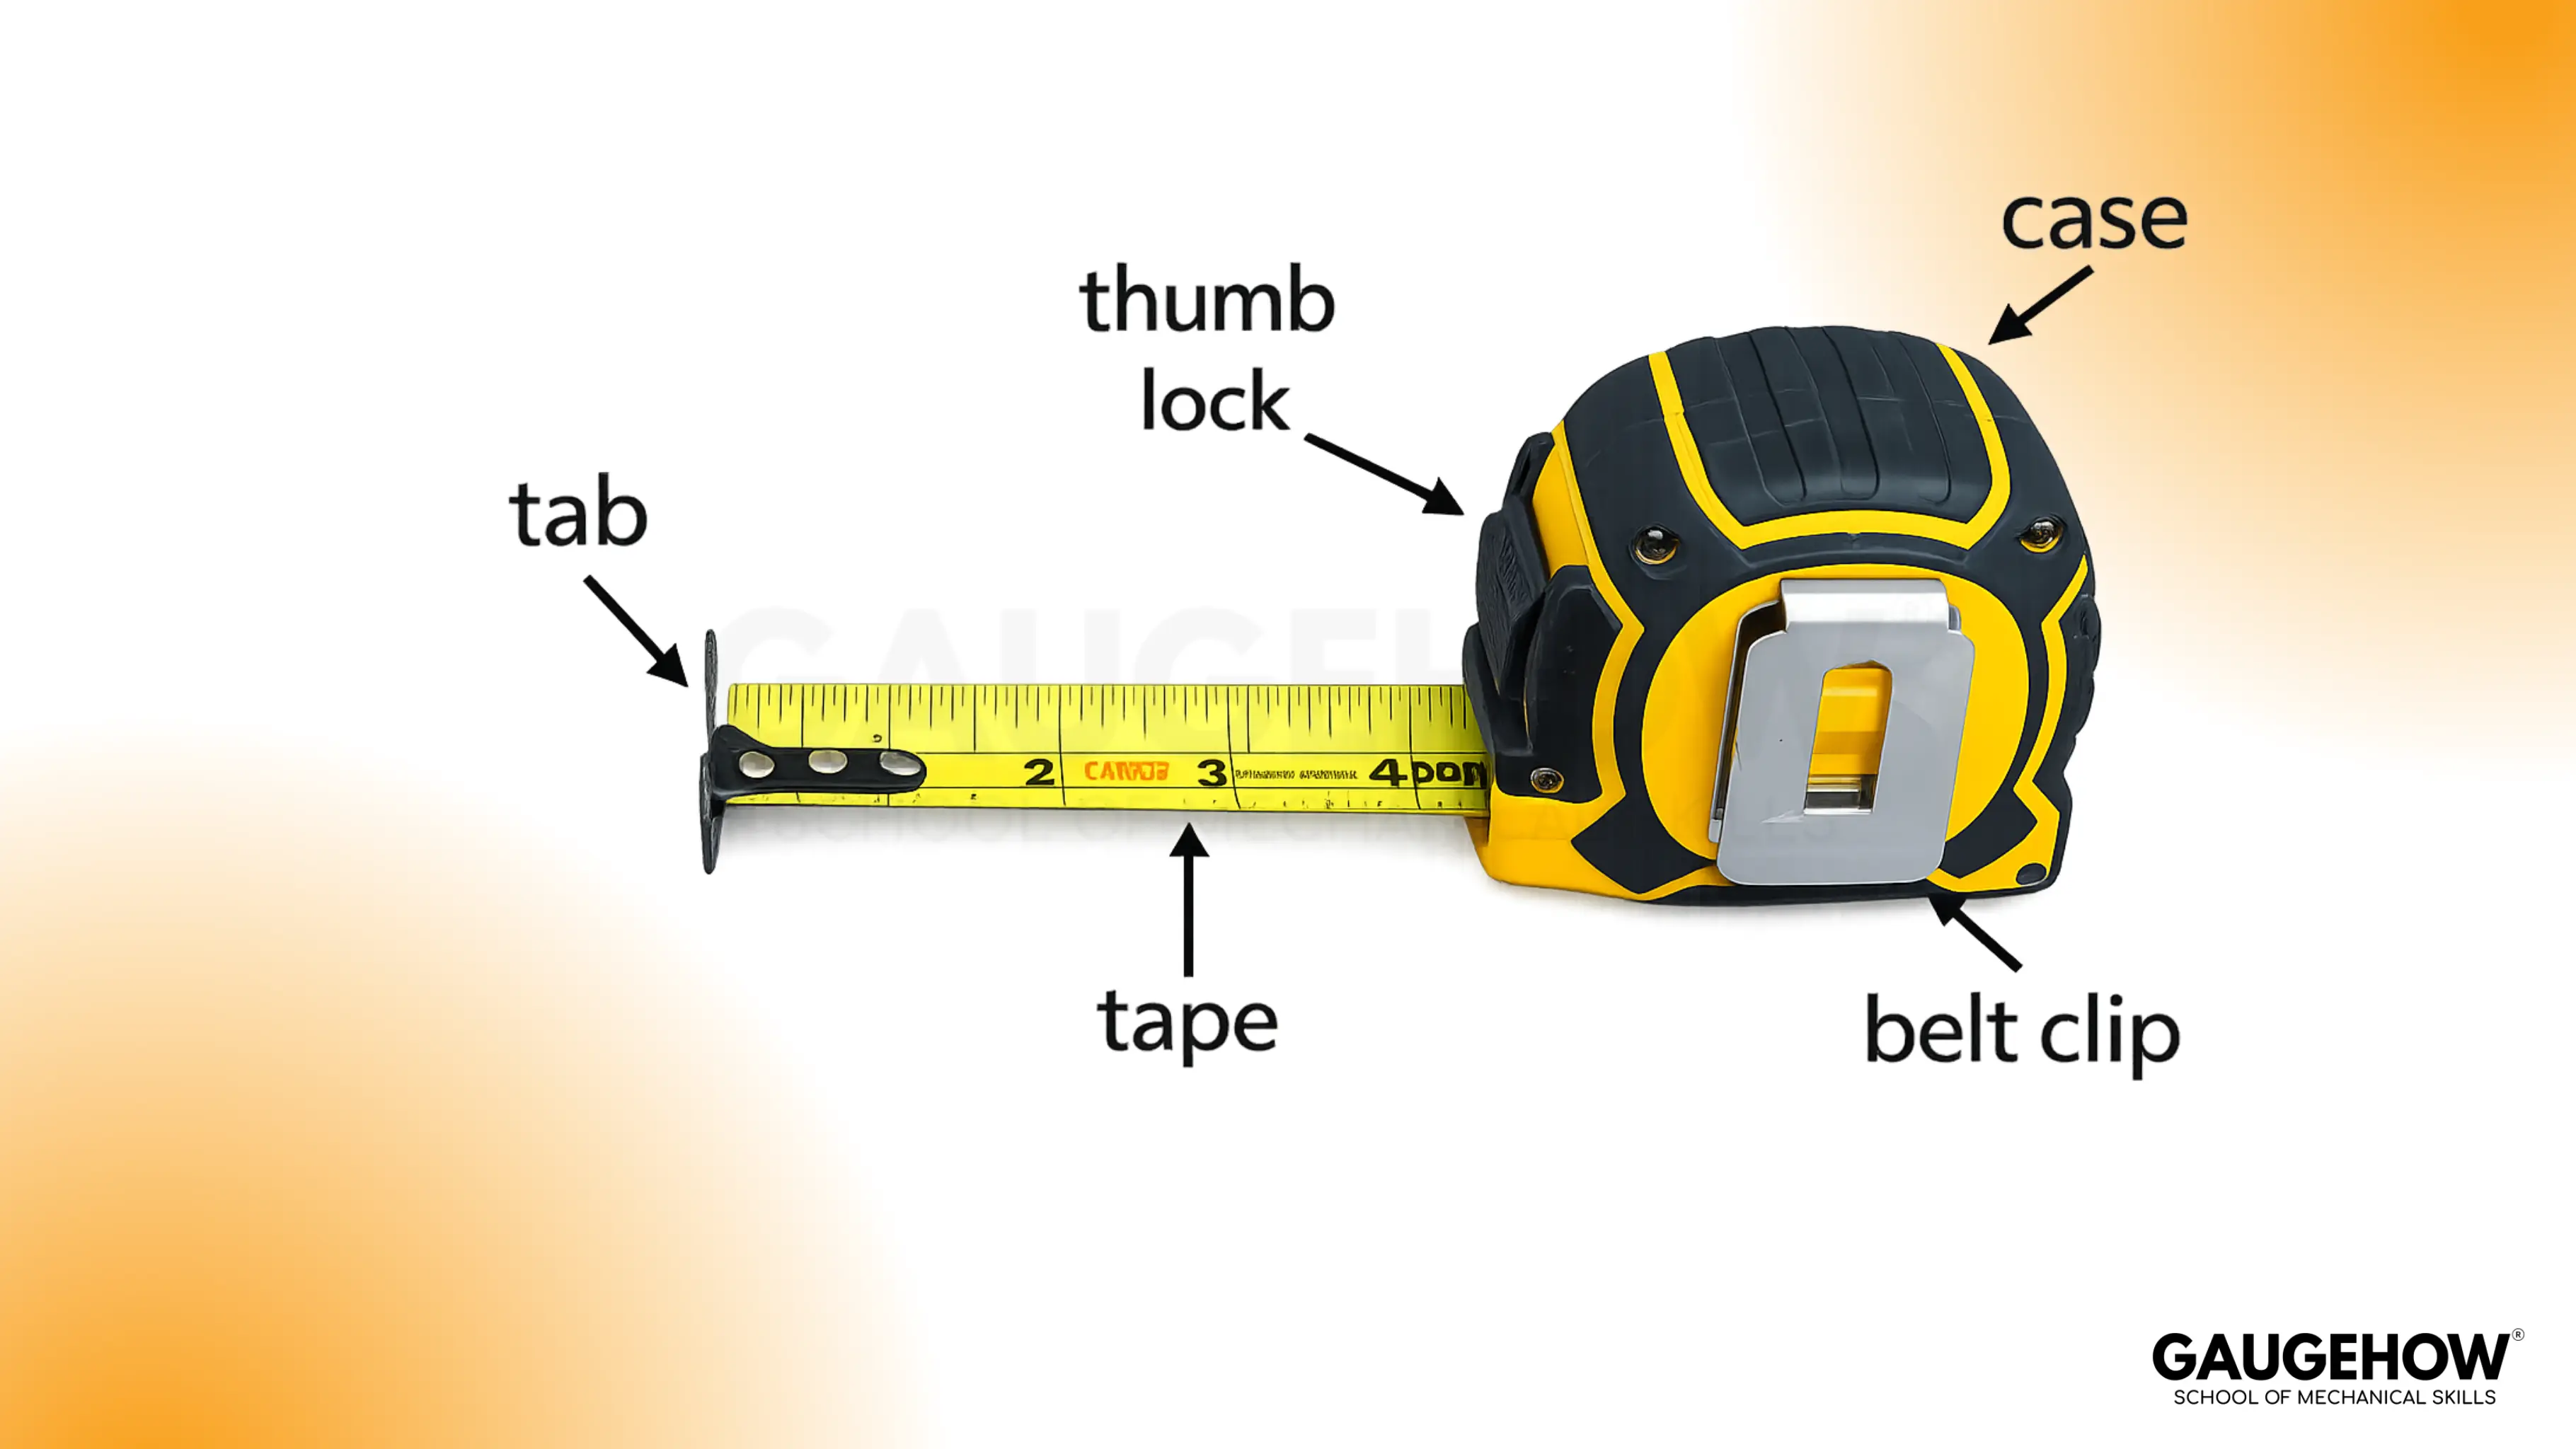
Parts of Measuring Tape
The main parts of a measuring tape are:
Blade (Tape Strip): This is the flexible strip that carries the scale and spans the distance. Keep it flat and straight, because any twist turns a straight length into a diagonal and makes the reading drift long.
End Hook: Your measurement starts here. A clean, square hook seats consistently; a bent tip or worn contact edge shifts the start point and throws off the earliest marks first.
Hook Rivets/Slot: Controlled hook movement happens at the rivets and slot. That small travel keeps the “true start” correct for both pull measurements and push measurements, so inside and outside readings stay consistent.
Case Mouth/Guide: A smooth guide keeps the blade centred as it exits and returns. Damage at the mouth can kink the blade near zero, which changes how the hook seats and makes repeats disagree.
Lock: Use the lock to freeze the blade before you read. Without a firm lock, the blade creeps back while your eyes move, and the final mark becomes guesswork.
Return Spring (Retractable Tapes): Retraction should be controlled, not violent. A snap-back habit beats up the hook over time and slowly degrades zero integrity.
Case Body: Grip stability comes from the case. A square, stable hold keeps alignment honest; a tilted case encourages skew and inflates the measured length.
Scale Mark Zones: Major and minor marks exist so you can read in a repeatable pattern. Counting divisions beats “eyeballing” between ticks, especially near the final edge.
Note on the moving hook: Hook travel is intentional and sized to the hook thickness, so the start point stays correct when you pull from an outside edge or push into an inside face. Excessive looseness is different; treat that as wear and verify before trusting the tape.
Measuring Tape Least Count
Least count is the smallest division you can read directly on the tape without estimating between two marks.
On a tape, the least count is not calculated from gears or dials. It is taken from the scale itself.
Rule: Least Count = Value of the Smallest Marked Division
Under normal shop conditions, Measuring tape least count is the smallest tick you can consistently distinguish on that blade. Metric tapes commonly show 1 mm divisions. Inch tapes commonly show 1/16 inch divisions, and some show finer.
How to find it:
Look between two numbered marks.
Identify the smallest repeating tick.
Read its value in your reporting unit.
Worked example:
A metric tape shows 10 equal ticks between 5 cm and 6 cm.
One centimeter equals 10 mm.
Each tick equals 1 mm.
Least count = 1 mm.
Practical note: least count tells you the smallest step you can read. It does not guarantee the tool is correct.
🔧 Trusted by 23,000+ Happy Learners
Industry-Ready Skills for Mechanical Engineers
Upskill with 40+ courses in Design/CAD, Simulation, FEA/CFD, Manufacturing, Robotics & Industry 4.0.
Tape Measure Accuracy
Accuracy is the closeness of your reading to the true length. Resolution (least count) and accuracy are related, but they are not the same thing. Repeatability matters as well, because a measurement that changes every time is not dependable, even if the scale is fine.
Use this clean distinction:
Least count (resolution): the smallest readable division on the blade.
Accuracy: how close the reading is to the true length.
Repeatability: how consistently you can get the same result with the same method.
Most online explanations stop at “be careful.” An engineering-grade approach uses a decision rule and a verification gate.
Decision rule:
Tight tolerance or small parts push you away from a tape.
If the feature is small or the tolerance is tight enough that half a millimeter matters, a caliper is the correct tool.
For controlled inspection work, confirm critical dimensions with a reference instrument.
Error-source map:
Error Source | Mechanism (What’s Happening) | Impact on Your Reading |
Hook play / bent hook / worn tip | The hook does not seat consistently because of wear, bending, or burrs at the contact edge. | Early marks shift, so the first part of the scale reads “off.” |
Skewed setup (cosine error) | The blade is not aligned with the true measurement direction, so you are measuring along a diagonal. | The result reads longer than the true straight-line length. |
Blade sag on longer spans | Unsupported blade weight creates a curved path instead of a straight line. | Longer spans drift high, especially mid-span. |
Blade twist near the case | Exit angle or guide friction twists the blade near zero. | Tick alignment becomes ambiguous, so repeat readings disagree. |
Temperature or stretch (long tapes) | Heat and pull tension change the effective length of the tape material over long runs. | Long measurements vary between methods or between operators. |
30-second verification gate:
Zero check: confirm the hook is not bent, and the motion is controlled, not sloppy.
Reference check: compare the first 100 mm or first 4 inches against a known reference (a good steel rule works).
Inside measurement check: Confirm your inside method is valid before you use it. If you rely on the case length rule, verify the case length first and keep the case square to the surfaces.
Repeatability check: take the same measurement three times using the same setup. A wide spread means the method is unstable.
That structure is why tape measure accuracy improves immediately without adding more theory. Setting up and zeroing decide the outcome.
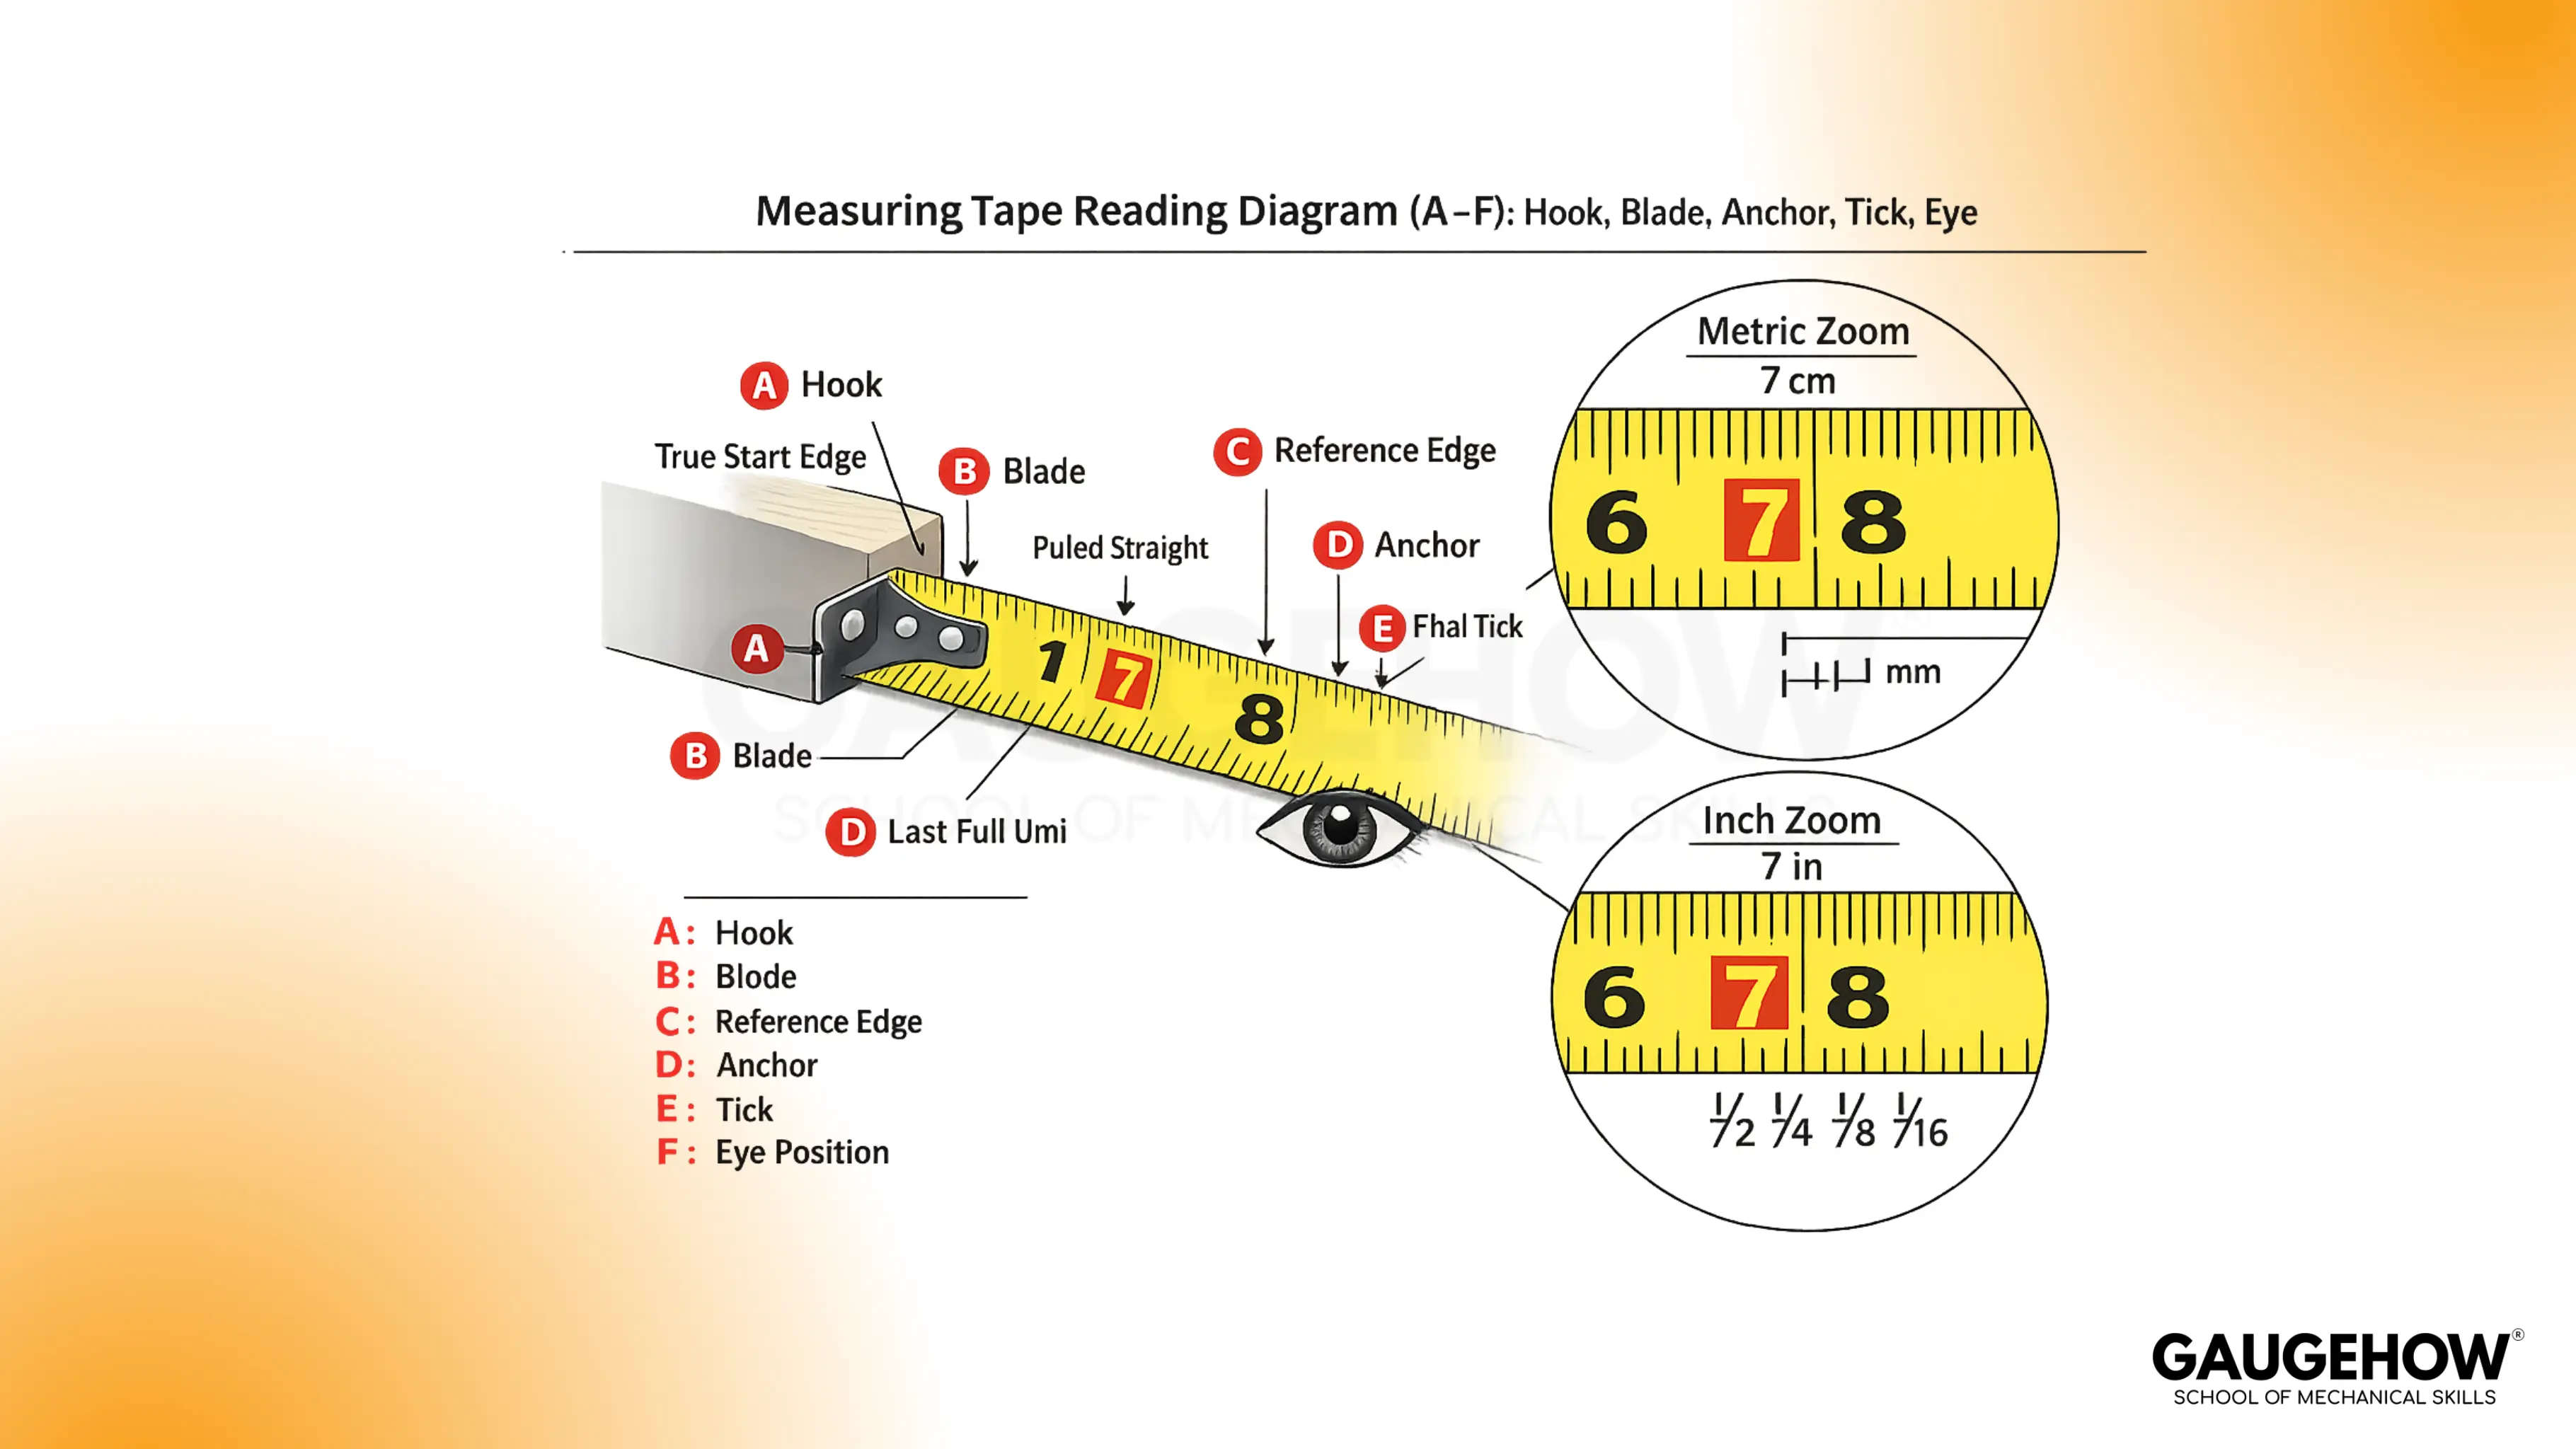
How to Read a Measuring Tape
A measuring tape reads correctly when three things are controlled: the start point, the blade line, and the viewing line. The labeled diagram shows this as A (hook), B (blade), C (reference edge), D (last full unit), E (tick at the edge), and F (eye position).
Reading sequence
Anchor-and-Count rule: Anchor on the last full unit, then count ticks to the edge.
1. (A) Seat the hook on a true start edge
Hook contact is flat and fully seated. A rounded corner, burr, or paint ridge is treated as an unstable start.
2. (B) Set the blade line straight and untwisted
A straight blade gives a single line of ticks. A diagonal or twisted blade makes the scale intersect the edge at different points.
3. (C) Hold the reference edge as the “reading plane.”
The reading edge stays fixed. The tape moves until one tick aligns cleanly with that edge.
4. (D) Anchor on the last full unit before the edge
Metric uses the last full cm. Inch tapes use the last full inch. This anchor prevents midpoint guessing.
5. Count minor ticks from the anchor to the edge, then add
Counting is the reading. The edge decides the final tick.
6. (F) Read with the eye normal to the scale
Eye position sits directly above the edge. An angled view shifts which tick appears closest.
Recordings that stay consistent
Scale system | Read it like this (D → E) | Write it like this |
Metric | last full cm, then count mm ticks | 24 cm + 6 mm = 24.6 cm |
Inch/Fraction | last full inch, then count fraction ticks | 7 in + 3/16 in = 7 3/16 in |
Inch fractions
Tick length acts as a code on most blades. Half marks are longest, quarter marks are next, eighth marks are shorter, and sixteenth marks are shortest. The correct fraction is the tick family that the edge lands on.
Inside measurements
Inside faces block the hook. The case is used as the contact surface. The blade reading is taken at the far face, then case length (printed on the body) is added.
Special marks
Black diamonds and highlighted numbers are layout cues. The measurement still comes from the normal graduated ticks.
Quick checks:
Hook check: a loose or bent hook produces drift. Use a clean edge, then repeat once.
Line check: the blade must point in the measurement direction. Diagonal pull reads long.
Edge check: the reference edge must be a single plane. Curved edges create shifting alignment.
Parallax check: move the eye left-right. If the tick “moves,” the view is not centered.
Doubt reset: reseat the hook, straighten the blade, re-anchor on the last full unit, then recount ticks to the edge.
Types of Measuring Tapes
Different tapes exist because different jobs punish different weaknesses. Stiffness matters for one-person reach. Stretch matters for long runs. Flexibility matters for soft materials.
In practice, types of measuring tapes can be sorted by what they do well:
Retractable steel pocket tape: Stays stiff for short spans and supports one-person layout. Poor handling or snap retraction damages the hook and shifts the start point.
Long retractable tape: Covers longer measurements while staying portable. Support becomes important to reduce sag.
Open-reel fiberglass tape: Suits long outdoor distances and resists corrosion. Pull tension and temperature matter more on long runs.
Tailoring tape: Wraps around bodies and soft materials without kinking. It is not ideal for hard-edge precision layout.
Specialty tapes (dual-scale, reverse, diameter): Reduce mental conversion when one task repeats often.
Selection gate:
One-person reach and quick layout push you toward a stiff steel blade.
Long runs outdoors push you toward an open-reel design and careful verification.
Curved or soft surfaces push you toward a flexible tailoring tape and consistent seating.
FAQs
1. How do you read a tape measure in inches and fractions?
Use the last full inch mark, then count fractional ticks to the edge. Reduce fractions when possible. The method stays the same, even on a metric vs imperial tape measure.
2. What is the least count of a measuring tape?
It is the smallest printed division you can read directly. Many metric tapes read to 1 mm. Many-inch tapes read to 1/16 in.
3. Why does the tape measure hook move
The hook is designed to slide slightly, so inside and outside measurements reference the correct start point. Loose or bent movement is different and needs correction.
4. What do the black diamond marks mean on a tape measure?
They are layout aids for spacing in certain framing systems. For length measurement, they do not replace the standard ticks. That is the simplest tape measure markings meaning to remember.
5. How do I check if my tape measure is accurate?
Compare the first part of the tape against a trusted reference length, repeat the measurement three times, and confirm the hook and blade are in good condition.


