What Is a Vernier Depth Gauge? Uses, Parts, Reading

What is a Vernier Depth Gauge? It is a depth-measuring instrument, also known as a vernier depth gauge or vernier depth caliper in some shops, used to measure recess depth, hole depth, slot depth, and step depth from a flat datum face.
A pocket that should be 12.00 mm deep measures 11.86 mm on the bench. A lot of rework starts right there, because the next decision is usually a cutter offset, not a measurement check.
A vernier depth gauge is built for that moment. It sits on a reference surface, reaches the bottom of a feature, and gives a direct depth reading you can trust when the setup is right.
Working, parts, reading method, least count, and shop use are covered in the same order you would use at a bench.
Job | Setup | Best Fit Because | Typical Failure |
Blind hole depth | Base flat around the hole | Direct datum-to-bottom read | Chips/bottom radius |
Counterbore step | Based on the top face | Plane-to-plane step depth | Edge rocking |
Pocket floor depth | Base bridges opening | Stable, repeatable seating | Burrs under the base |
Slot floor depth | Based on clean land | Blade reaches the narrow floor | Side rub/binding |
Shops Use Cases
Depth checks decide fit, clearance, and assembly stack-up. In most shops, the role of a depth gauge is not “high math.” It is repeatability, speed, and a direct read from a datum surface.
Portability matters because depth is often checked at the machine, not only in the inspection room. Repeatability matters because a stable method reduces arguments between “operator depth” and “QC depth.”
Cost and training matter because a vernier depth gauge is usually easier to deploy across multiple stations than higher-end depth systems, as long as the seating surface is controlled.
Across industries, the applications look different, but the measurement need stays the same.
Toolroom QC uses it to confirm pocket floors and counterbore steps before finishing.
Automotive-style production uses it to spot drift early on high-volume features.
Aerospace-style practices focus on documenting methods and controlling seating conditions so a depth number is consistent between shifts.
Vernier Depth Gauge diagram
The Vernier Depth Gauge diagram is presented below:
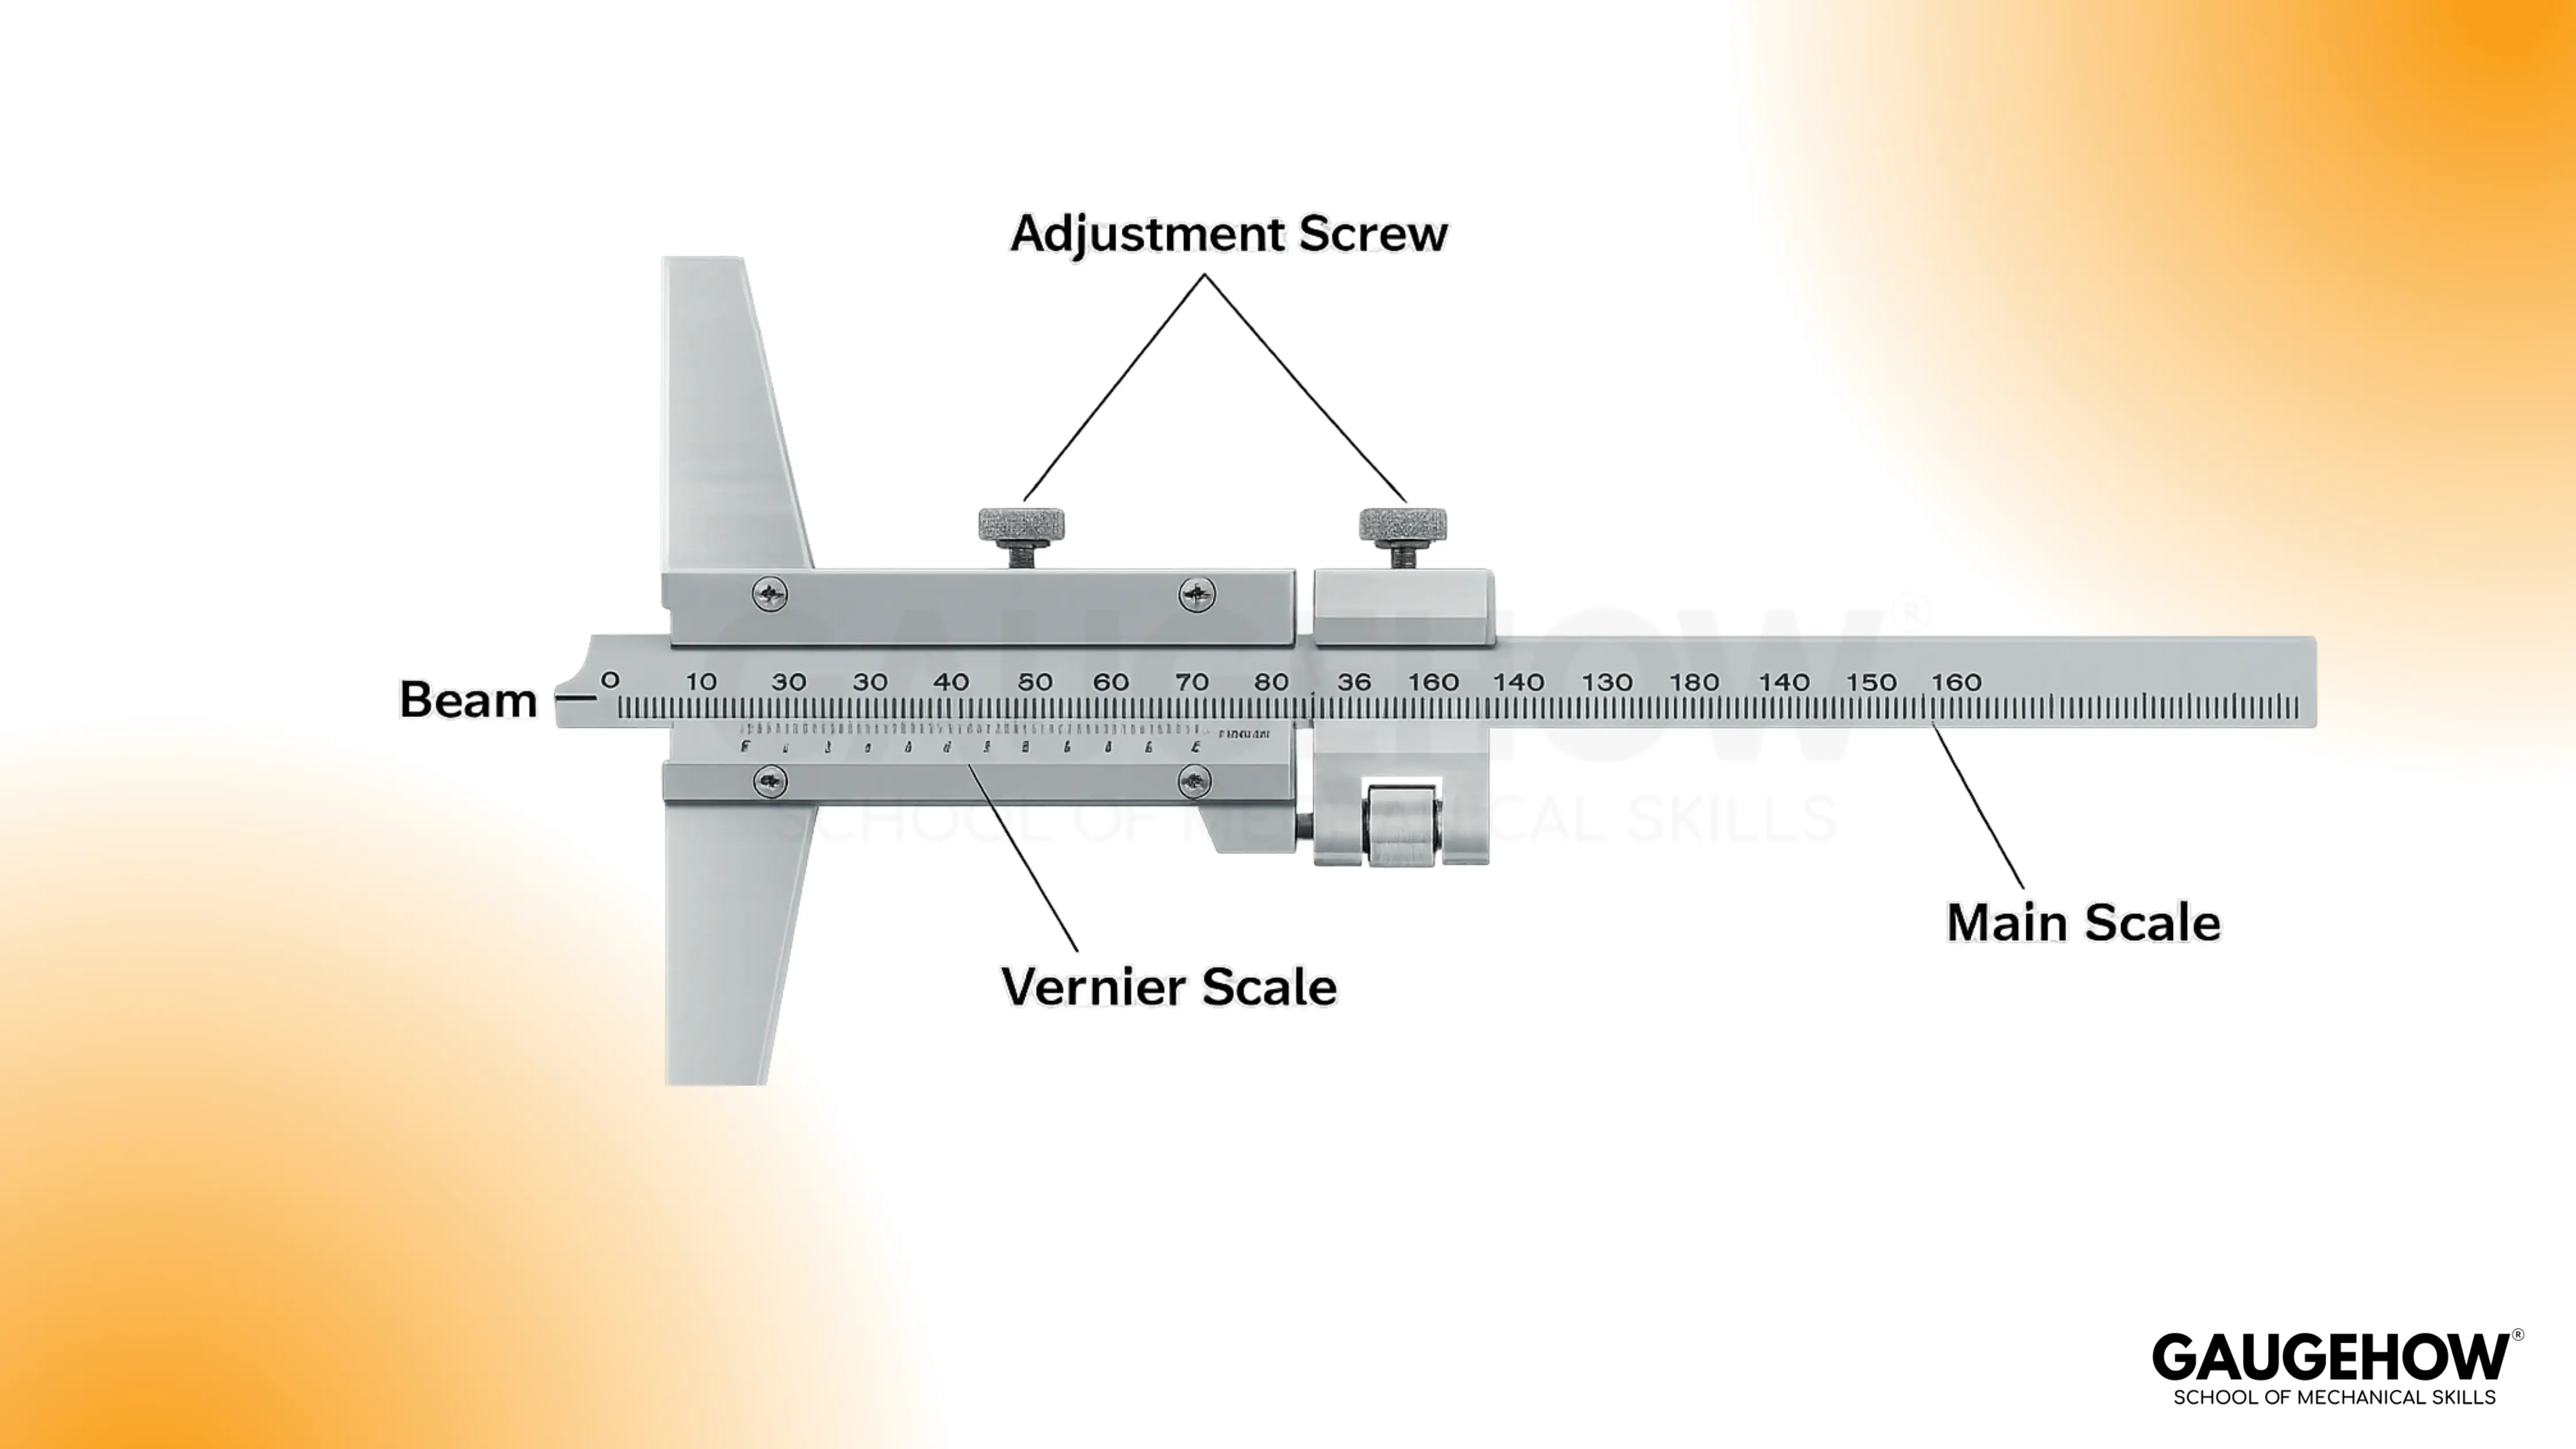
Vernier Depth Gauge Parts
The key vernier depth gauge parts are the ones that control datum seating, controlled sliding, and a stable lock.
Base (datum face): Provides the reference plane and supports the tool on the work surface.
Main scale (beam): Carries the primary graduations and keeps the slider aligned.
Vernier scale (slider scale): Provides the fractional reading by line coincidence.
Measuring rod or blade: Touches the feature's bottom and transfers depth to the slider position.
Clamp or locking screw: Holds the slider position during reading and lift-off.
Fine adjustment (if fitted): Allows a controlled approach to contact with less overshoot.
Vernier Depth Gauge Least Count
Least count is the smallest value an instrument can resolve from its scale system. It is a resolution statement, not a promise of overall measurement accuracy.
For training and shop calculations, vernier depth gauge least count is calculated using the vernier relationship.
Least count = Value of 1 main scale division ÷ Number of vernier divisions
Example:
1 main scale division = 1 mm
Vernier divisions = 50
Least count = 1 ÷ 50 = 0.02 mm
🔧 Trusted by 23,000+ Happy Learners
Industry-Ready Skills for Mechanical Engineers
Upskill with 40+ courses in Design/CAD, Simulation, FEA/CFD, Manufacturing, Robotics & Industry 4.0.
Working Principle And Reading
Vernier depth gauge working principle
Base: Defines the datum plane and must sit flat.
Slider: Travels on the beam and sets the rod position.
Vernier scale: Creates the fractional value by coincidence alignment.
Clamp: Holds position after contact without twisting the beam.
Two things stay true in every correct measurement. The base stays seated with no rocking, and the rod touches the bottom surface without side contact.
How to use vernier depth gauge
A consistent method beats a fast method. For most shop checks, how to use a vernier depth gauge comes down to seating, touch, and a clean read.
Wipe the base and the reference surface.
Seat the base fully so it is supported and does not rock.
Lower the rod until it just touches the bottom surface.
Lock the slider without twisting the beam.
Read the main scale at the vernier zero.
Find the vernier line that aligns with a main scale line and add the fraction.
Total Depth Definition:
Total depth = Main scale reading + (Vernier coincidence × least count)
Worked example (numbers only):
Main scale reading = 18.00 mm
Vernier coincidence = 7 divisions
Least count = 0.02 mm
Vernier reading = 7 × 0.02 = 0.14 mm
Total depth = 18.14 mm
Better readings come from controlled contact. Excess force does not improve accuracy. It usually introduces tilt, clamp shift, or rod digging on softer bottoms.
Types of vernier depth gauge
Types matter because they change speed, readability, and error risk, not because they change the measurement concept.
Analog vernier type: Choose this when durability and battery-free reliability matter, and the inspector is comfortable reading coincidence lines.
Digital type: Choose this when speed, low-light readability, and recording numbers quickly matter, especially in repetitive inspection.
Blade style vs rod style: Choose a blade style when a narrow slot floor needs better access, and choose a rod style when holes and circular features dominate the work.
Applications of Depth Gauge
In shop terms, applications of depth gauge include blind hole depth checks after drilling, counterbore steps before fastener trials, pocket floors before finishing passes, and step depths that affect assembly stack-up.
Application example | Control point | Setup detail | Common failure |
Drill depth on a blind hole | Clearance / bottom wall | Base around hole | Chips/coolant under rod |
Counterbore step depth | Fastener head seat | Based on clean face | Rocking on chamfer |
Pocket floor depth | Fit/weight | Base bridges pocket | Burrs lift base |
Slot floor depth | Key/insert seat | Based on solid land | Wall rub, reads shallow |
If the base cannot seat flat, the tool is being asked to do a job it cannot do. Tiny holes, narrow lands, or heavily textured faces often require a different depth tool or a different referencing method.
Depth Gauge Comparisons
Caliper depth rod vs depth gauge
A depth rod on a caliper works for quick checks, but it is not the same as a dedicated depth gauge. The dedicated base is an advantage because it creates a more stable datum.
Confusion is common around the phrase vernier caliper depth gauge, so it helps to separate the tools by their reference behavior rather than by their scales.
For narrow edges or a limited seating area, the caliper depth rod may be the only practical option. For repeatability across multiple parts, the dedicated base usually wins.
Depth gauge vs depth micrometer
A depth micrometer is preferred when tolerance is tight enough that seating behavior and contact control must be improved further.
A vernier depth gauge stays useful when the tolerance allows a fast, repeatable bench method with good seating conditions.
A simple decision gate works in most shops. Tight tolerance and formal inspection lean toward a depth micrometer. Fast process checks and general machining work lean toward a depth gauge.
Depth gauge vs height gauge
Depth measurement references down from a surface on the part. Height measurement references up from a surface plate or datum base.
A height gauge is chosen for layout, marking, and controlled vertical measurement against a surface plate. A depth gauge is chosen when the part surface itself is the datum.
Errors That Cause Rejections
Most errors look like clean numbers, then show up downstream as rejects, mismatch to drawing tolerance, or assembly fit issues. Each error has a common prevention habit.
Rocking base: A tilted datum increases apparent depth and can trigger false “too deep” calls. Better results come from measuring away from chamfers and removing burrs before seating.
Bottom fillet or radius contact: Contact on a radius reads shallow and can cause a false “not deep enough” correction. A simple fix is to confirm the rod is touching the true bottom plane, not a corner radius.
Side contact in narrow slots: Wall rubbing stops the rod early and reads shallow. A blade style or a cleaner approach path usually removes the side load.
Clamp shift: Slider movement during locking changes the number after contact. A light lock with steady hand pressure reduces the shift.
Excess contact force: Over-pressure flexes the beam or digs into a softer bottom, which creates inconsistent readings. Light contact and repeated seating produce more stable numbers.
Dirty datum face: Chips under the base add false depth and lead to scrap decisions based on a lifted reference plane. Clean the base and the seating face every time the reading matters.
Care And Calibration Notes
Good depth readings depend on a good base. Store the tool so the base does not get nicked. Keep the beam clean so the slider does not bind. Check zero behavior on a known flat reference surface before a run when the measurement drives a tolerance decision.
Light oiling on moving surfaces prevents stick-slip. Heavy oiling attracts debris, so a thin film is usually enough. Digital units benefit from clean battery contacts and a quick sanity check against a known depth standard.
One last reminder frames the tool correctly. When you understand What is a Vernier Depth Gauge as “datum plane plus bottom contact plus readable scale,” the process becomes repeatable instead of interpretive.
FAQs
How do you read a vernier depth gauge?
A correct read comes from seating the base flat, touching the bottom lightly, locking without shift, then adding the main scale reading to the vernier coincidence value times the least count.
What is the least count of a vernier depth gauge?
Least count is the smallest scale increment the vernier system can resolve. Many common metric vernier systems resolve 0.02 mm, but the correct value depends on the scale division design.
What causes different readings on the same hole?
Most variation comes from seating changes, chips at the bottom, side contact, or clamp shift during locking.
Is a vernier caliper depth rod accurate enough?
It can be adequate for quick checks, but repeatability is often lower because seating area is smaller and the datum is easier to disturb. That is why the vernier caliper depth gauge phrase leads to confusion, because the base behavior is the real difference.
Can a depth gauge measure step depth?
Yes, step depth is one of its cleanest uses when the base can sit fully on the upper surface, and the rod can reach the lower surface without edge rocking.


