Vernier Height Gauge: Purpose, Parts & Least Count

A vernier height gauge is a precision measuring instrument used to measure vertical heights and to mark accurate lines on a workpiece. It stands on a rigid base and runs on a surface plate, so the plate becomes your reference plane. A vernier scale on the slider lets you read fine fractions of a millimetre.
In metrology, the question What is a Vernier Height Gauge is best answered as: a reference tool that both sets a vertical dimension and transfers it onto the work.
Measurement is only half the value; the scriber carries that height to the job, so stability, squareness, and a clean setup control accuracy. Treat it like an inspection and layout in one instrument, and results stay repeatable.
Role | Best For | Typical Examples | Proof Check |
Vertical measuring tool | Accurate height from a flat datum | Step height, shoulder height, reference height checks | Wipe plate + base, seat fully flat |
Marking-out tool | Transferring a set height to a workpiece | Scribing a parallel line, layout lines from datum | Use light contact, don’t “push” the base |
Fine-reading vernier instrument | Small increments without electronics | Reading to 0.02 mm (typical), lab readings | Lock the slider before reading |
Comparator with attachments | Repeatable comparison, not just numbers | Dial indicator comparisons, matching parts | Zero on a master, re-check after clamp |
What is a Vernier Height Gauge
A vernier height gauge is a measuring and marking instrument that reads vertical distance from a datum surface. The datum is the surface plate. The slider carries a vernier scale and a scriber, so you can both measure a height and mark it on the workpiece.
The purpose is to measure a height from a reference plane and set the same height on the part for marking-out.
Key terms:
Main Scale Division (MSD): one division on the main scale, usually 1 mm.
Vernier Scale Division (VSD): one division on the vernier scale on the slider.
Datum: the reference plane, usually the surface plate.
Scriber: the marking tip used to touch and scribe the workpiece.
Height Gauge Diagram
The height gauge diagram is added below.
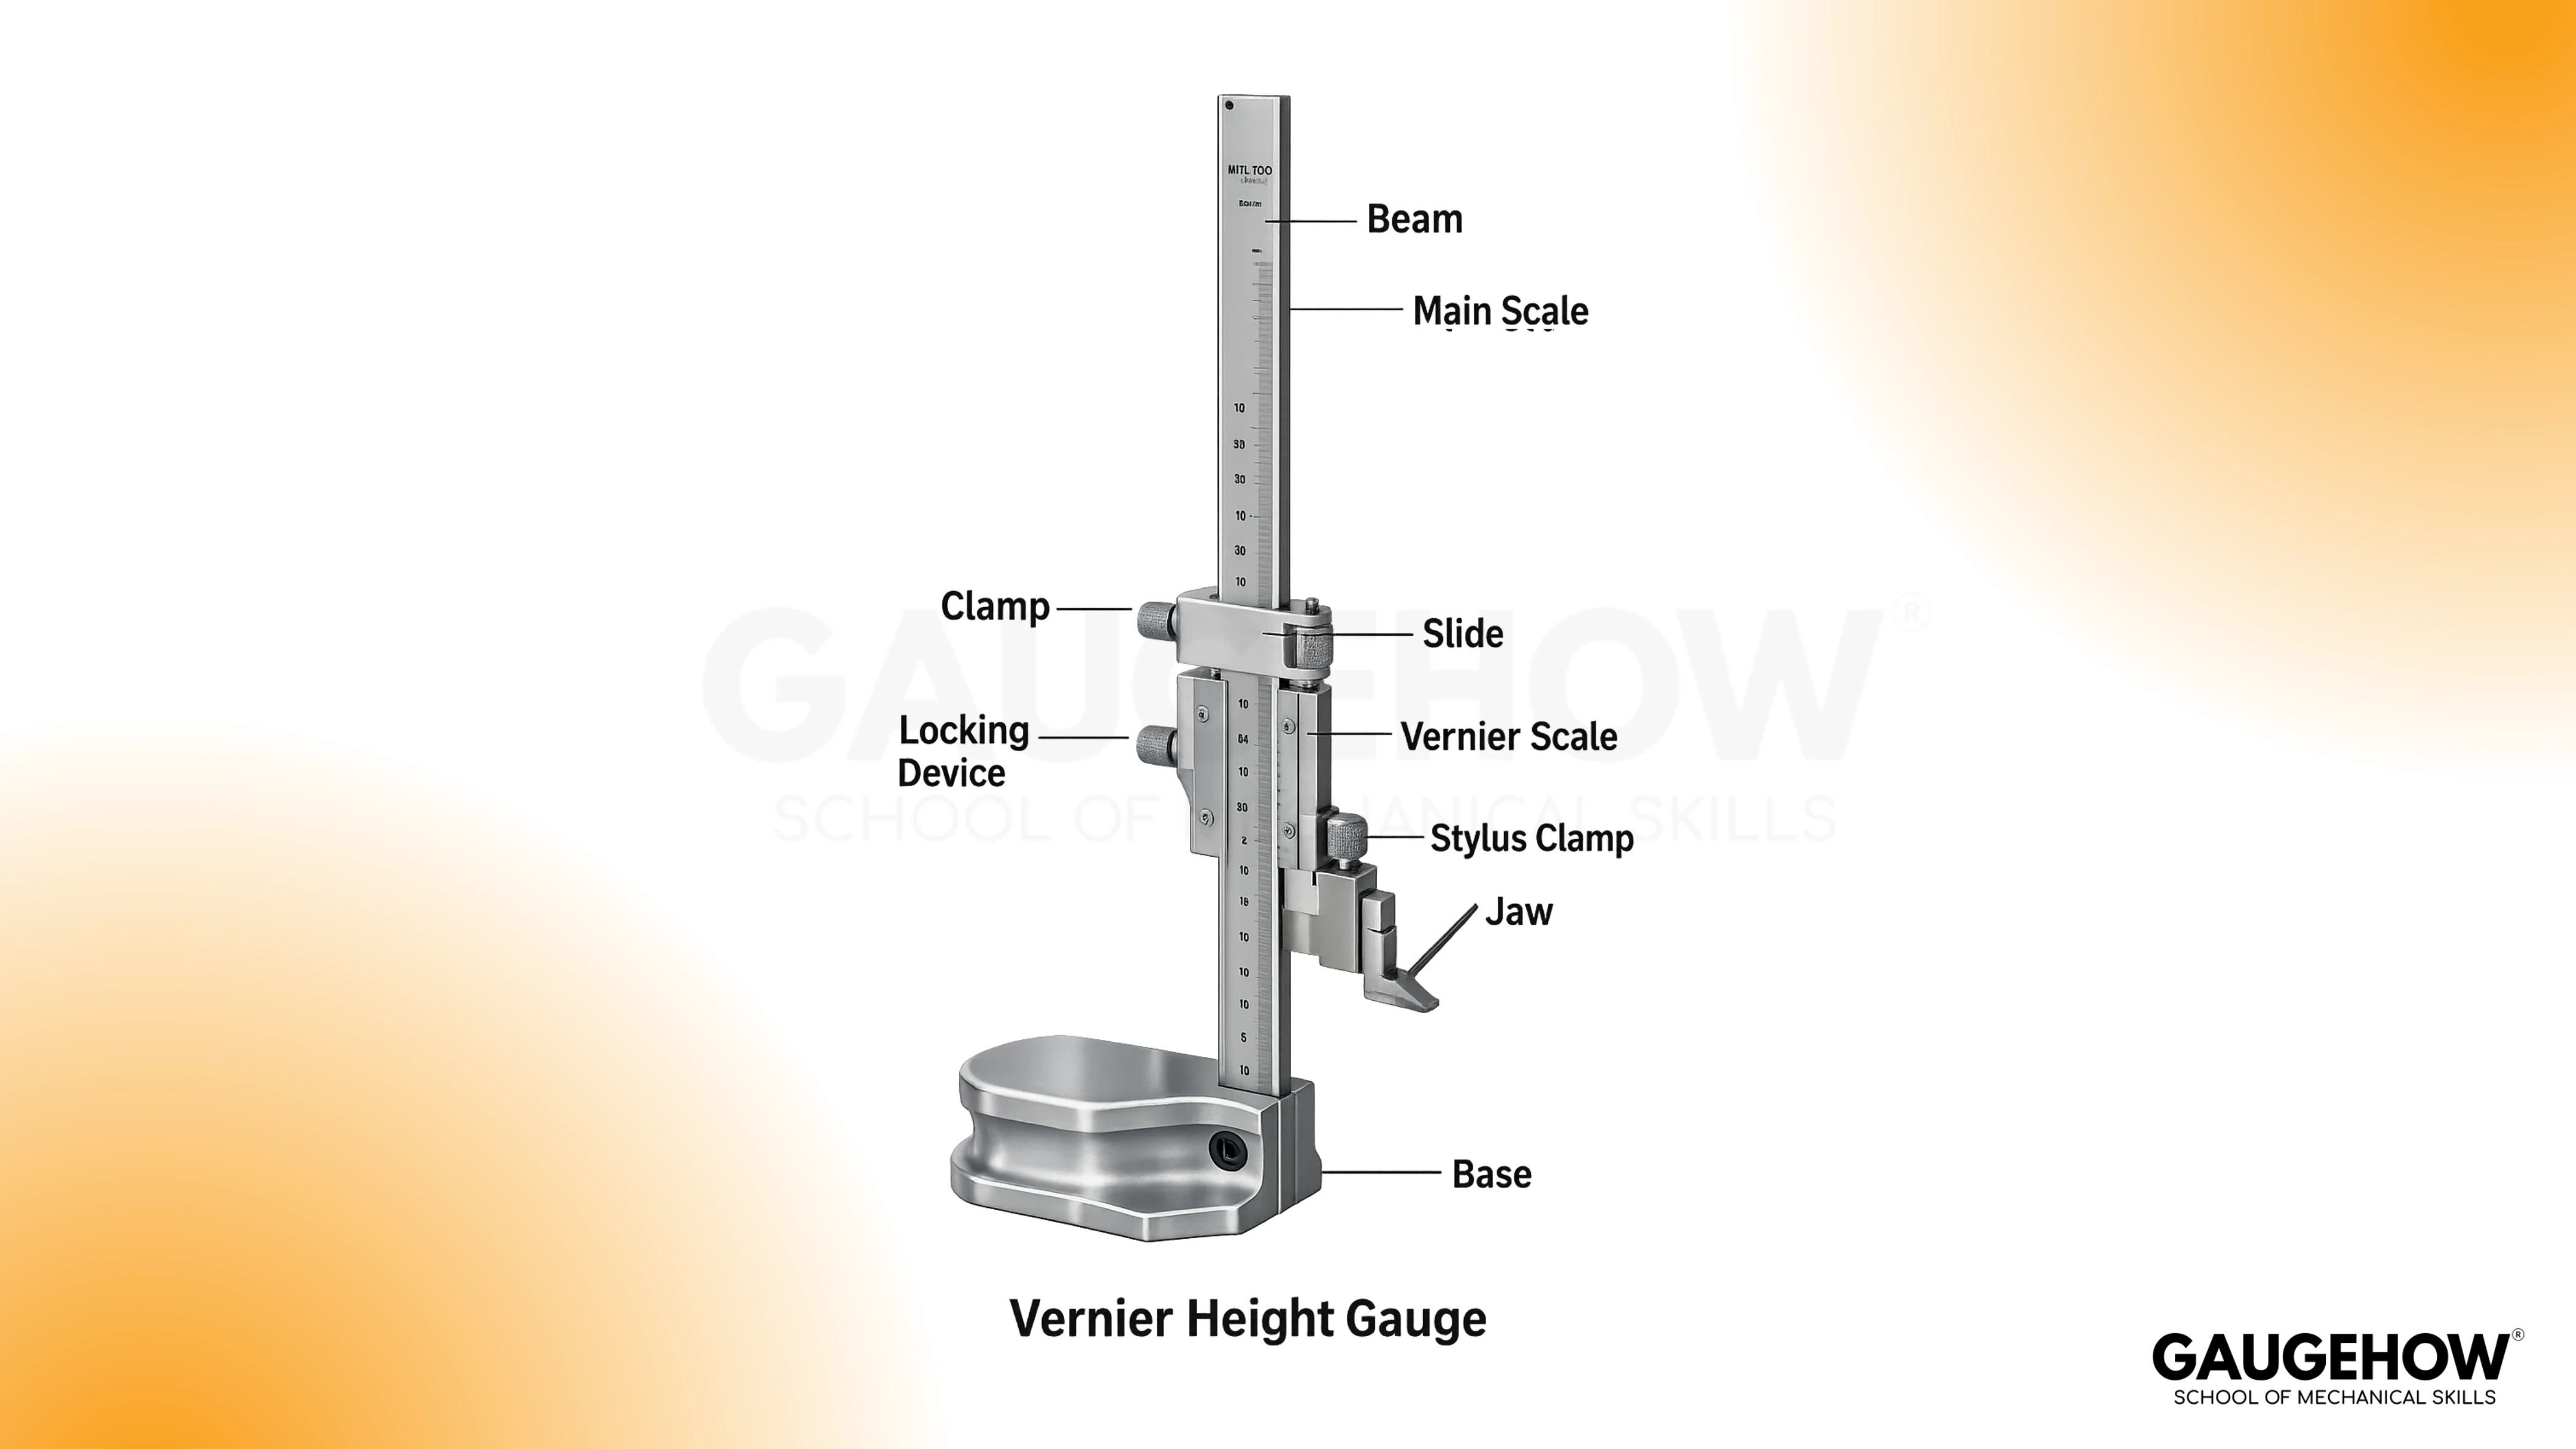
Parts of Height Gauge
In most lab records, parts of height gauge refer to the components that control stability, movement, and the marking contact.
Base: Provides stability and sits on the surface plate.
Beam or Column: Carries the main scale in vertical direction.
Slider (Vernier Head): Moves along the beam and carries the vernier scale.
Vernier Scale: Gives a fine fraction of the reading.
Clamping Screw / Lock: Holds the slider at the set height.
Fine Adjustment Screw: Allows slow, controlled movement near the final setting.
Scriber (Straight or Offset): Touches the workpiece for measuring and marking.
How It Works and How to Take a Reading
The working principle is simple. You slide the vernier head to a height. The main scale gives the whole millimetres. The vernier scale tells you the fractional part when a vernier line matches a main scale line.
Total reading formula
Total Reading = Main Scale Reading + (Vernier Coinciding Division × Least Count)
Reading steps
A clean method for how to read vernier height gauge uses the same sequence every time.
Seat the base on the surface plate.
Bring the scriber to the contact point with light touch.
Lock the slider so it cannot creep.
Note the main scale reading just below the vernier zero.
Find the vernier division that aligns exactly with a main scale line.
Multiply that division number by least count and add it.
Worked example 1
Main scale reading = 35 mm
Least count = 0.02 mm
12th vernier division coincides
Total reading = 35 + (12 × 0.02) = 35 + 0.24 = 35.24 mm
Height Gauge Least Count
In exam language, height gauge least count means the smallest change in height that the vernier scale can show. It is the resolution of the scale, not a promise of perfect accuracy under poor setup.
For most metric lab instruments, the question “what is the least count of vernier height gauge” is answered from the scale design. The common configuration gives 0.02 mm.
Least count formulas
LC = 1 MSD − 1 VSD
Or
LC = (Value of 1 MSD) ÷ (Number of vernier divisions)
Worked example 2 (least count)
Given:
1 MSD = 1 mm
50 vernier divisions coincide with 49 mm on the main scale
So, 1 VSD = 49/50 mm = 0.98 mm
LC = 1.00 − 0.98 = 0.02 mm
🔧 Trusted by 23,000+ Happy Learners
Industry-Ready Skills for Mechanical Engineers
Upskill with 40+ courses in Design/CAD, Simulation, FEA/CFD, Manufacturing, Robotics & Industry 4.0.
Errors in Height Gauge
Most wrong readings come from setup, not from the scale.
Zero error: Zero error exists when the scriber is on the datum surface, but the scale does not read zero.
Positive zero error: The reading is above zero at datum contact.
Correction rule: Corrected reading = Observed reading − zero error.
Negative zero error: the reading is below zero at datum contact.
Correction rule: Corrected reading = Observed reading + magnitude of zero error.
A lab note should state the sign and the correction clearly. That keeps your final value consistent.
The common failure modes
Parallax error: the eye is not normal to the scale, so the alignment looks false.
Creep error: the slider slips because the lock was not tightened.
Base-lift error: the scriber is pushed hard, so the base tilts slightly.
Dirt-under-base error: dust or chips rock the base and shift the datum.
Two-minute proof check (CLAP rule)
Use CLAP before you trust a reading.

In practice, the safest answer to the question “What is a Vernier Height Gauge?” is a stable reference system. A clean datum and a controlled touch make the tool behave like a measuring instrument, not a marking tool.
Vernier Height Gauge Uses
In real work, vernier height gauge uses fall into three outcomes: measurement, comparison, and marking-out.
1. Measuring height from a datum
You measure the distance from the surface plate to a feature, then record it as a vertical height.
2. Marking lines and steps on a job
You set a height, lock the slider, and scribe the line on the workpiece. This is the main workshop use.
3. Comparing heights with an indicator attachment
A dial indicator attachment turns the height gauge into a comparator. This is useful when you care more about repeatability than absolute reading.
Vernier vs Dial vs Digital
Type | Best For | Strength | Watch-Out |
Vernier | Exams, basic inspection | No battery, clear principle | Reading skill needed |
Dial | Fast shop readings | Quick to read | Dial backlash and handling |
Digital | Quick logging and speed | Direct display | Battery and zero discipline |
A digital vernier height gauge is worth it when you must record many readings quickly, or when operator-to-operator variation is hurting repeatability.
FAQ
1) What is the least count of vernier height gauge?
The least count depends on the vernier design. Many metric vernier height gauges use a 50-division vernier against 49 mm on the main scale, which gives 0.02 mm.
Always confirm it from the instrument itself. The scale or manual usually states the resolution.
2) How to read vernier height gauge?
Read the main scale first. Then find the vernier division that aligns perfectly with a main scale line. Multiply that division number by least count and add it to the main scale reading.
Locking the slider before reading prevents creep. Eye alignment prevents parallax.
3) Is a digital vernier height gauge better than a vernier one?
A digital unit is faster to read and easier to log. The measurement still depends on a clean surface plate and light contact.
Choose digital when speed and repeatability matter. Choose vernier when you want a simple tool with no battery, and you are comfortable reading a vernier scale.
4) Where can I find a Vernier height gauge drawing?
A standard lab diagram labels the base, beam, main scale, slider, vernier scale, locks, fine adjustment, and scriber. That is the drawing you should use for notes and viva.
If your instrument has an offset scriber, include it in the diagram. It changes how you approach edges and faces.
5) Can a height gauge measure depth?
A height gauge is designed for height from a datum plane, not depth inside a pocket. Some setups can infer depth by referencing a step or using attachments, but the clean method is a depth gauge or a suitable comparator arrangement.


