What Is a Sine Bar? Working Principle, Formula, Uses

In shop metrology, what is sine bar comes down to is a repeatable right triangle: a rigid bar with two rollers of known center distance L, one roller lifted by a slip-gauge stack height H. Sweep the top face with a dial indicator, then the angle θ is set or measured.
Bench role | Best-fit setup | Benefits | Pass proof |
Angle setup for grinding or milling | Sine bar + slip gauges + dial sweep | Standard-based, repeatable angle | Top-face sweep shows no drift |
Taper angle inspection | Level-top method + dial sweep | Angle measurement without a scale | Sweep stays consistent end-to-end |
Rigid holding during cutting | Sine table / sine vice | Locked angle under load | Angle holds after tightening |
Sine Bar
A sine bar is a precision angle device used in machining and metrology to set or measure angles using two standards: a known roller center distance and a known height built from gauge blocks. Once the top face is proven by a dial sweep, the setup becomes repeatable enough for serious inspection and setup work.
What is Sine bar
On a practical bench, it is a tool that converts gauge block height into an angle you can verify. Two rollers establish a fixed geometry, the surface plate provides the datum, and the dial indicator confirms the condition you actually care about: a stable, level reference surface at the chosen inclination.
Construction of Sine Bar
A sine bar is built as a rigid steel body carrying two equal rollers with parallel axes. Length is taken as the center-to-center distance between rollers, commonly 100 mm, 200 mm, or 300 mm, so calculations stay consistent and repeatable.
Rigid steel body and rollers
Rigidity keeps the top face stable under light loading, while roller parallelism keeps the geometry honest. Relief holes are often used to reduce weight without sacrificing stiffness.
Surface Plate
A surface plate provides the flat datum plane. Clean contact matters because a thin film under a roller shifts the effective height and mimics an angle error.
Dial Gauge
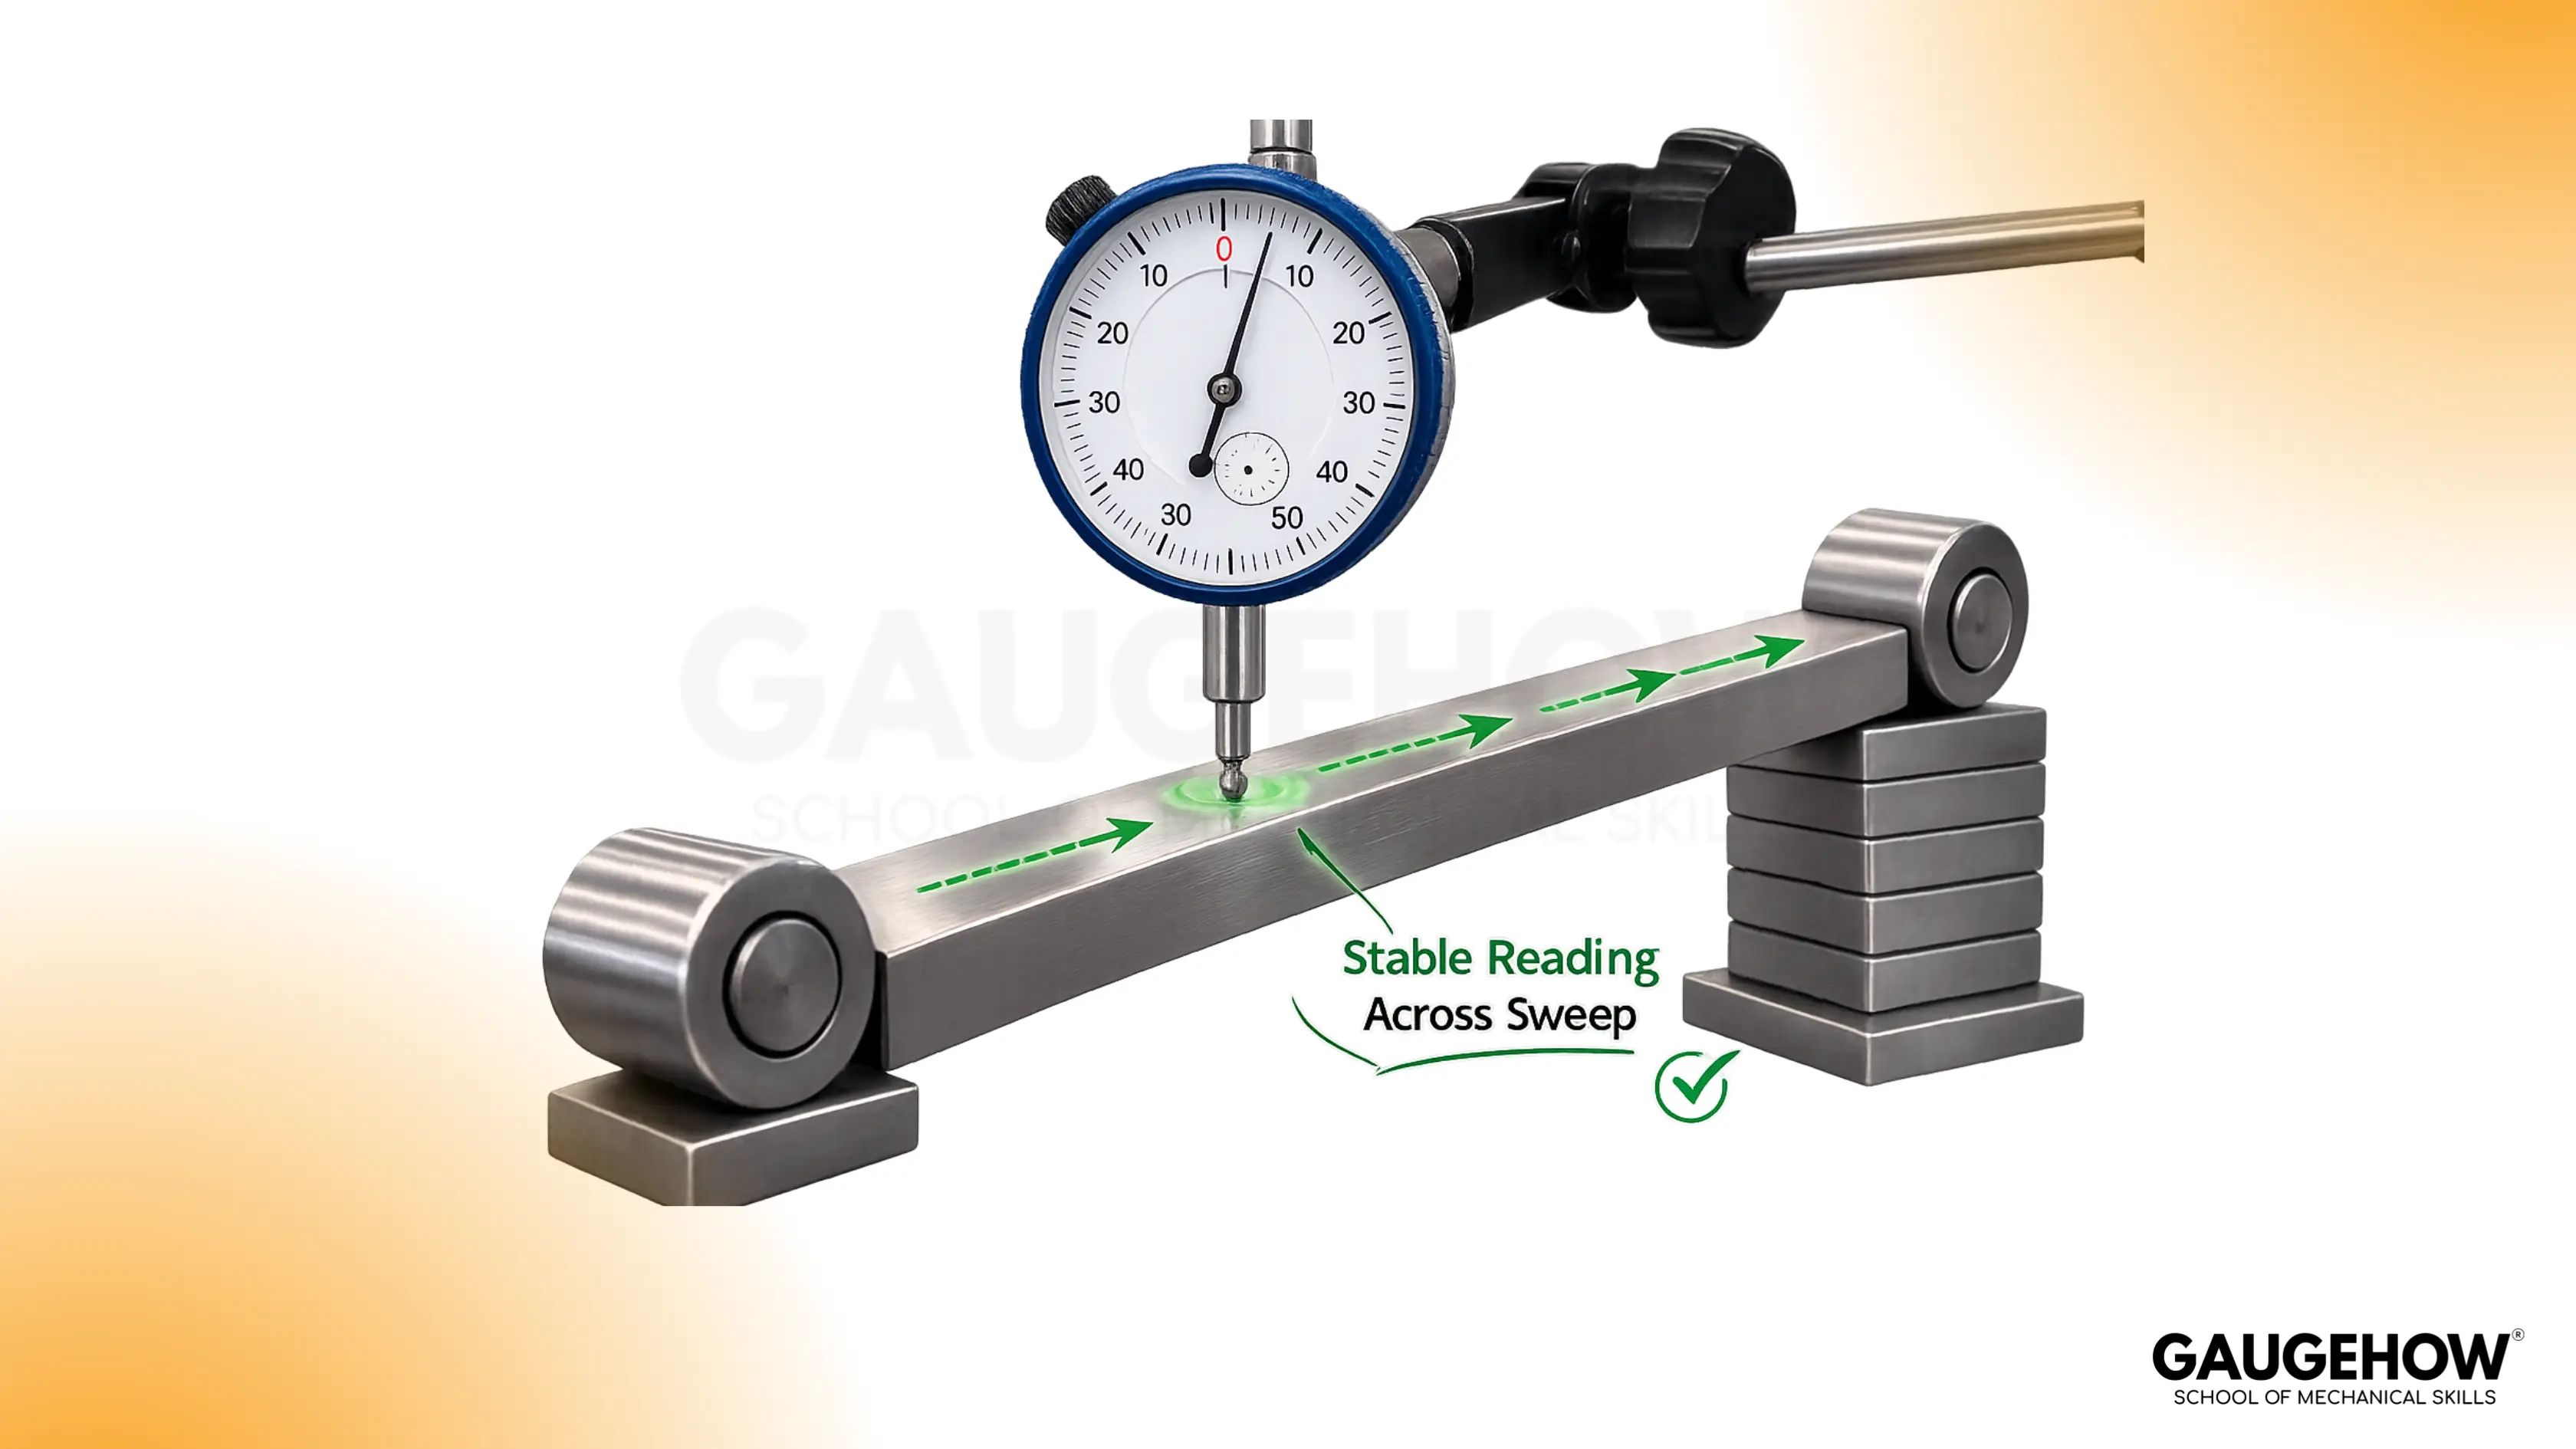
A dial gauge turns “looks level” into a measurable condition. Sweep consistency across the top face is proof that the setup is behaving as intended.
Block Gauges or Slip Gauges
Gauge blocks establish the height standard. Wringing quality and stack discipline usually dominate the real-world result more than the math does.
Vernier Height Gauge
A height gauge helps verify larger builds, confirm heights on bulky setups, and support inspection routines where you want redundant checks.
Working Principle of Sine Bar
The working principle is a controlled right triangle: one roller sits on the surface plate, the other roller sits on a gauge block stack. The sine bar length becomes the triangle length reference, and the gauge block stack becomes the height reference.
Triangle setup on a surface plate
Once seated, the top face becomes your working plane. A dial sweep across that face confirms whether the bar is truly “set” or only “placed.”
Sine bar formula
For the working triangle, the relationship is sinθ = H/L, where H is the gauge block height, and L is the roller center distance.
In practice, sine bar formula calculations are only trusted after a sweep shows stable readings across the travel.
Formula block
sinθ = H / L
H = L · sinθ
θ = sin⁻¹(H / L)
Where: H = gauge block height, L = roller center distance.
Sine bar Diagram
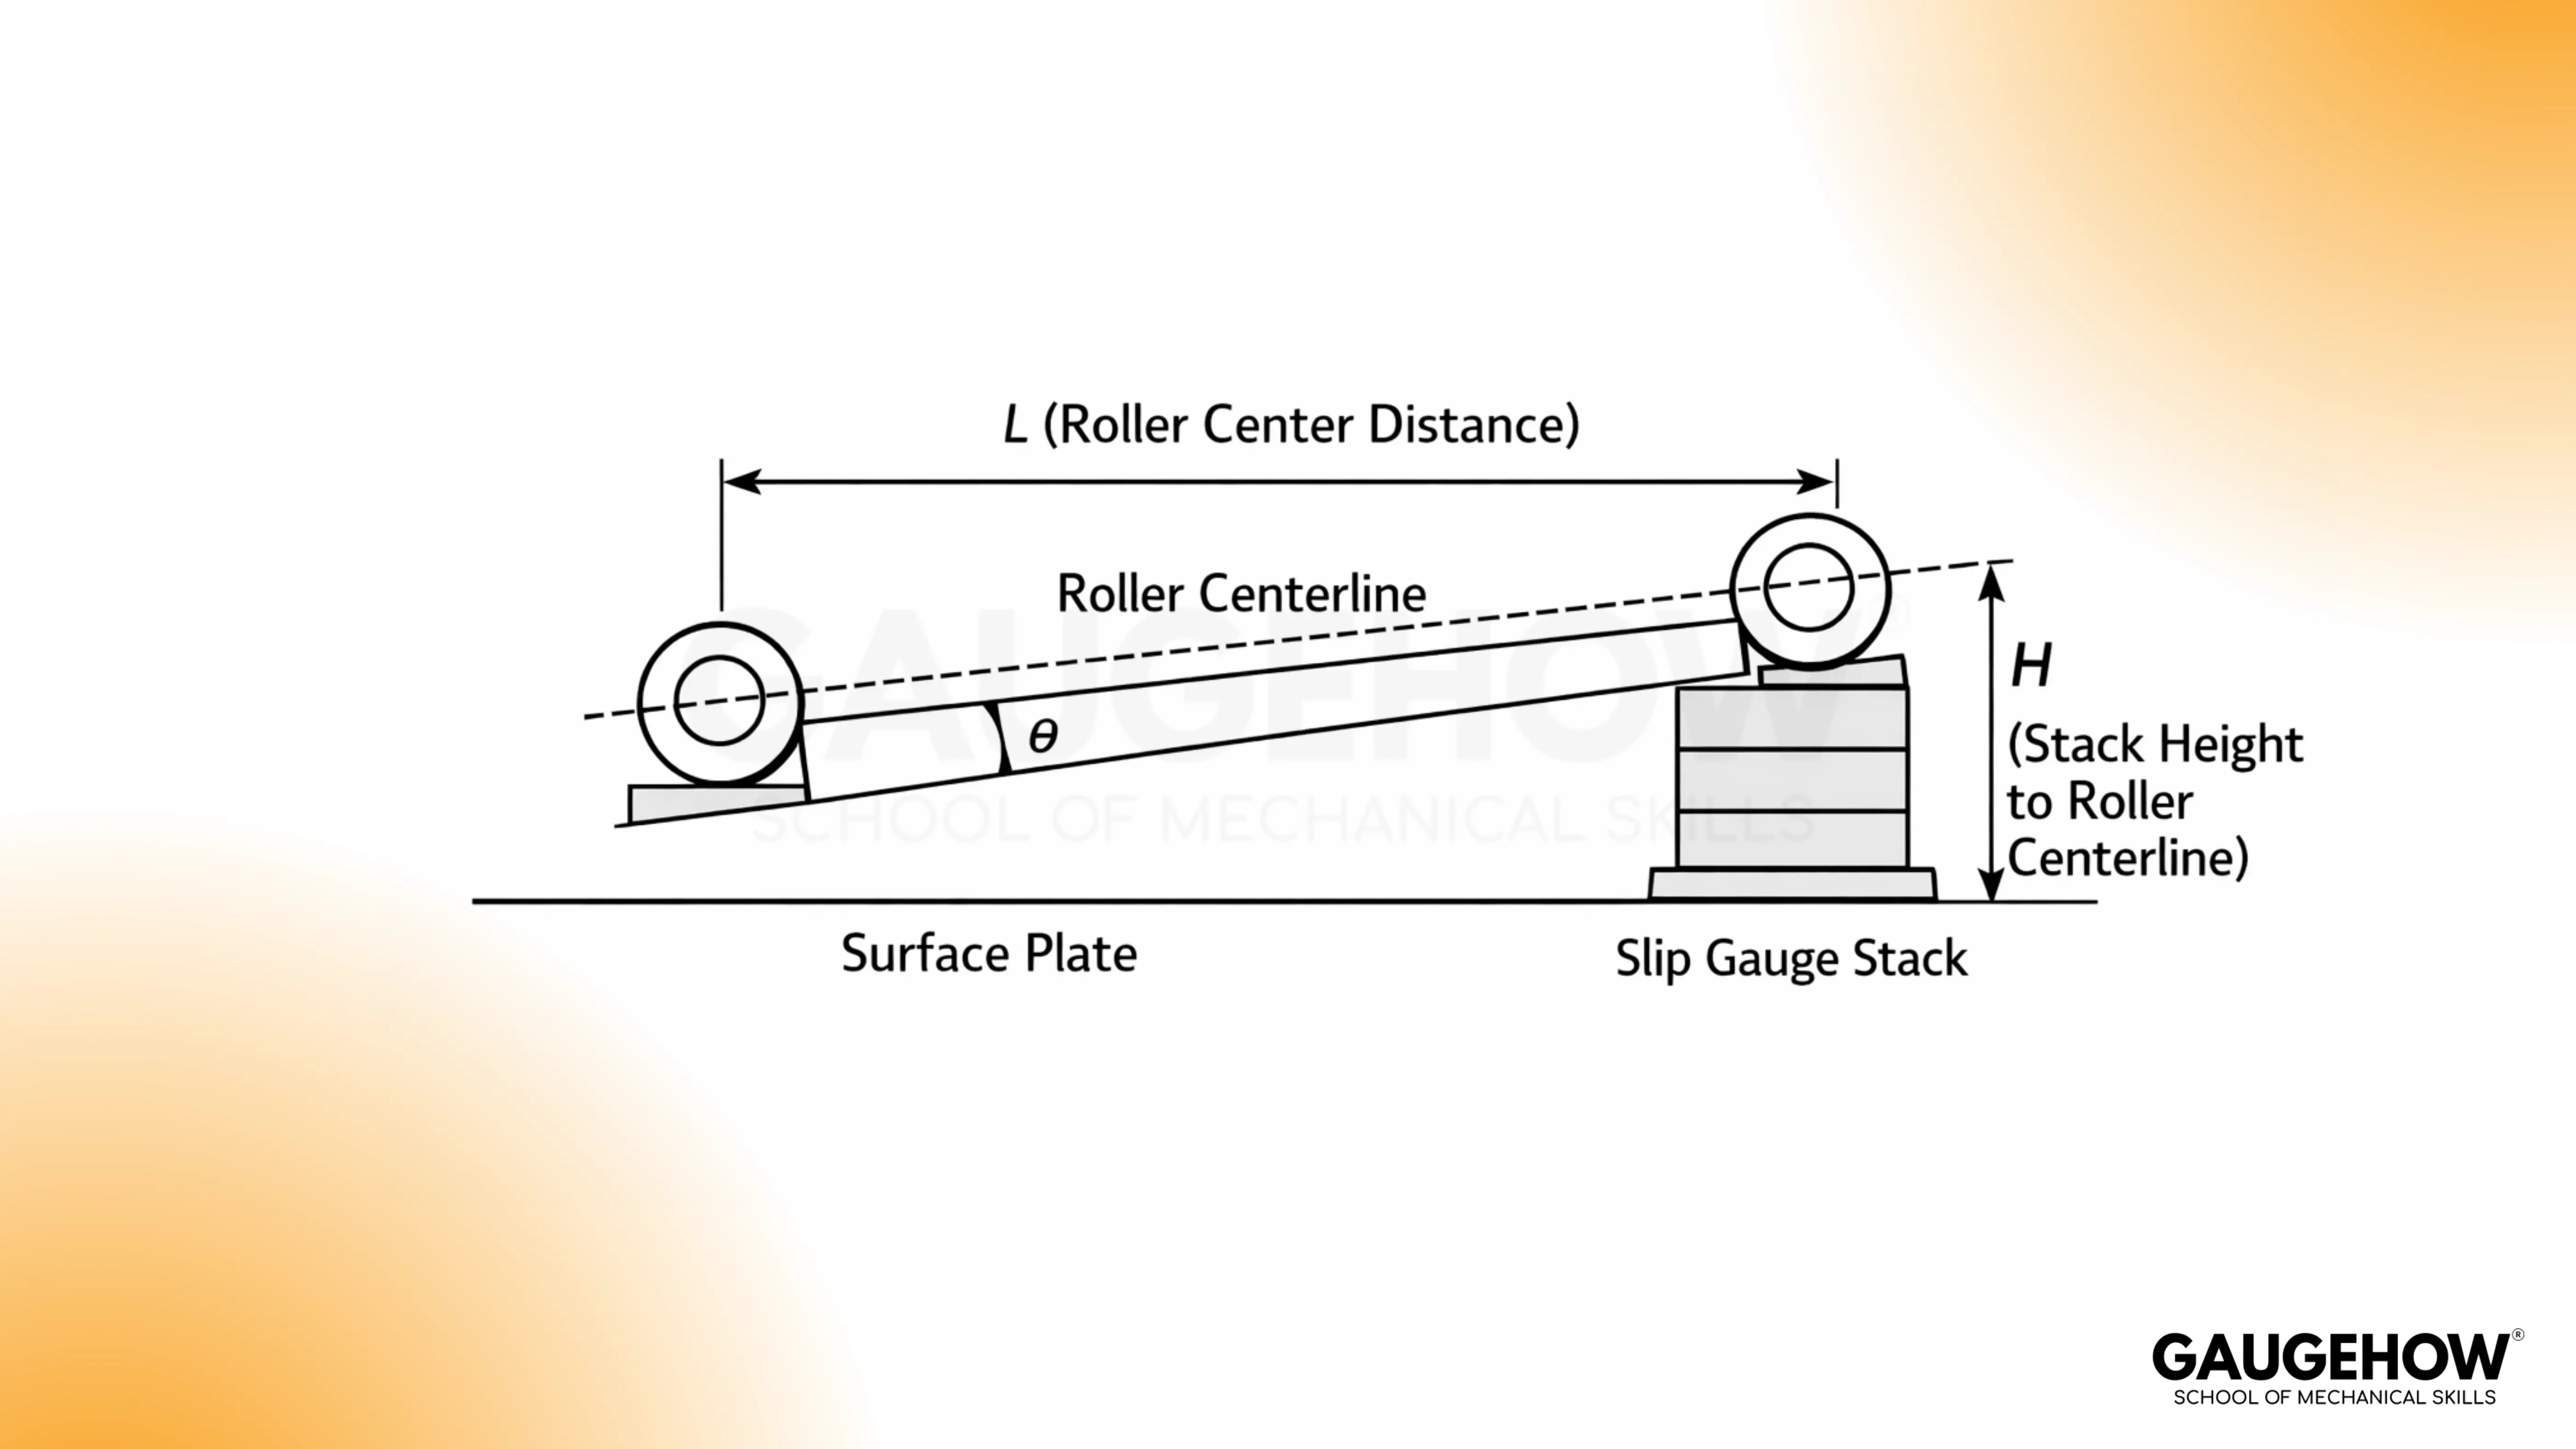
A clean diagram labels L (roller center distance), H (gauge block height), and θ (angle). The roller centerline is the reference that keeps measurements consistent, so sine bar diagram clarity should always show height taken to the centerline, not to the roller surface.
Sine Bar Master Setup: Slip Gauge Stack + Dial Sweep Proof
Bench authority comes from proof. After the height build is made, the dial sweep confirms whether the setup is stable enough to trust, and it also exposes small errors that would otherwise look “close enough.”
Setting a known angle
Clean the surface plate, rollers, and gauge blocks, then seat the bar gently.
Choose L and calculate target H, then build the stack with careful wringing.
Place the stack under one roller and allow the assembly to settle naturally.
Sweep the top face with a dial gauge across the usable length.
Pass condition: the indicator shows a stable reading across the sweep travel.
Measuring an unknown taper angle
Support the taper so it seats fully and does not rock during sweeping.
Raise one roller using gauge blocks until the top reference line can be swept.
Sweep along the taper direction and adjust height until readings stabilize.
Record H and compute the angle from the same triangle relationship.
Pass condition: the sweep remains consistent end-to-end along the measured line.
200 mm quick table for common setups
Use it as a fast starting point, then build the nearest stack your set allows and prove it by sweep.
Angle setting | Slip gauge height H (mm) |
5° | 17.431 |
10° | 34.730 |
15° | 51.764 |
30° | 100.000 |
45° | 141.421 |
Failure points that quietly ruin results
Failure point | Bench sign | Correction |
Dust film on contact faces | Sweep drifts in one direction | Re-clean, re-seat, re-sweep |
Weak wringing in the stack | Height changes after rebuild | Rebuild with firm writing, fewer pieces |
Roller wear or nicks | Sweep changes after rotating the bar | Inspect rollers, avoid damaged areas |
Wrong length reference | Numbers never match behavior | Use roller center distance, not diameter |
A single line separates a classroom setup from a shop-grade setup: treat the slip gauge stack height as the standard, then treat the sweep as the proof. A sine bar angle calculation example is finished only after that proof holds.
Sine Bar Accuracy Reality: Least Count, Sensitivity, and Practical Limits
Accuracy is a system result: bar length, gauge block resolution, contact condition, and your verification discipline. Better results usually come from cleaner contacts and tighter sweep practice, rather than from adding more digits to the calculation.
Sine bar Least Count
Least count is the smallest angle change your setup can resolve from your smallest practical height step.
For a 200 mm bar with a 0.01 mm height step, the small-angle resolution is about 0.0029°, roughly 0°0′10″.
In that range, sine bar least count feels real because small stack changes translate into visible, controllable results.
Sensitivity rises at steeper angles.
As angles increase, the same height error produces a larger angular error, so precision work is usually more stable at moderate angles. Cleaner seating and consistent sweep technique become more important as the setup gets steeper.
Practical limits on the bench
Large workpieces can be awkward to support, and high-angle builds can become tall and less stable. When setup rigidity becomes the limiting factor, a sine table or sine vice typically becomes the better choice.
🔧 Trusted by 23,000+ Happy Learners
Industry-Ready Skills for Mechanical Engineers
Upskill with 40+ courses in Design/CAD, Simulation, FEA/CFD, Manufacturing, Robotics & Industry 4.0.
Types of Sine Bar
Different types exist because work size, workholding, and geometry vary.
Sine Centre: Used for conical work with male and female centers, commonly used up to about 45° in typical practice.
Sine Table: Larger and wider, usually includes a locking mechanism for secure holding.
Compound Sine Table: Two sine tables at right angles, rotated as required for compound angles on larger work.
Difference Between Sine Bar and Protractor
A sine bar is trig-based precision built from standards and verification, while a protractor is scale-based general measurement. The decision is mainly about repeatability and proof, not about convenience.
Decision area | Sine Bar | Protractor |
Purpose | Sets and measures precise angles | Measures angles for general use |
Structure | Rigid body with two rollers | Graduated scale tool |
Precision | High, standard-based | Moderate, scale-based |
Companion equipment | Slip gauges, surface plate, dial gauge | Usually standalone |
Measuring range | Practical range based on setup stability | Broad range on scale |
Typical application | Machining setups, inspection | Layout, fabrication, general checks |
Specialist use | Tapers, calibration routines | Basic marking and checking |
Common users | QC, metrology, machinists | General trades and fabrication |
Advantages of Sine Bar
Reliable results come from standards-based geometry and verification.
High accuracy: Because the angle comes from length and gauge-block height standards, you can hit tight tolerances when the dial sweep proves the setup is stable.
Repeatable: Rebuild the same slip gauge stack, seat the bar the same way, and the sweep will return the same result across jobs and operators.
Versatile: It handles both angle setting and angle measurement for flats and tapers, so one tool covers a lot of bench work.
Simple operation: The method is straightforward: calculate height, build the stack, sweep the top face, then lock in the setup.
Cost-effective: Compared to higher-end angle instruments, it delivers serious precision using basic shop standards you likely already own.
Limitations of Sine Bar
Limits are driven by setup dependency and sensitivity.
Limited by length for certain angle builds: With a fixed roller center distance, some angles demand a height stack that becomes impractical or unstable for the bar you’re using.
Needs slip gauges and supporting tools: The sine bar is only as good as the ecosystem around it, so gauge blocks, a surface plate, and a dial indicator are part of the job.
Not ideal for very small or very large angles in demanding precision work: At the extremes, either the height change is too fine to prove confidently, or the setup becomes too tall and sensitive to tiny errors.
Wear or damage affects accuracy: A nicked roller, bruised contact face, or worn surface quietly changes the geometry and shows up as poor repeatability long before it looks “bad.”
Setup is more complex than a simple protractor: You don’t just read a scale, you calculate, build a stack, seat the bar properly, and verify by sweep to earn the accuracy.
Care and calibration habits
Cleanliness and contact integrity keep the tool fresh without bloating your routine.
Cleaning contact faces
Before any build, wipe the surface plate area, rollers, and gauge blocks. Even a thin film under a roller can shift the effective height enough to show up as a repeatability problem.
Roller wear awareness
Rollers should be smooth and consistent. If the dial sweep changes after rotating the bar, contact condition is no longer stable enough for critical work.
Storage discipline
Store the bar dry in a protective case and keep gauge blocks protected. Periodic checks using a known height build and repeated sweep behavior preserve trust in the tool.
Uses of Sine Bar
Most real applications fit into setup, inspection, or calibration.
Precision angular measurement in machining
Aligning workpieces at specific angles
Verifying flatness and parallelism of surfaces
Accurate setups in manufacturing and engineering
Calibration support for other measuring instruments
On tight work, what is sine bar is worth is repeatability you can prove on the spot, without guessing whether a scale reading is “close.”
FAQs
1. Preferred angle range for high-precision bench work?
Moderate angles are typically preferred because sensitivity increases at steeper settings. Clean contacts and sweep stability usually decide the outcome.
2. Dial sweep purpose during setup?
Sweep consistency proves the top face is stable at the chosen inclination. Without that proof, the calculation alone is not trustworthy.
3. Most common reason repeatability fails?
Contaminated contact faces or a weak gauge block build. Small seating errors often look fine, but refuse to repeat.
4. Longer bar benefit in daily use?
Longer bars improve resolution for the same height step, so angle changes become easier to control and verify at moderate settings.
5. Fast check before a critical inspection job?
Rebuild the height, re-seat the bar, then re-sweep. Consistent readings across rebuilds indicate the setup remains dependable.


