SpaceClaim Volume Extract For CFD: Tutorial And Fixes
Volume Extract builds your CFD fluid body from CAD wall faces. Spaceclaim volume extract succeeds when openings are deliberate, and contacts truly intersect.
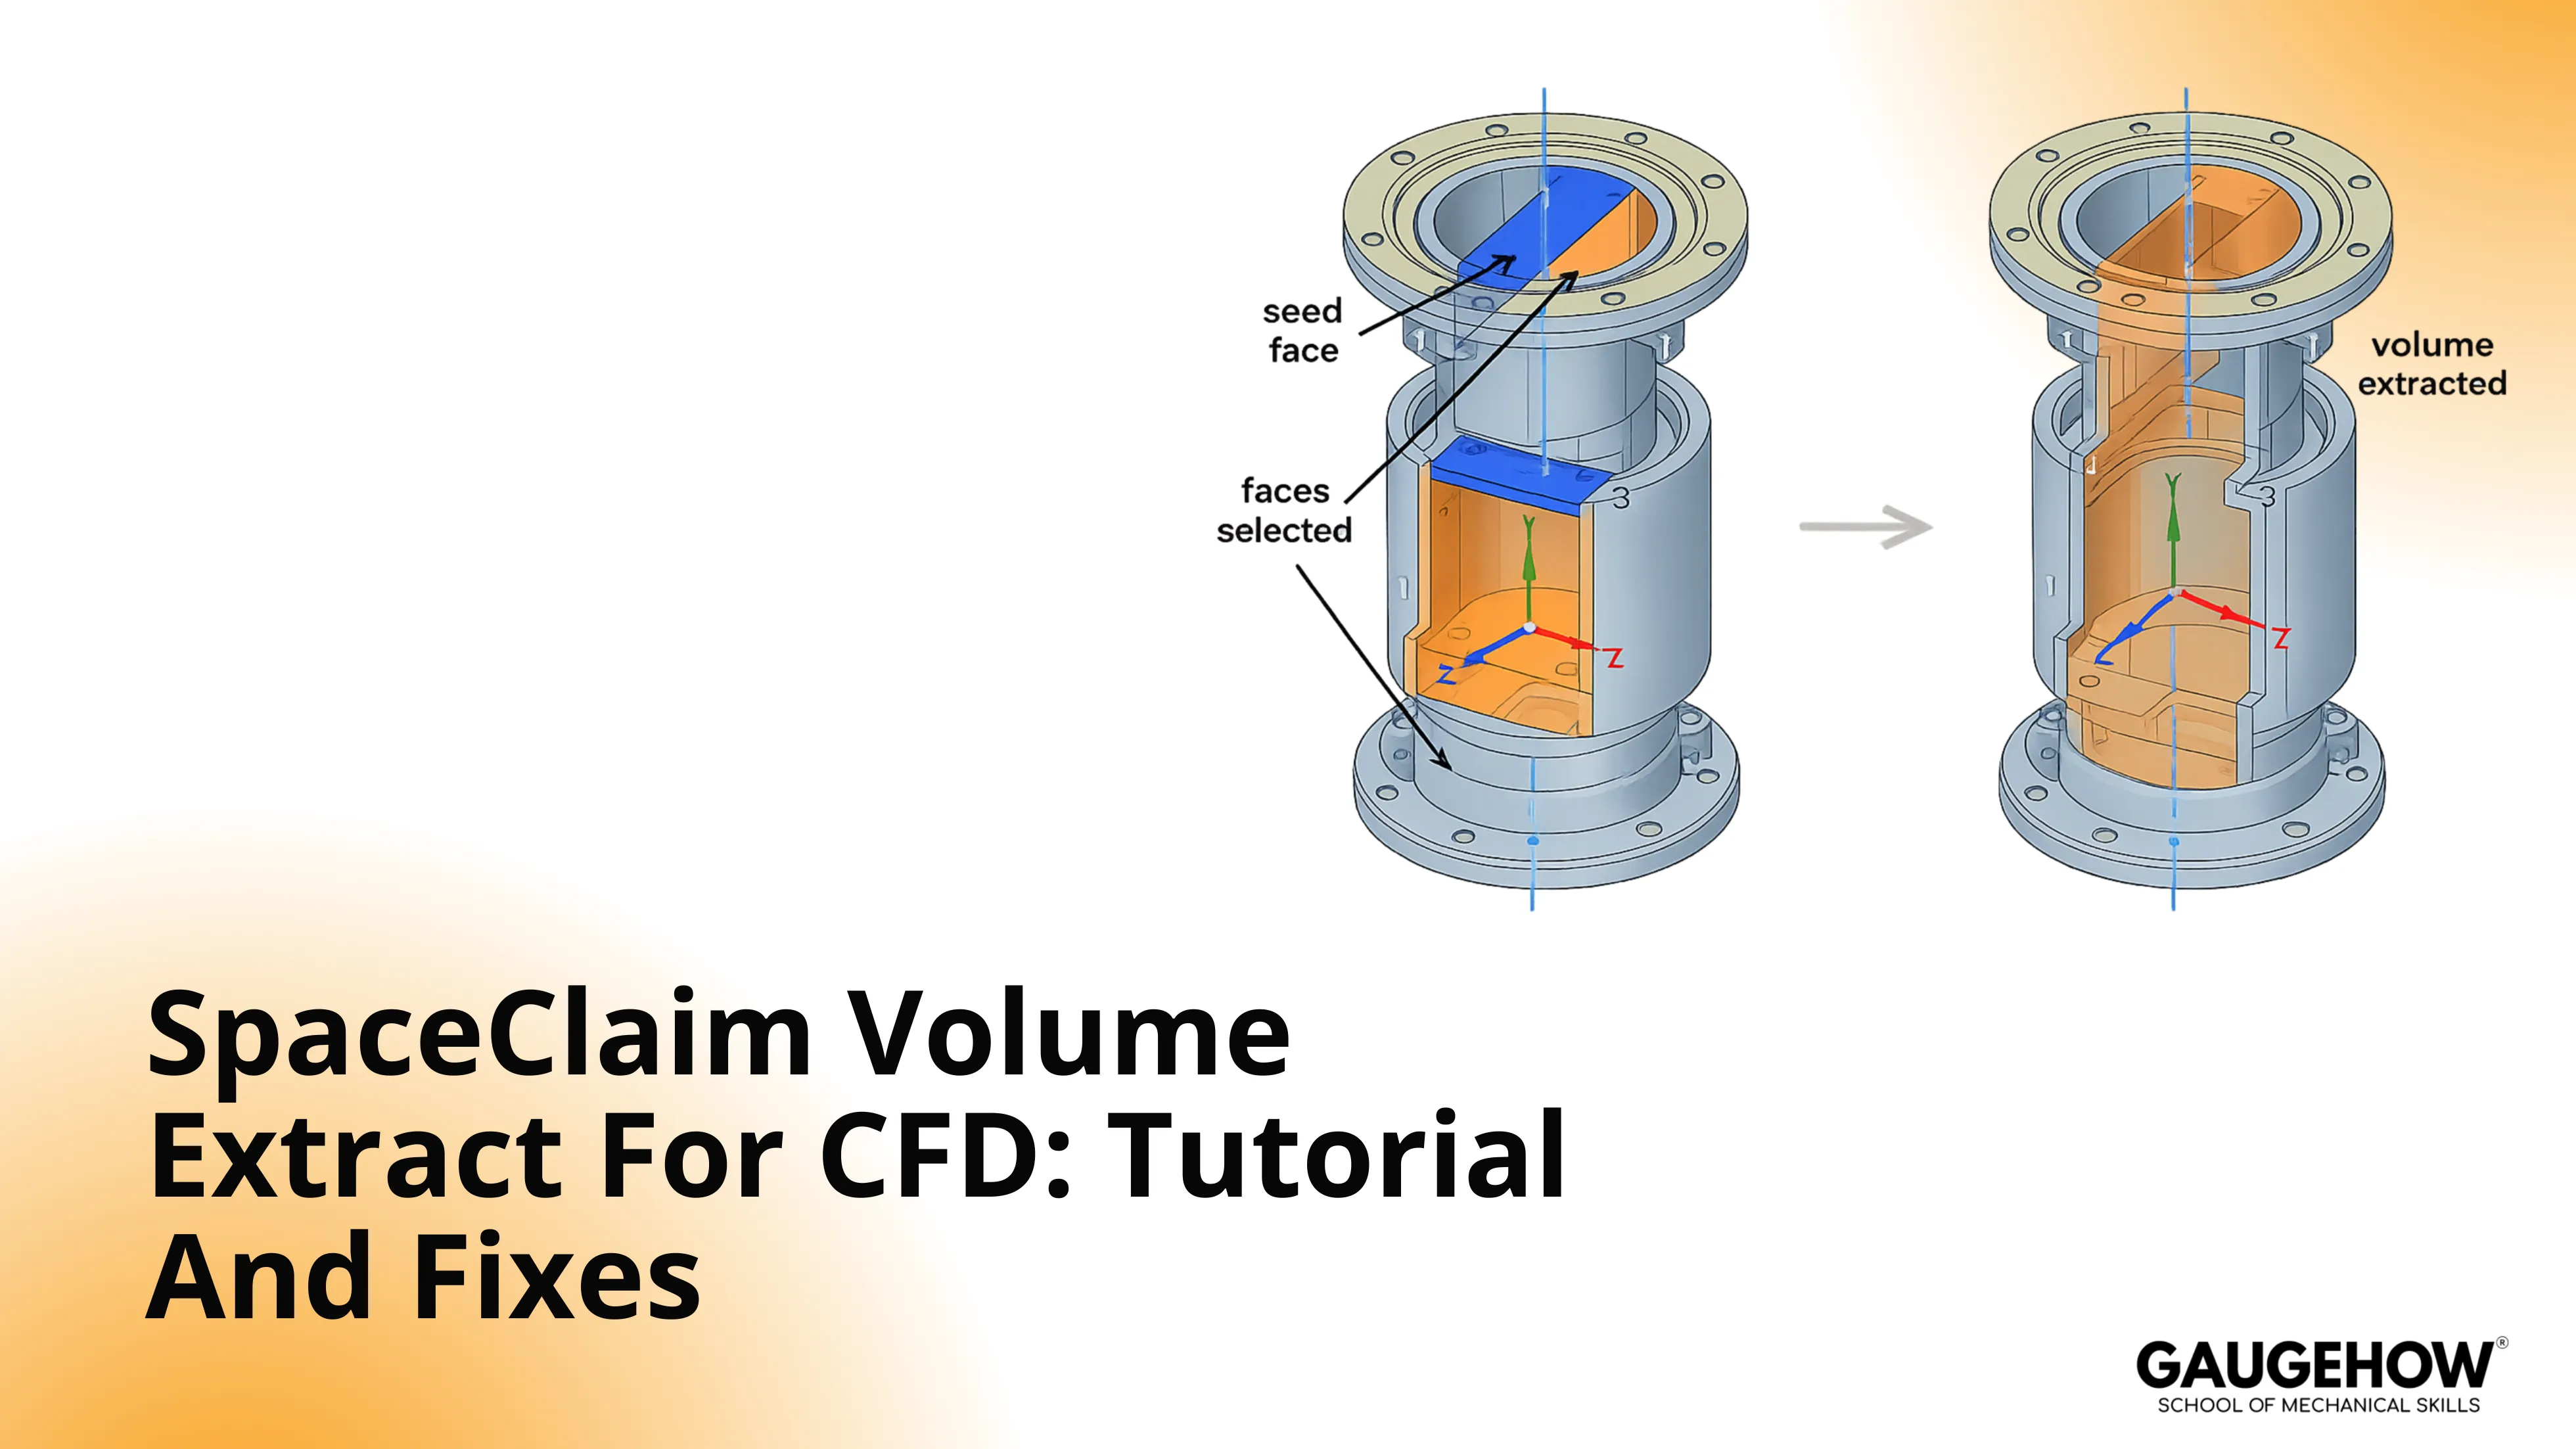
Set a seed face to lock the cavity, use inside-face preview to spot leaks, then cap openings into clean boundary faces.
Volume Extract works fast when the model is clear. Small gaps, tangent touches, and split opening faces confuse the inside region. That is why the tool escapes, creates extra volumes, or quits.
This walkthrough shows the exact clicks, the selection choices that matter, and the proof cues on preview and section view. Follow it once and reuse it on every valve, duct, and manifold.
How To Run SpaceClaim: Volume Extract
Open the Prepare tab, then go to Analysis. Click Volume Extract, and keep the Options panel visible. The command builds a fluid solid from wall faces, so openings and contacts must be clear.
Pick Faces when the opening is one continuous face. One click should select the full inlet, so the boundary stays stable. This choice prevents later edits from splitting your inlet selection.
Pick Loops when the rim is cleaner than the face. Double-click the rim to select one closed loop, not fragments. This avoids loop breaks caused by imports and tiny blends.
Use Seed Face when two cavities could both exist. Place the seed on a flat wall inside the main passage. This anchors the inside region, so it doesn’t drift into pockets.
Use Cap Faces when the opening boundary keeps splitting. Caps create one boundary face, so naming stays consistent. That also stabilizes meshing at the opening.
Step 1: Prep The Model
Hide parts that the fluid never touches, along with cosmetic details. Fasteners and micro fillets multiply faces, so openings fragment. Fewer faces mean faster selection and fewer extraction surprises.
Make openings deliberate before running the command. Leave real inlets and outlets open, but close pinholes. A tiny gap behaves like an outlet, so inside escapes early.
Fix tangent touches where bodies only meet without overlap. A touch can look sealed, but it still leaks. Create a real intersection, or merge the interface into one wall.
Open a section view before you start the extract. Walls should read continuous, and openings should look intentional. Any “almost closed” seam will show up as a preview escape.
Step 2: Openings and Seed: extract fluid volume spaceclaim
Start Volume Extract from Prepare → Analysis, then choose the mode first. Select openings next, and place the seed after that. The order matters because mode changes what selection means.
Under this step, extract fluid volume spaceclaim by selecting only true inlets and outlets. Avoid “nearby” faces that look connected in shading. Those picks shift the boundary, so the cavity changes.
After selection, place the seed on a calm internal wall surface. Stay away from the junction throat, because pockets live there. Accept the result, then isolate the new volume body.
Section the volume along the flow path centerline. One continuous internal solid should fill the passages. Outside blobs or thin sheets mean the boundary still leaks.
Step 3: Leak Finding: preview inside faces volume extract
Turn preview on before you accept the operation. Preview shows where inside can travel, so repairs stay local. That saves time because you fix the first leak point.
Use preview inside the faces volume extract by moving the slider slowly. Stop at the first wrong growth location you can see. That location is the leak path you must repair.
Keep the view simple while hunting the leak. Hide blocking bodies, then run a section cut. Leaks show faster in the section than in exterior shaded views.
Step 4: Boundary Control: cap faces volume extract spaceclaim
Use caps when the opening edge chain is fragmented. A cap gives one boundary face, so selection stays stable. This also prevents boundary naming from changing after updates.
Apply cap faces volume extract spaceclaim only at true openings. Build the cap simply and align it with the opening plane. Avoid crossing small blend rings near the rim.
Click the cap and watch the full face highlight. Click the rim and watch a continuous loop highlight. Section the edge and check for a clean closure line.
Worked Example: Two Inlets, One Outlet Manifold
Take a mixing manifold with two side inlets and one end outlet.
Start with Faces mode. Each opening is planar, so each one should be selected in one click. Select inlet one, inlet two, and the outlet face.
Then seed on a flat internal wall in the main passage, not on the junction blend. That placement keeps the seed away from small trapped volumes that sit near intersections.
Turn preview on. Move the slider. Inside should grow through the main passage and stop at the three openings. Nothing should appear on the outside faces of the block.
Nothing should jump into bolt pockets or casting voids. Outside growth points to a seam or kiss contact along the wall. Multiple growth fronts point to multiple cavities.
Accept the extract and isolate the fluid body. Section it down the centerline. The section should show one continuous volume that occupies the passage, with three clean boundary faces at the openings or caps. No extra “rooms.” No thin sheets. No external blobs.
Capture three screenshots while it’s clean: opening selections, seed face placement, and preview at mid-slider. Those images make later debugging fast.
What Wrong Output Looks Like
Outside growth usually appears as a fluid blob on the exterior wall. That happens when inside escapes through a seam, a micro-gap, or a tangent touch that never formed a real intersection.
Preview shows the first escape point. That location is where topology is open.
Multiple volumes show up when two cavities are valid. Jacket voids, bolt pockets, trapped internal pockets, and thin clearances act like separate rooms.
Without a seed, the tool can split the extraction. With a poor seed, it can lock to the wrong room.
Shredded cap rims look like a cap face surrounded by a jagged ring of tiny faces. That comes from capping across blends or micro steps. Meshing then fails at the rim because edge lengths collapse into slivers.
Fixes And Repairs When It Fails
When the spaceclaim volume extract fails, the boundary is not topologically decisive. Repairs must change intersections, seams, or face fragmentation. Clicking different faces does not solve topology.
Start by repairing the first preview escape location. That point tells the truth.
Stitch closes gaps that exist as separate surface boundaries. Use Stitch when edges look aligned but are not joined. After stitching, the preview should stop leaking at that seam.
Merge Faces removes tiny face islands and reduces fragmentation. Use it around openings and caps when selection breaks into patches. After merging, a single click should pick the whole opening face or cap face.
An imprint forces a real intersection where two faces overlap but do not produce a reliable shared edge. Use imprint when a contact looks correct but behaves like a pass-through.
After imprint, the intersection should show as a stable edge, and the preview should stop slipping through the interface.
Rebuild the cap when the rim generates slivers. Delete the noisy cap and recreate it as a simpler surface that avoids crossing blends at the perimeter. Clean perimeter beats perfect curvature for CFD boundaries.
Eliminate kiss contacts by creating an overlap or a true intersection. Adjust one side so the faces cut each other, rather than “kissing.” That change closes the leak path at the topological level.
What You Should Hand Off
One fluid body. Clean inlet and outlet faces that select quickly. Caps that stay as single faces. A section view that shows one continuous volume with no pockets and no exterior growth.
Save three proof screenshots for handoff: seed face used, first clean preview state, and a section cut through the final volume. Those artifacts prevent rework when the model updates.
Escalation Path When It Still Fails
Capture three things and stop guessing. Save the seed face location. Save the first preview escape location. Save a section cut through that failure zone. Those three images make the topology break visible, so the fix stays small and targeted.
FAQ
1) Why Does Volume Extract Choose The Wrong Inside?
Two cavities exist, and both look valid. A seed face anchors the intended cavity,y so extraction grows in the right room.
2) What Finds A Tiny Leak Fastest?
Preview with a slow slider shows the first escape point. Repair that local seam or contact, then rerun the preview from the same seed.
3) Leave Openings Open Or Add Caps For CFD?
Leave openings open when they represent real inlets and outlets. Add caps when the opening boundary is fragmented and needs one stable face for boundary naming and meshing.
4) Why Do Tangent Touches Break Extraction?
A tangent touch looks closed, but does not create a robust intersection edge. Inside can slip through that contact. Change the contact into a real intersection or merge the interface.
5) What Should Be Checked Before Exporting To Meshing Or Fluent?
Look for one fluid body, stable boundary faces, preview containment, clean cap rims, and a section view without trapped pockets or side volumes.
CAD-CAM-CAE Work Platform
Find or Post CAD, CAM and CAE freelance projects, full-time jobs and Internships.
GaugeHow is the platform built for core engineering work. Whether you need a freelancer for a CAD project, a full-time hire, or an engineering intern,post it here and get matched with the right person.


