Ultimaker Cura
What Is Cura

What Is Cura? A Simple Guide for Students and First-Time 3D Printers
You designed a cool model. Now what? Your 3D printer can't read that file directly — it needs step-by-step instructions. The tool that creates those instructions is called a slicer, and the most popular one in the world is Cura. Let's break down what it is and how to use it .
Overview: What Is Cura?
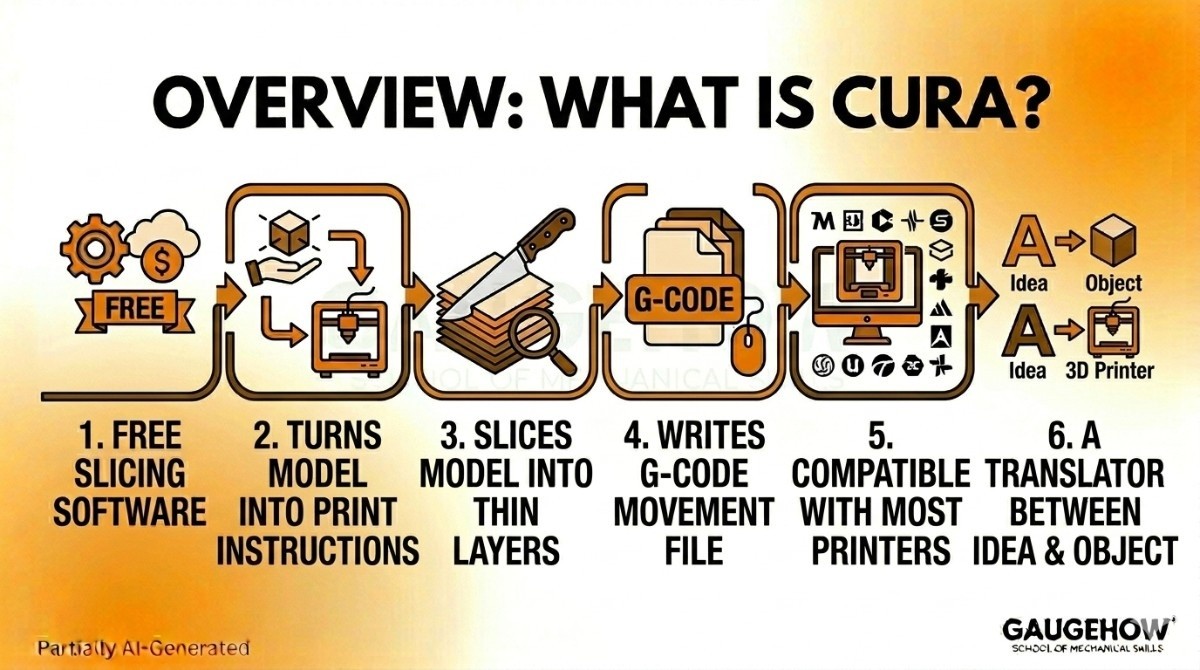
Cura is free software that turns your 3D model into instructions your 3D printer can follow.
In simple terms, it "slices" your model into hundreds of thin layers and writes a file (called G-code) that tells the printer exactly where to move, how fast, and how much plastic to push out.
It's made by UltiMaker, a company that builds 3D printers, but Cura works with almost any printer brand, not just theirs. It started as an open-source community project by developer David Braam, who later joined UltiMaker to keep building it.
Think of Cura as the translator between your idea and your printer.
Key Features of Cura
Here's what Cura actually does, minus the marketing talk:
Slices models into layers. This is the core job — it converts STL, OBJ, and 3MF files into printable G-code.
Layer-by-layer preview. You can scroll through every layer before printing, so you spot problems early.
Quality presets. Pick "fast," "standard," or "fine" without touching a single advanced setting.
400+ custom settings. When you're ready, you get deep control over speed, temperature, infill, and more.
Automatic supports. It builds scaffolding under overhangs so they don't droop.
Profiles for many printers. It already knows the settings for thousands of printer models.
Plugins and a marketplace. Add filament profiles and extra tools made by the community.
Works on Windows, Mac, and Linux. Same look and feel across all three.
How to Use Cura
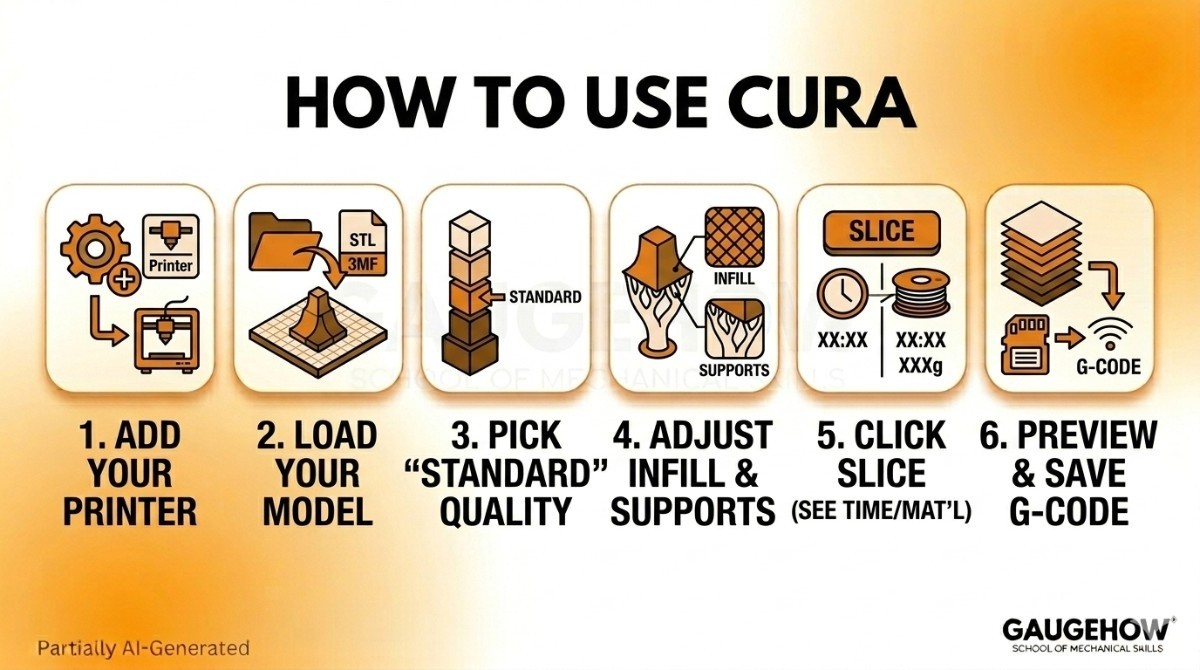
You don't need any experience to get a first print going. The basic flow is short:
Add your printer (we cover this in the next section).
Load your model by dragging an STL or 3MF file onto the build plate.
Pick a quality preset — start with "standard."
Adjust infill and supports if your model needs them.
Click Slice. Cura shows the print time and how much material it'll use.
Preview the layers, then save the G-code to an SD card or send it to your printer.
A quick tip for students
Always check the layer preview before you print. Catching a floating part or a missing support on screen saves you hours of wasted filament.
How to Add a Printer to Cura
Cura needs to know which machine you're using before it can slice correctly. Here's how to set it up:
Open Cura and go to Settings → Printer → Add Printer.
Choose Add a non-networked printer if your machine isn't connected to Wi-Fi.
Scroll through the brand list and pick your exact model (for example, "Creality Ender 3").
If your printer isn't listed, choose Custom and type in your bed size and nozzle size by hand.
Click Add, and Cura loads the correct default settings for that machine.
That's it. You can add several printers and switch between them from the top menu.
Best Cura Settings for PETG
PETG is strong and slightly flexible, but it can be sticky and stringy if your settings are off. These starting points fix most problems:
Printing temperature: 230–245°C (start at 235°C).
Bed temperature: 70–80°C.
Print speed: Slower than PLA — try 40–50 mm/s.
Retraction: Lower the distance and speed to cut down on stringing.
Cooling fan: Around 30–50%. Too much cooling makes PETG layers weak.
Z-hop: Turn it on to stop the nozzle from dragging over the print.
Every printer is a little different, so treat these as a base and adjust from there.
Best Cura Settings for Miniatures
Tiny models live or die by detail. The goal here is fine layers and clean small features:
Layer height: 0.08–0.12 mm for crisp detail.
Print speed: Slow it down to 30–40 mm/s so small areas have time to cool.
Wall line count: 2–3 walls to capture sharp edges.
Supports: Use tree supports — they're easier to remove from delicate parts.
Infill: 10–15% is plenty; miniatures don't need to be solid.
Ironing: Optional, but it smooths flat top surfaces nicely.
If your mini comes out fuzzy, lower the speed before changing anything else.
Pricing: Is Cura Free?
This is the easiest pricing section you'll ever read.
Cura is 100% free. There are no paid tiers, no subscription, and no trial that runs out. It's open-source software released under the LGPL license, which means anyone can use it for personal or commercial work at no cost.
You only pay for the things around it — your printer, your filament, and your electricity. The software itself never asks for a card.
Pros and Cons of Cura
No tool is perfect. Here's the honest version.
Pros
Completely free and open-source.
Beginner-friendly with simple presets.
Works with almost every printer brand.
Huge community, so help is easy to find.
Cons
The huge number of settings can overwhelm new users.
It can run slowly or crash on very large, complex models.
Newer rival slicers sometimes get speed features first.
Default supports can be harder to remove than some competitors'.
Who Is Cura Best For?
Cura fits a wide range of people, which is part of why it's so popular.
It's ideal for beginners and students learning to 3D print, hobbyists who run different printer brands, and teachers setting up a classroom or makerspace. It also scales up well — plenty of professionals and small businesses rely on it for everyday FDM printing.
If you want a free, flexible slicer that grows with your skills, Cura is hard to beat.
Cura Integrations
Cura connects to the rest of your 3D printing workflow in a few ways.
CAD software: Plugins link it to tools like SolidWorks, Siemens NX, and Autodesk Fusion.
In more advanced manufacturing workflows, Cura is often used alongside tools such as Autodesk Netfabb and Materialise Magics. Engineers may use these platforms to repair mesh files, optimize build preparation, and check print quality before exporting models to Cura for slicing and printing.
File formats: It imports STL, OBJ, 3MF, and more.
UltiMaker printers: It connects directly for network printing and monitoring.
Marketplace add-ons: Filament profiles and community plugins extend what it can do.
Cura Deployment: Desktop or Cloud?
Cura is desktop software that you install and run on your own computer — Windows, Mac, or Linux.
It does its slicing locally, so your files stay on your machine and you don't need an internet connection to work. UltiMaker also offers cloud and network features for sending jobs to connected printers, but the core program runs offline.
Because it supports so many printer brands and file types, it slots easily into a setup you already have, without forcing you to change hardware.
Cura vs PrusaSlicer
This is the most common slicer comparison, so let's keep it clear.
Feature | Cura |
|---|
Best For | Mixed printer brands | Prusa printer users |
Ease of Use | Beginner-friendly | Clean and organized interface |
Print Profiles | Highly customizable | Strong default settings |
Printer Support | Supports many printer brands | Best optimized for Prusa printers |
Community | Large user community | Active open-source community |
Plugins & Extensions | Extensive plugin library | Fewer extensions |
Key Skills | Slicing, print settings, support generation, printer management | Slicing, print optimization, support generation, workflow efficiency |
Choose If... | You want flexibility and broad compatibility | You want reliable results with minimal tweaking |
Cura has the biggest user base, supports the widest range of printers out of the box, and feels approachable for beginners. Its custom mode goes very deep when you want it to.
PrusaSlicer is also free and open-source, and many users say its default profiles produce great results with less tweaking, especially on Prusa machines. Its interface feels tidy and organized to a lot of people.
The short version: pick Cura if you run mixed printer brands or want the largest community and plugin library. Pick PrusaSlicer if you own a Prusa printer or prefer strong defaults that "just work."
Quick Take:
Cura is best for users with different printer brands who want flexibility and a large community.
PrusaSlicer is best for users who prefer strong default settings and a smoother setup process, especially with Prusa printers.
Cura Alternatives
If Cura isn't clicking for you, these are worth a look:
PrusaSlicer — free and open-source, loved for reliable default profiles.
OrcaSlicer — a fast-growing, feature-packed slicer built on the open-source family.
Bambu Studio — polished and quick, tuned mainly for Bambu Lab printers.
Simplify3D — a paid slicer with strong support controls and broad printer support.
Frequently Asked Questions (FAQ)
Is Cura free? Yes, completely. It's open-source software with no paid tiers or subscriptions.
What file types does Cura open? Common 3D formats like STL, OBJ, and 3MF, then it outputs G-code for your printer.
Does Cura work on Mac and Linux? Yes. There are separate downloads for Windows, macOS, and Linux, and they all work the same way.
Why won't Cura slice my model? Usually it's a printer that isn't set up, a model placed outside the build area, or a broken file. Re-check your printer profile and make sure the model sits fully on the plate.
Is Cura good for beginners? Very. The quality presets let you print on day one, and you can explore the advanced settings whenever you're ready.
Cura vs OrcaSlicer — which is better? Cura is simpler and has a bigger community; OrcaSlicer offers more cutting-edge features. Beginners often start with Cura and try OrcaSlicer later.
Ultimaker Cura is a free 3D printing slicer for students and engineers. Learn print settings, supports, and how to improve print quality.